Sales Playbook
← Back to Dashboard

Creating a Solar Proposal in SCH

The exact step-by-step flow, start to finish.

SubcontractorHub · 15 Steps

New: Adding your Texas HIS license → required before you can finalize quotes from Sept 1.

Table of Contents Required · Sept 1 Adding your HIS License Texas TDLR number → SCH
  1. Create the customer
  2. Open the proposal
  3. Pick the utility
  4. Pick the utility
  5. Enter their monthly usage
  6. Enter their monthly usage
  7. Start the design
  8. Confirm the roof
  9. Set the panel & review
  10. Editing the design (add/move panels)
  11. Shading & NREL designs
  12. Add the battery
  13. Proposal wizard — Finance
  14. Create the account
  15. Equipment & battery
  16. Pick pricing & create the quote
  17. Compare Financing Options → quote
  18. Finalize
  19. Finalize (Finance Workflow)
  20. Send it
  21. Send it
  22. Credit check, then send the contract
  23. Qualify, then send the contract
  24. Send the welcome call link
  25. Send the billing profile
  26. Get the utility bill uploaded
Texas · Required

Adding your HIS License

Where your Texas TDLR number goes in SubcontractorHub, and how a manager adds it for a rep.

SEP 12026

From September 1, SubHub will not let you finalize a quote if the logged-in user has no HIS license on file. No license on your profile means no finalized quote. In Texas that stops the deal, not just the paperwork.

You need your TDLR registration number and its expiry date before you start. Not registered yet? Register yourself at tdlr.texas.gov/apply. It runs roughly $50 plus a background check, and it is on the rep, not the office. TDLR asks for up to 30 days, so do it now and add the number here the day it lands.

Add your own

Every rep
1

Open your profile

Log into SCH. Click your name in the top-right corner, then Your Profile in the dropdown. You land on the User Profile page.
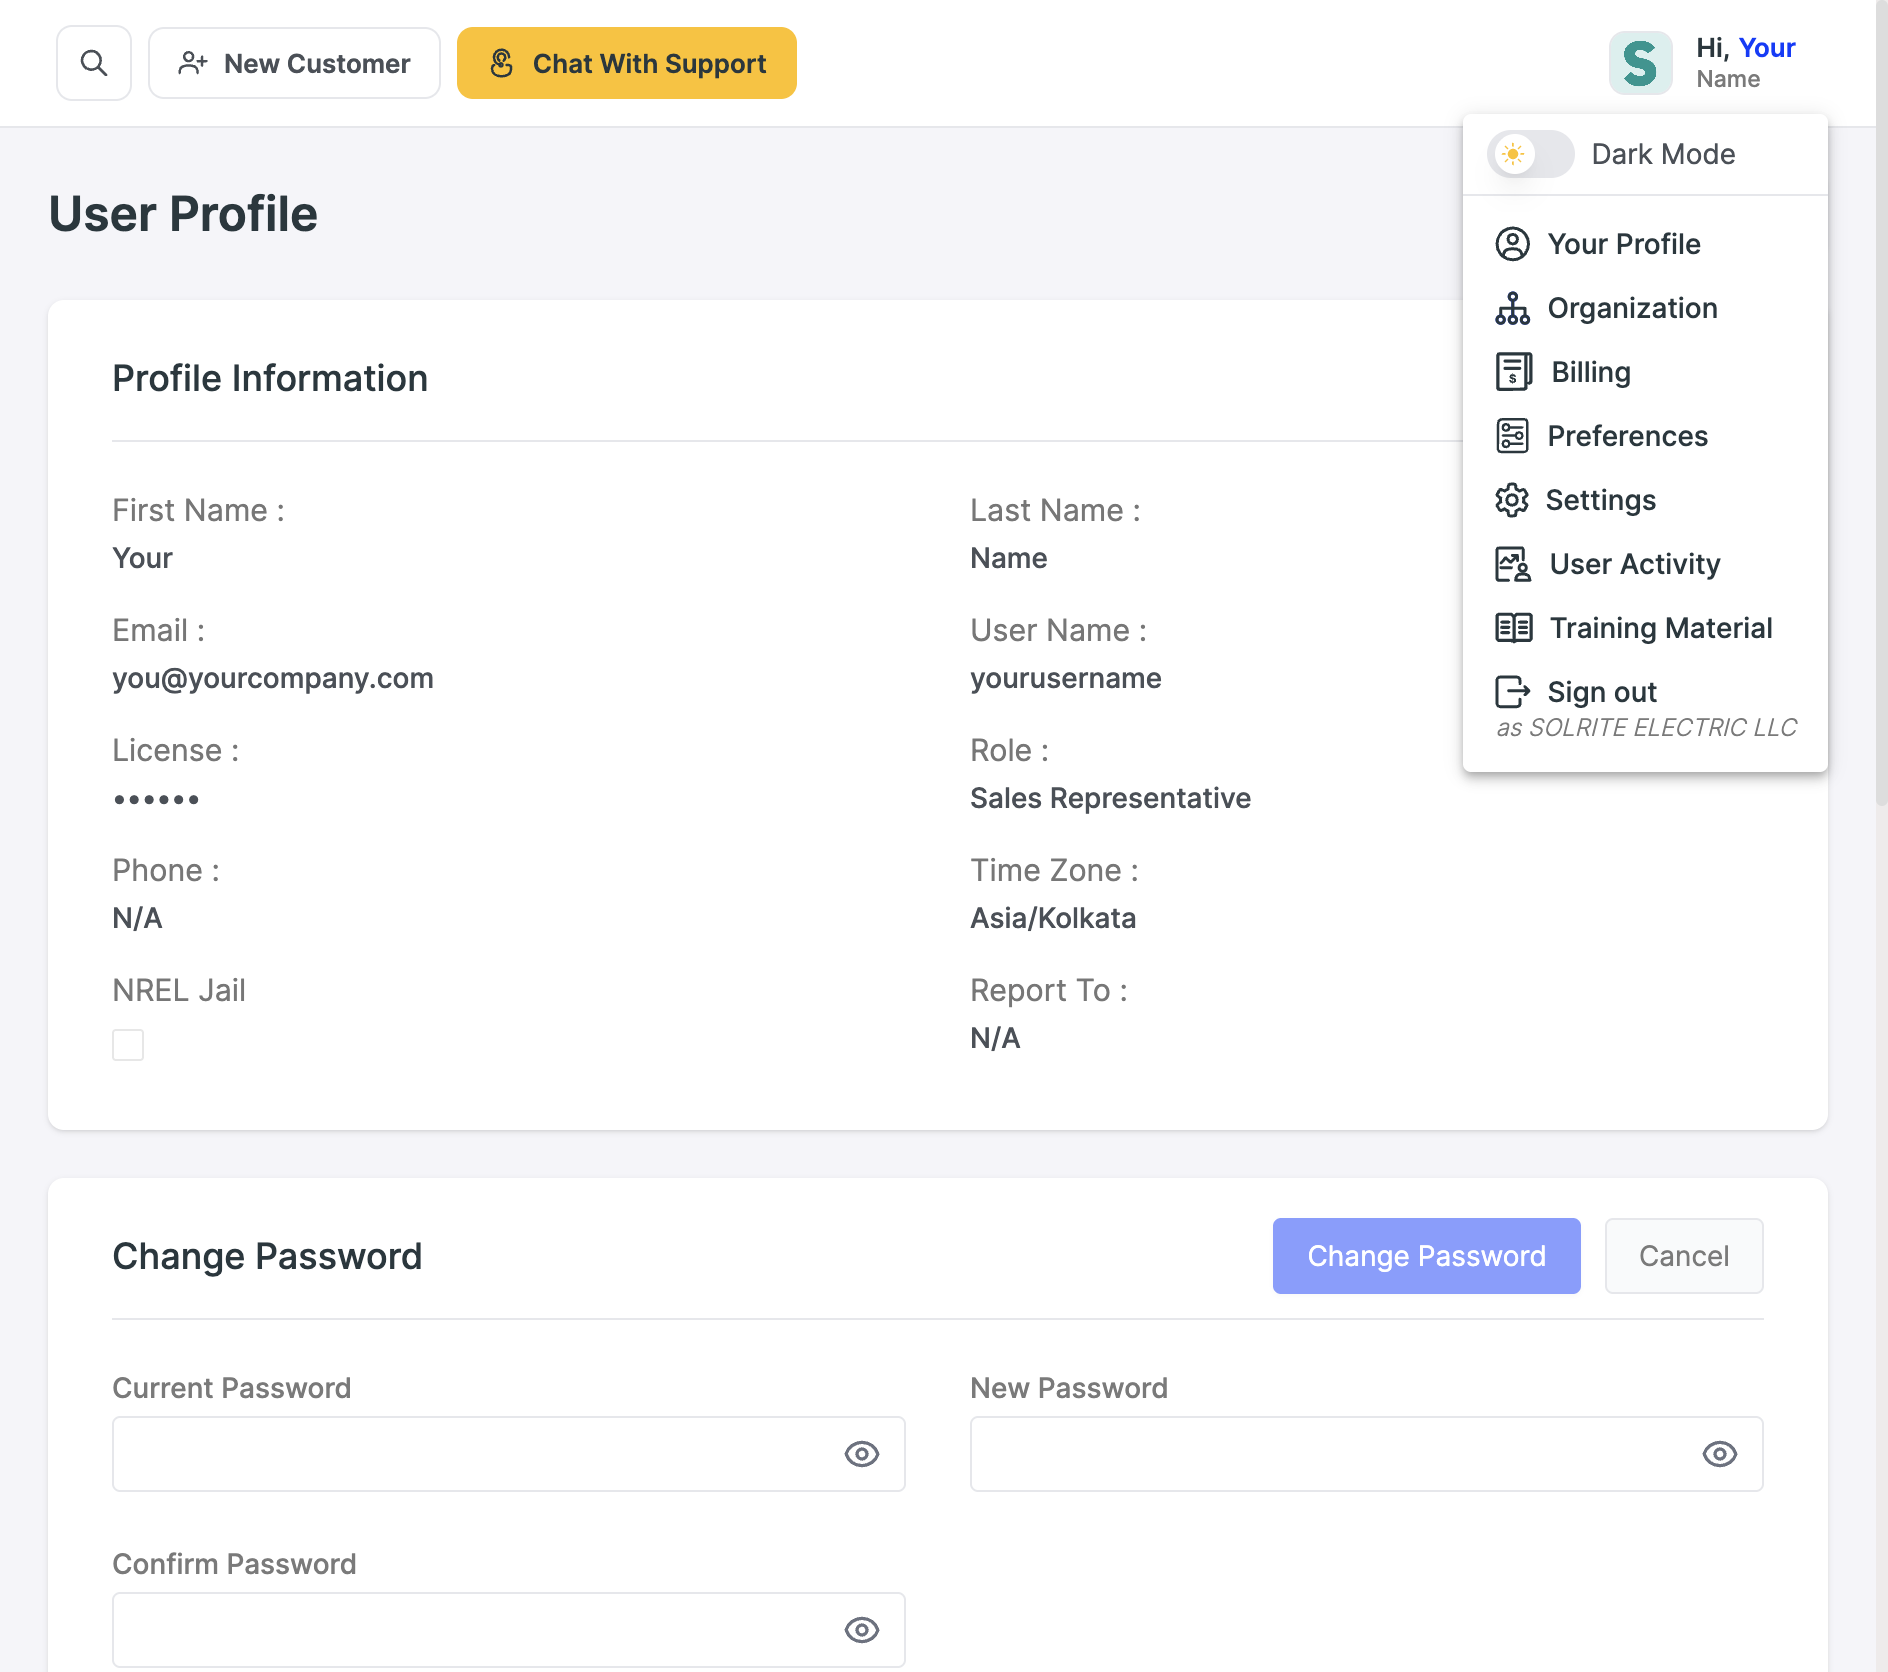

The account dropdown in SCH with Your Profile highlighted
Top-right account menu → Your Profile.
2

Scroll to HIS License → Add

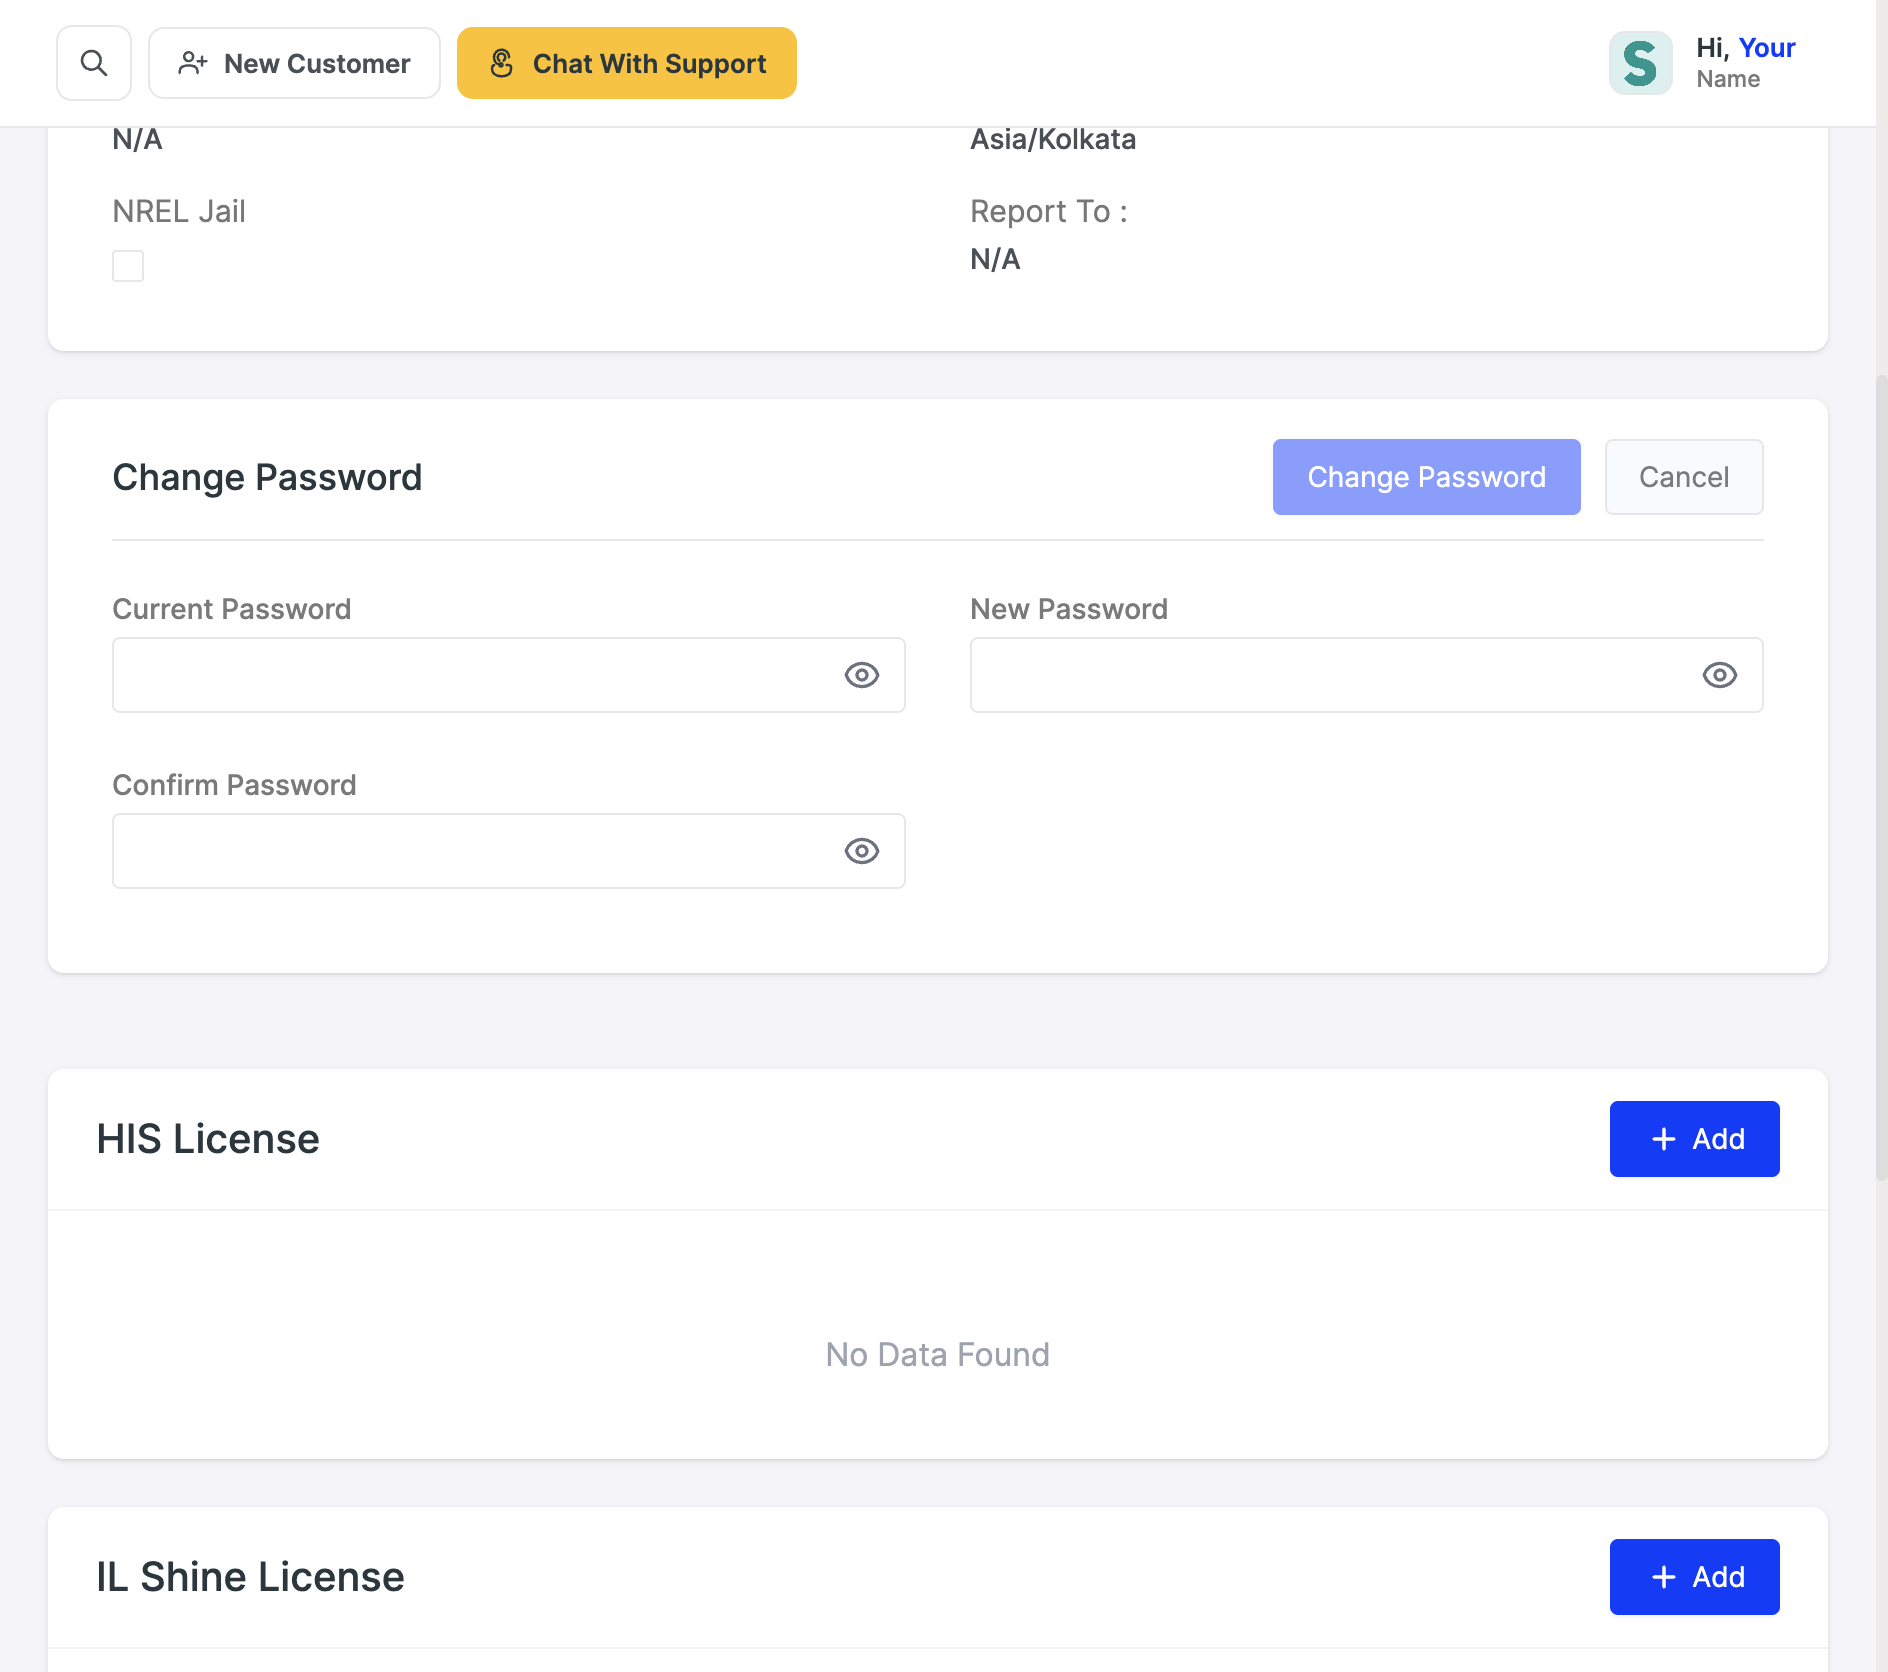
Scroll past Profile Information and Change Password. You will find a card titled HIS License with a blue + Add button on the right. If you have never entered one it reads No Data Found. Click + Add.
Not the other one
Directly below it is a separate IL Shine License card. That one is Illinois only. Texas does not go there.
The HIS License card on the SCH user profile page
The HIS License card, empty, with the + Add button.
3

Set State = Texas

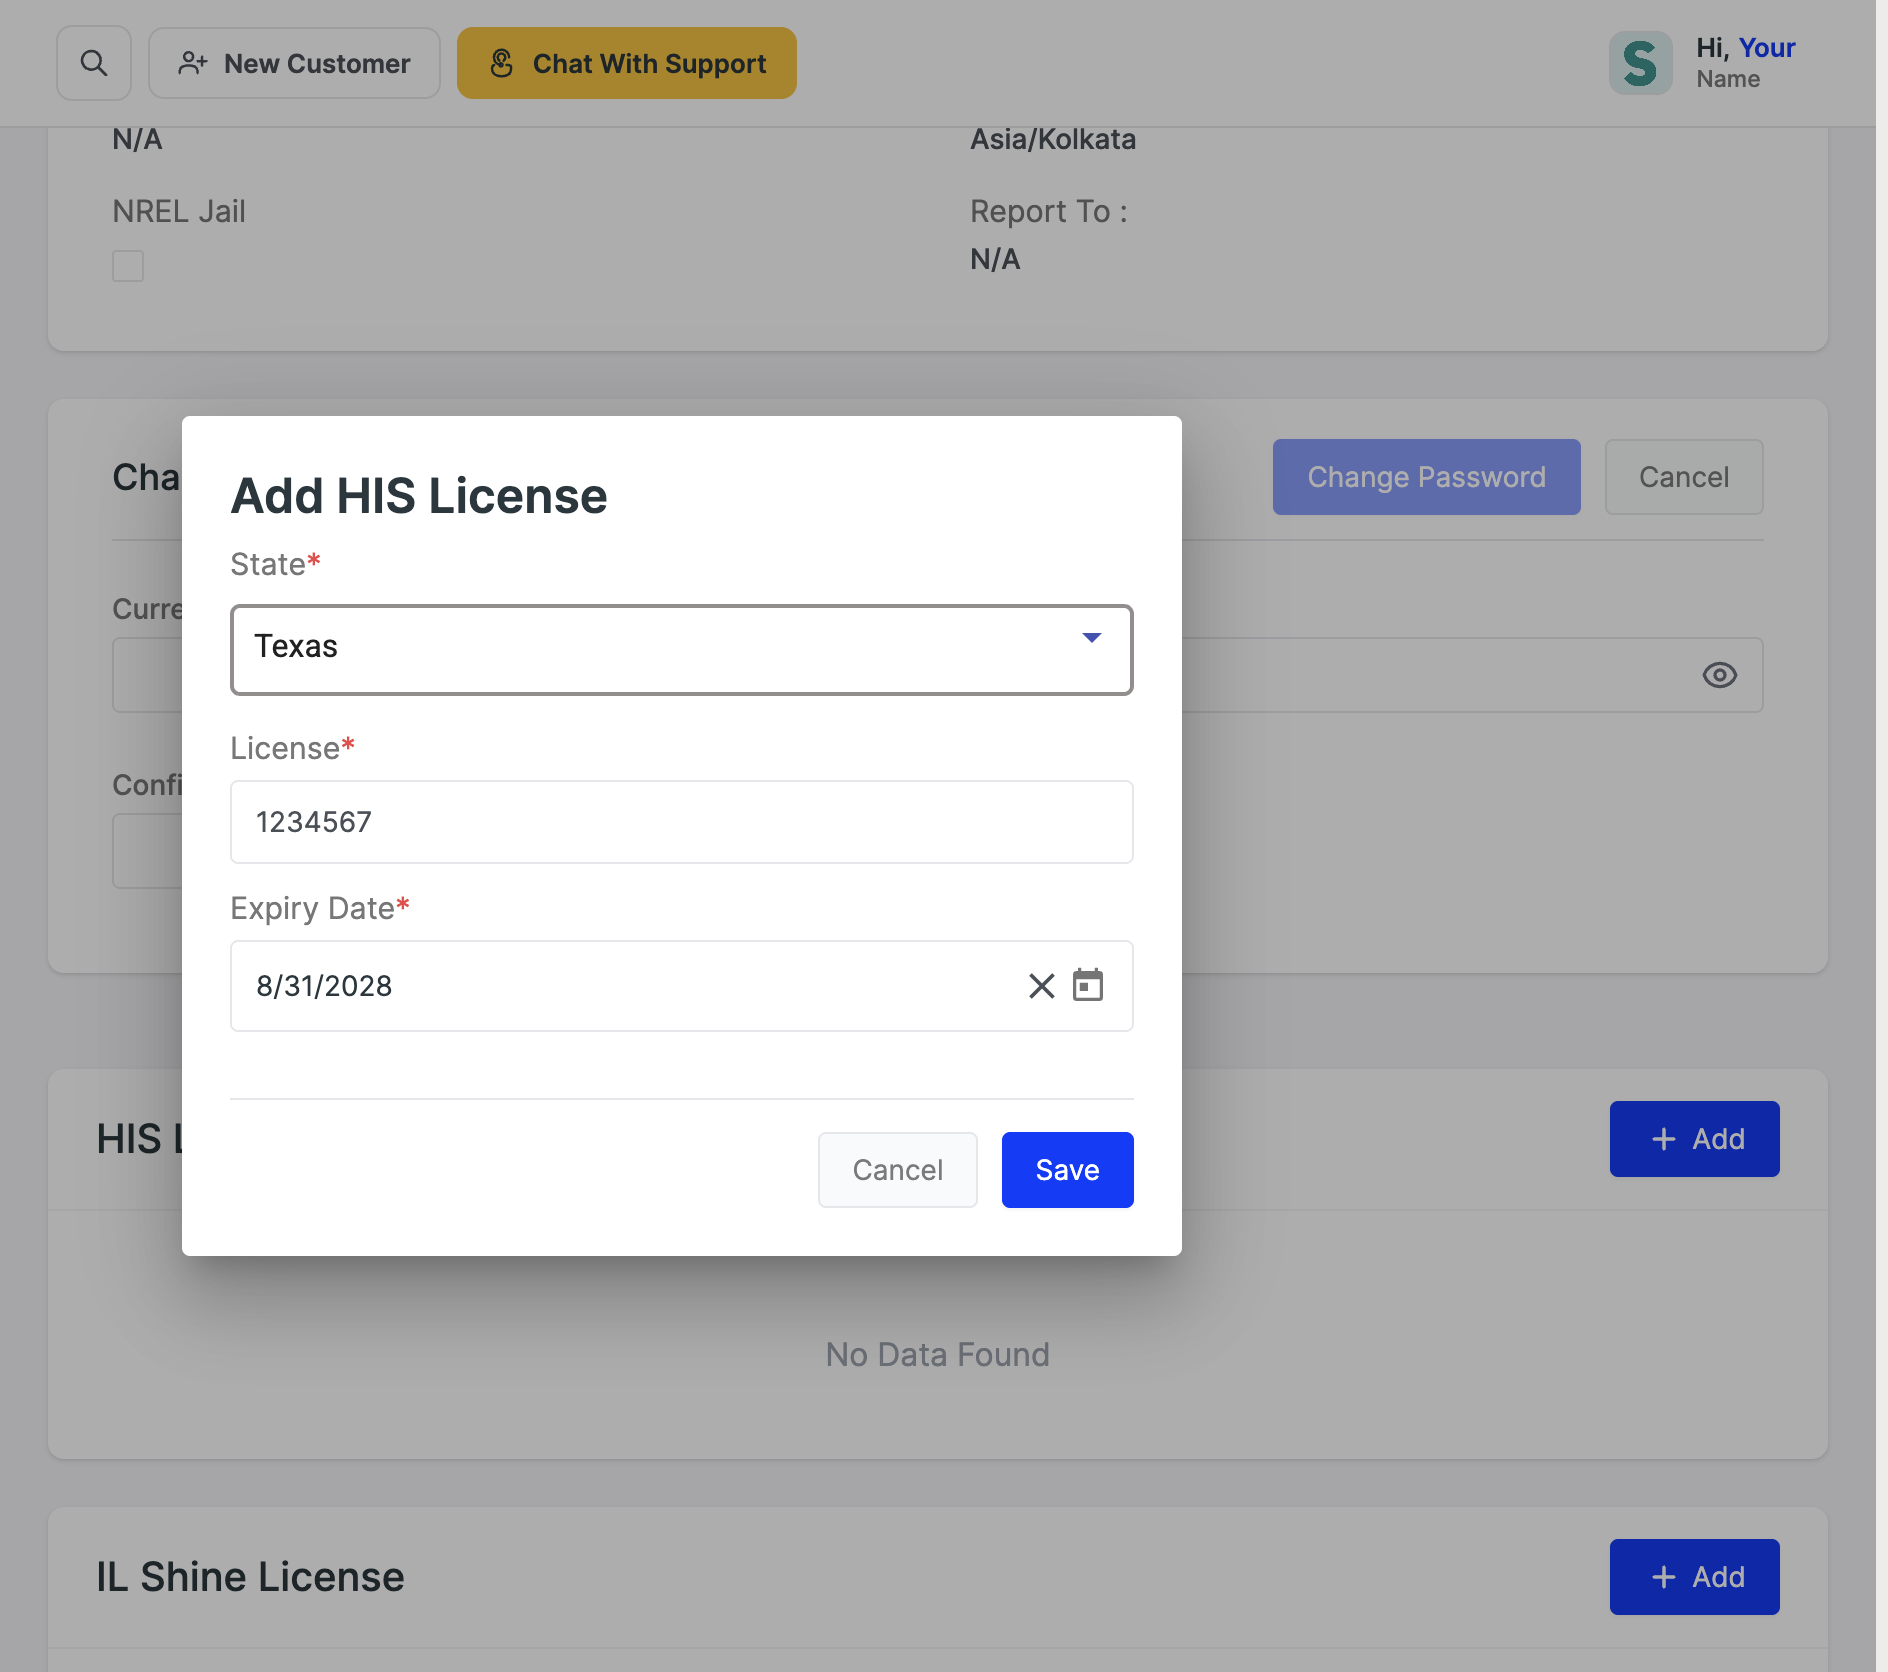
The Add HIS License box opens with three required fields: State, License and Expiry Date. Open the State dropdown. There is a search box at the top, so type Texas rather than scrolling the full list, then pick Texas.
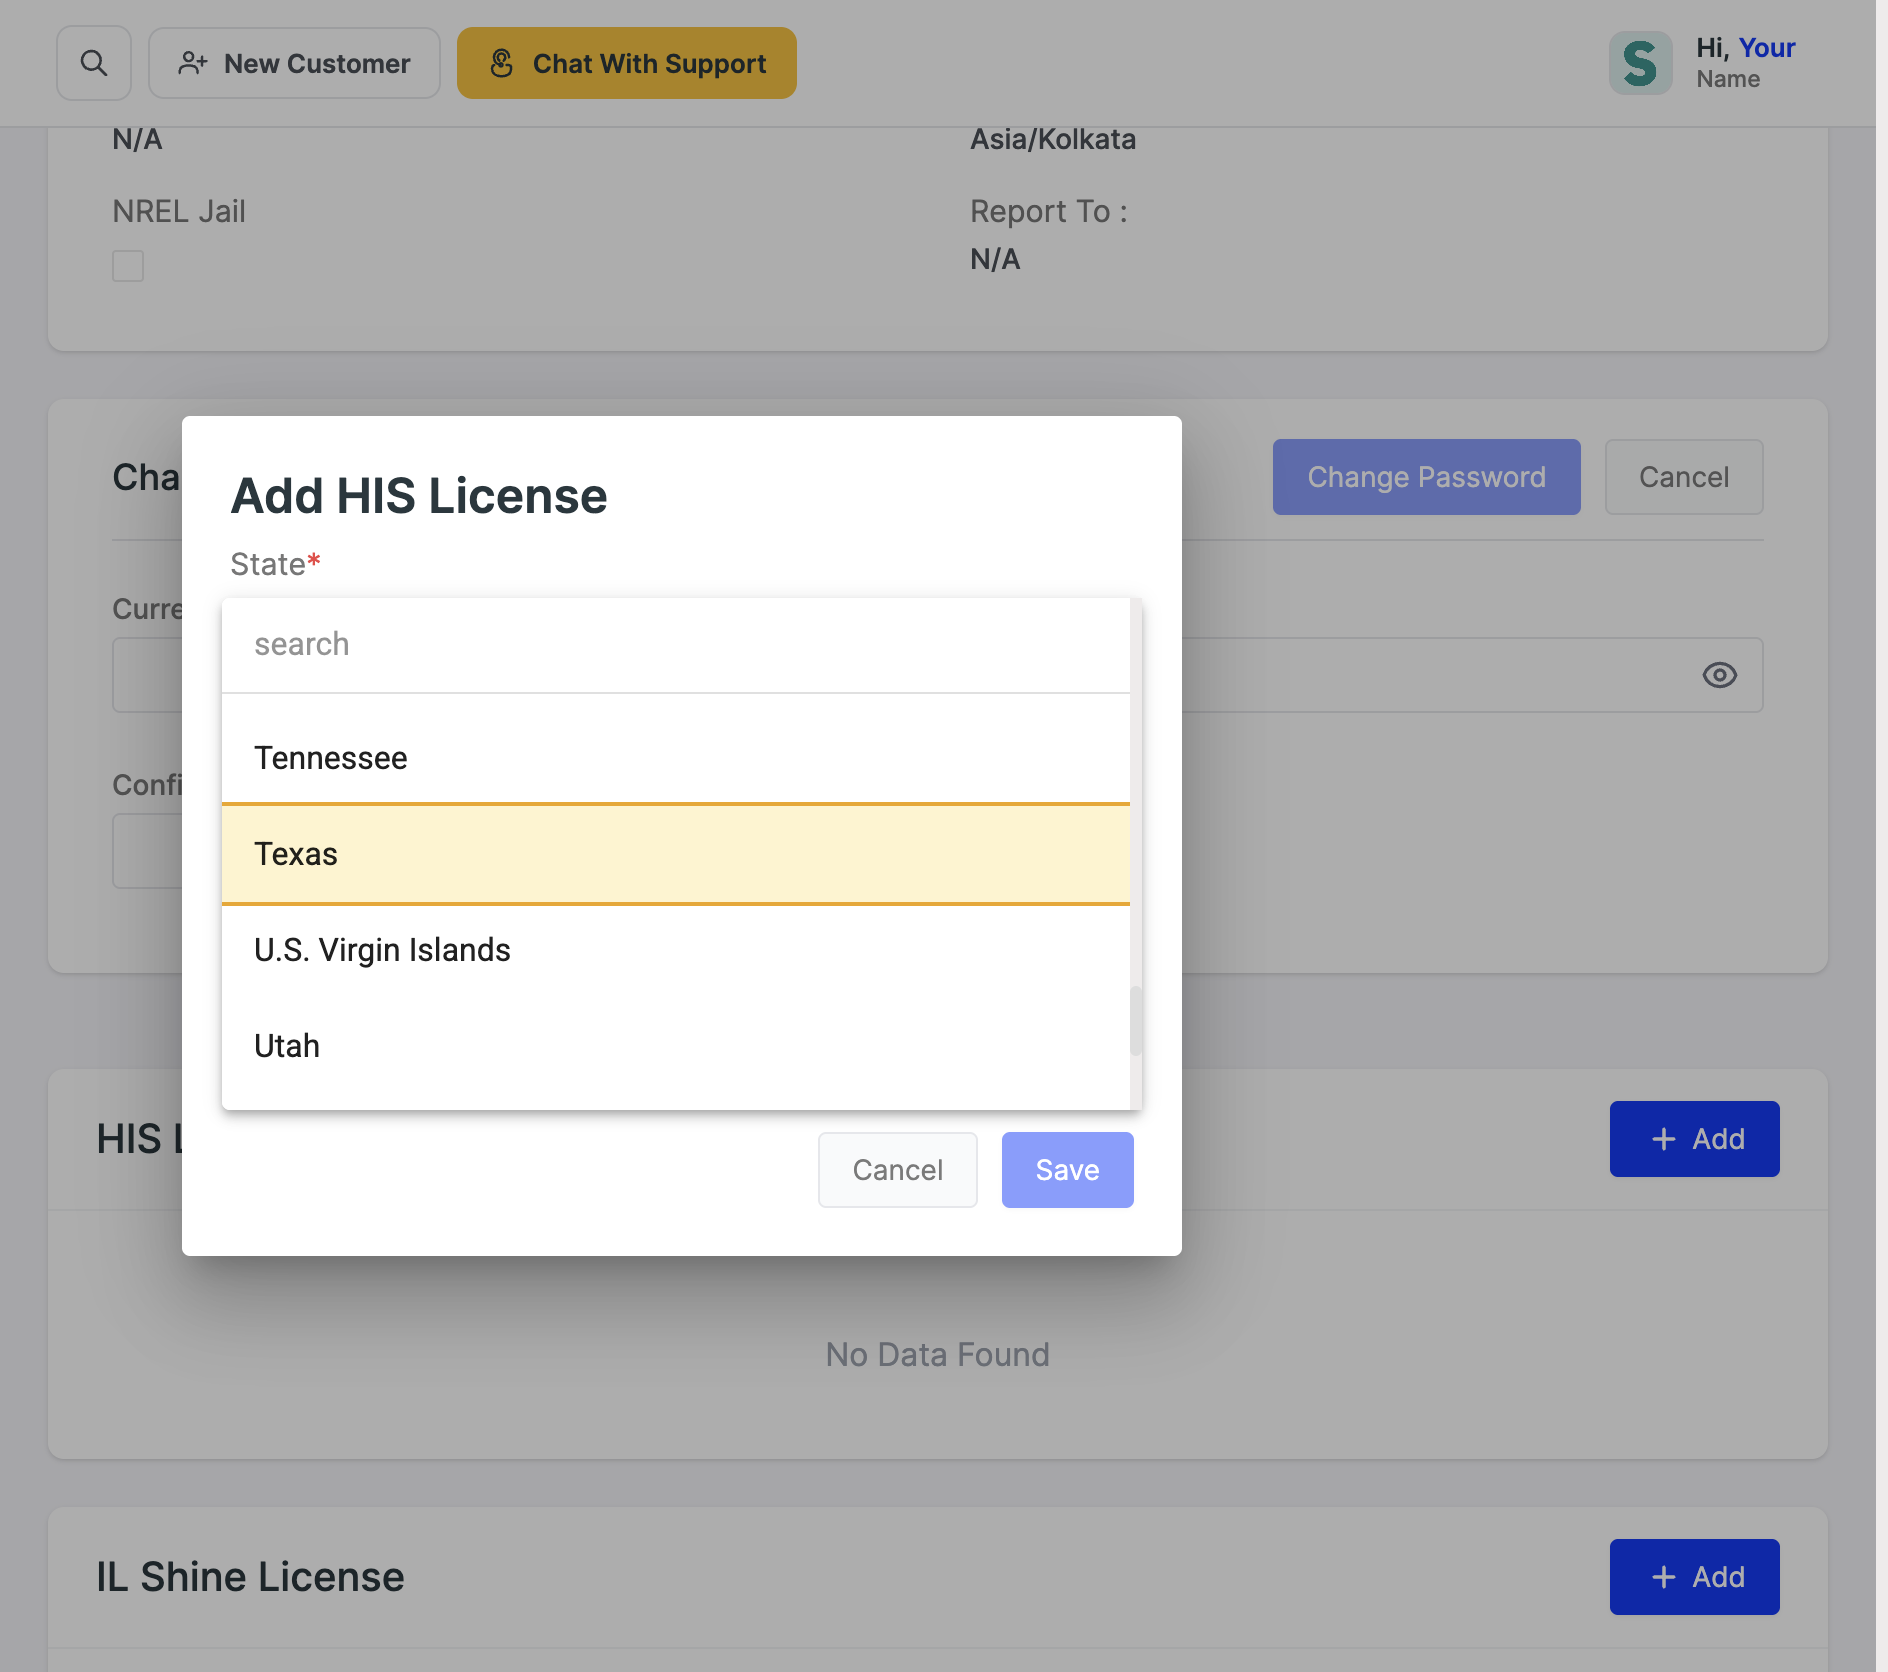
The State dropdown open with Texas highlighted
State dropdown: search “Texas” and select it.
4

Enter the number and expiry, then Save

Type your TDLR registration number into License, exactly as it appears on your TDLR record: digits only, no TX prefix and no dashes. Set Expiry Date from the same record. All three fields are required; Save stays greyed out until they are filled.
Example only
The number below is a placeholder. Use your own, and check it digit for digit. Nobody validates it against TDLR for you.
The Add HIS License dialog filled in with state, licence number and expiry date
All three fields filled, Save is now active.
5

Check the row saved

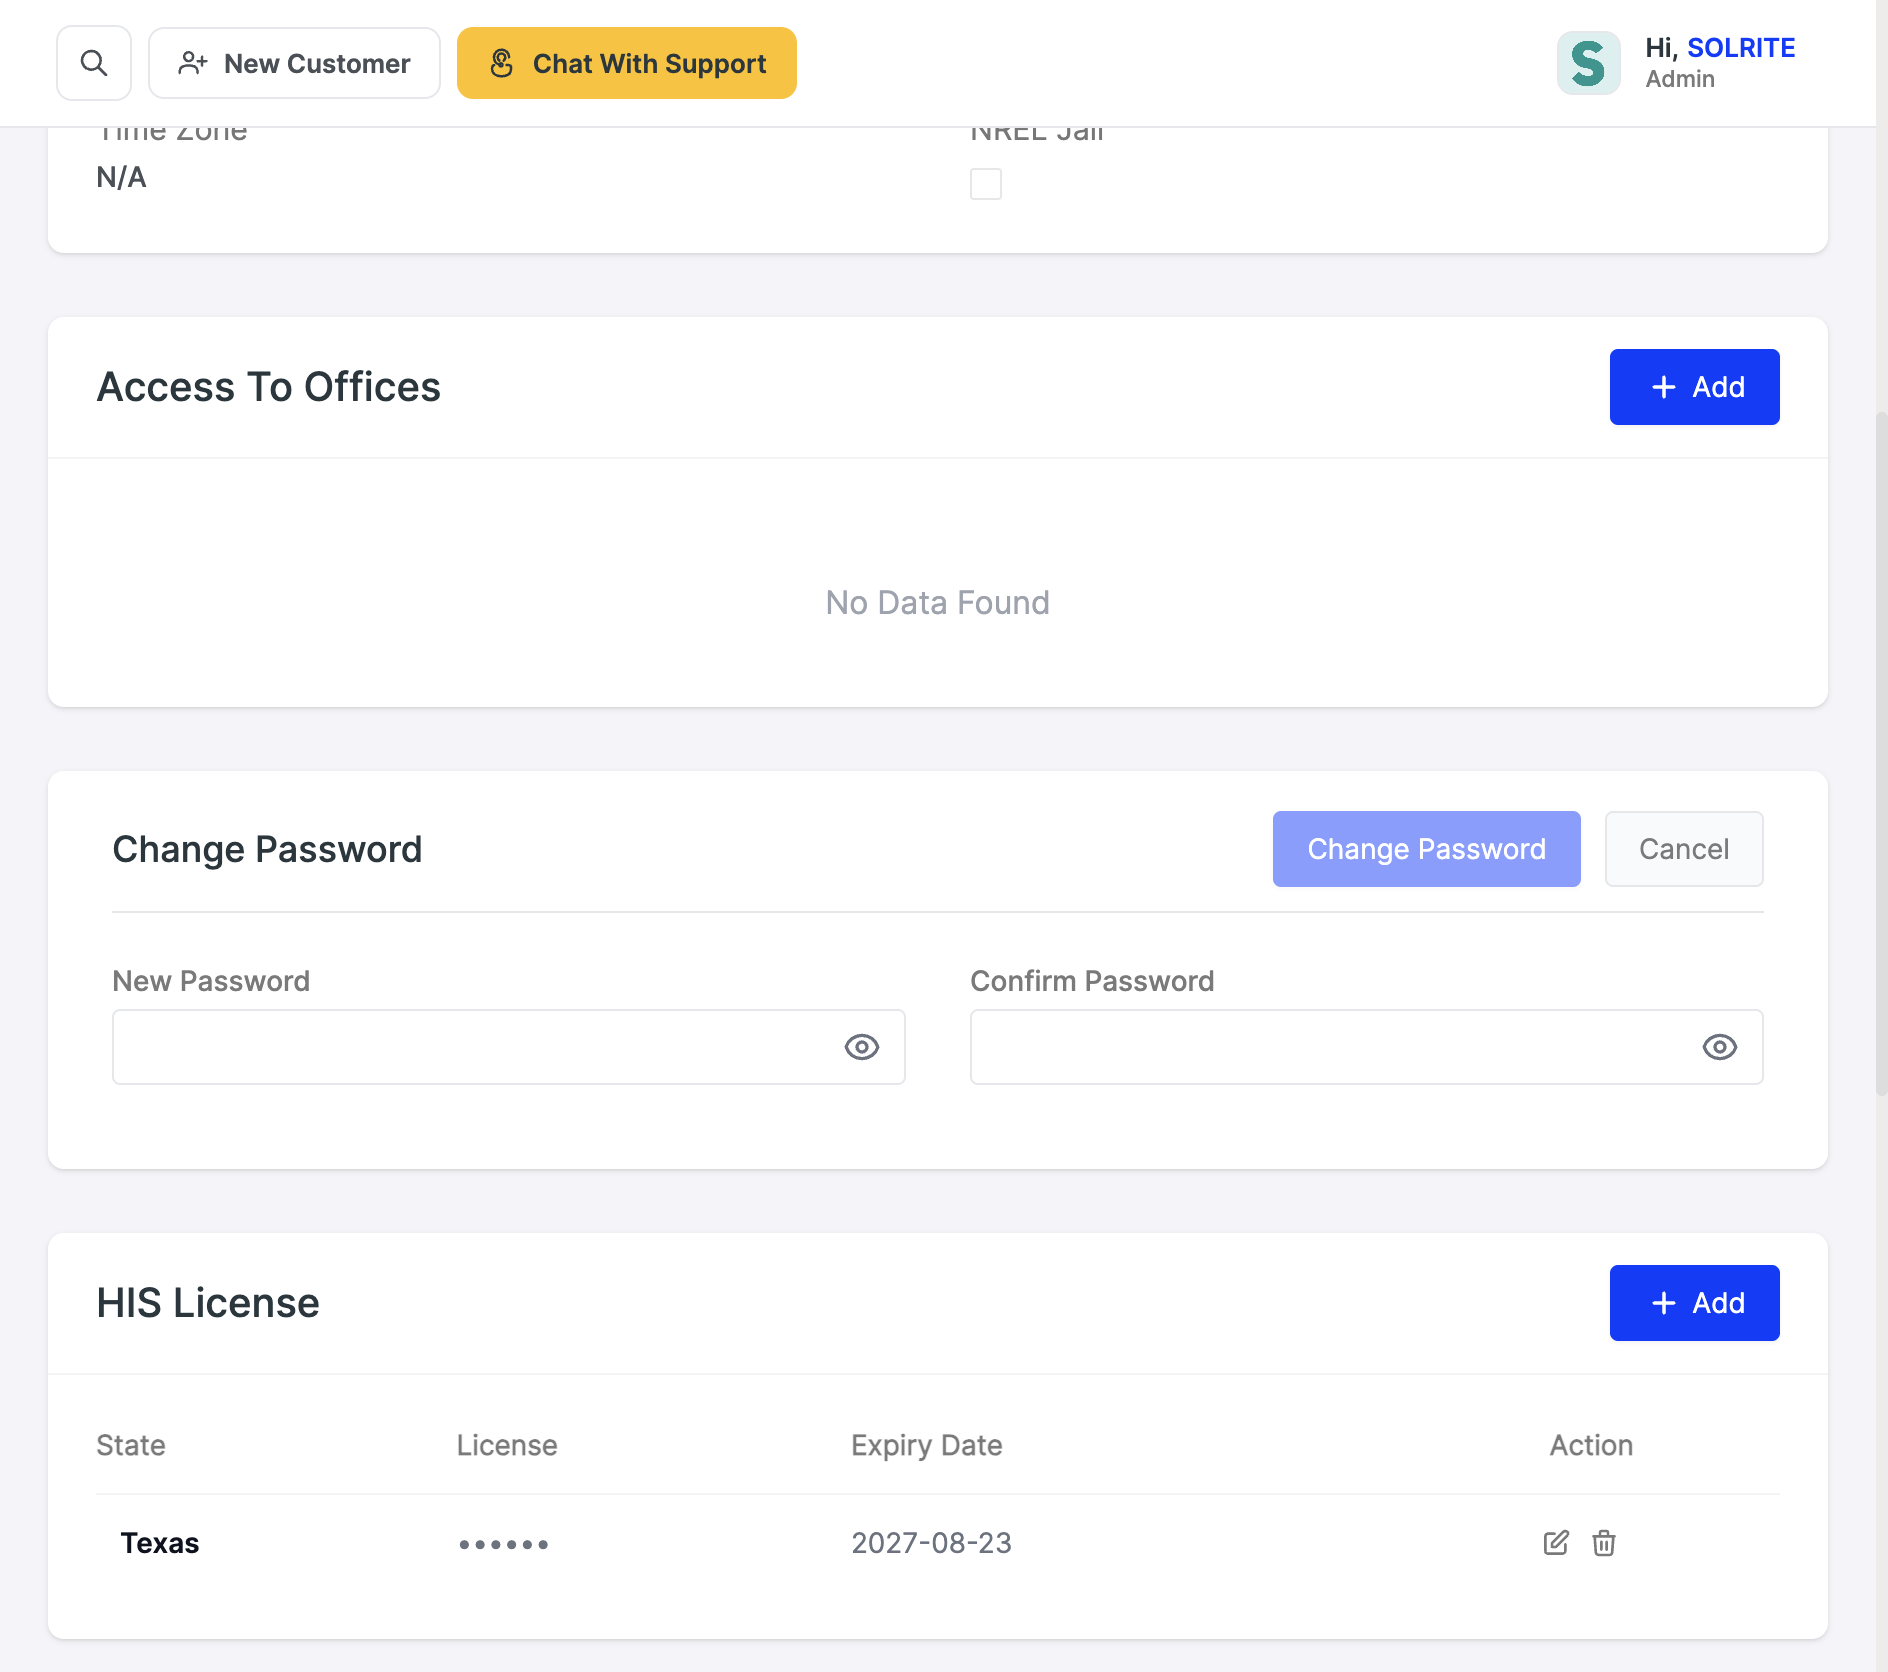
After saving, the HIS License card shows a row: State, License, Expiry Date and an Action column with edit and delete icons. If you see that row with Texas on it, you are done and you can finalize quotes.

Typo'd the number? Use the pencil icon in the Action column to fix it. You do not need to delete and re-add.
A saved Texas HIS licence row on the profile with edit and delete icons
Saved: a Texas row in the HIS License card.

Add it for a rep

Managers & admins
M1

Find the rep in Users

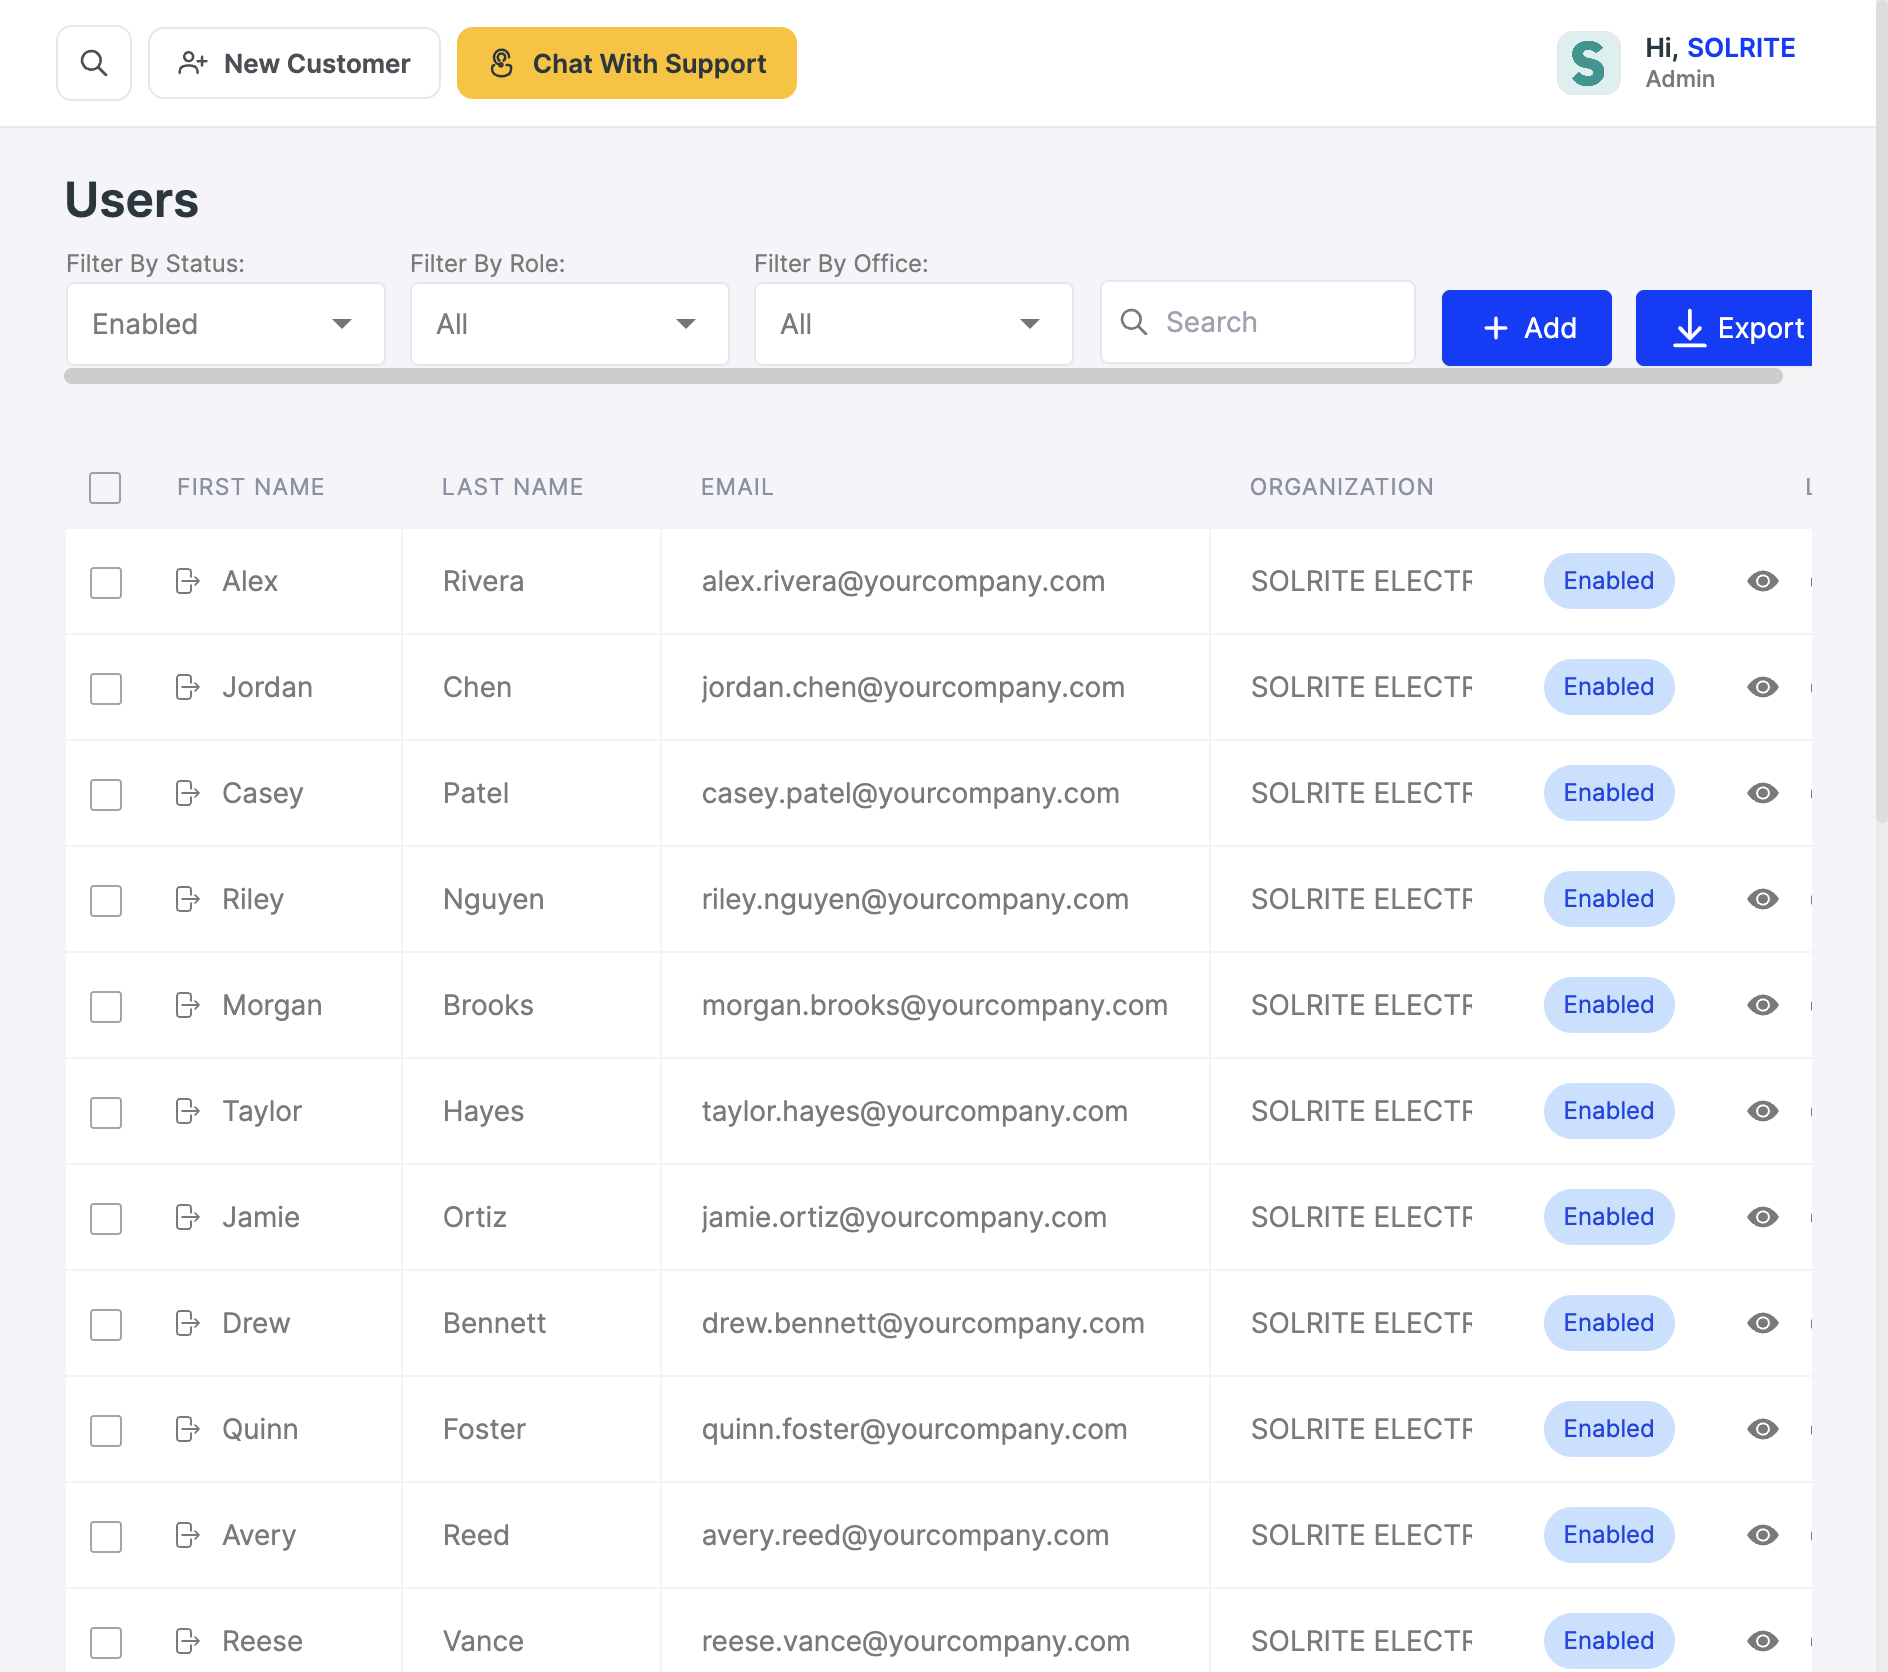
In the left sidebar go to Users & Roles → Users. Search the rep by name or email in the Search box and press Enter. Then click the eye icon at the right end of their row to open their record.
Check for doubles
Search their surname, not just the one login you know about. If two rows come back, that rep has duplicate logins. See the warnings below before you enter anything.
The SCH Users list with search and the row view icon
The Users list: search the rep, then click the eye icon at the end of their row.
M2

Same card, same three fields

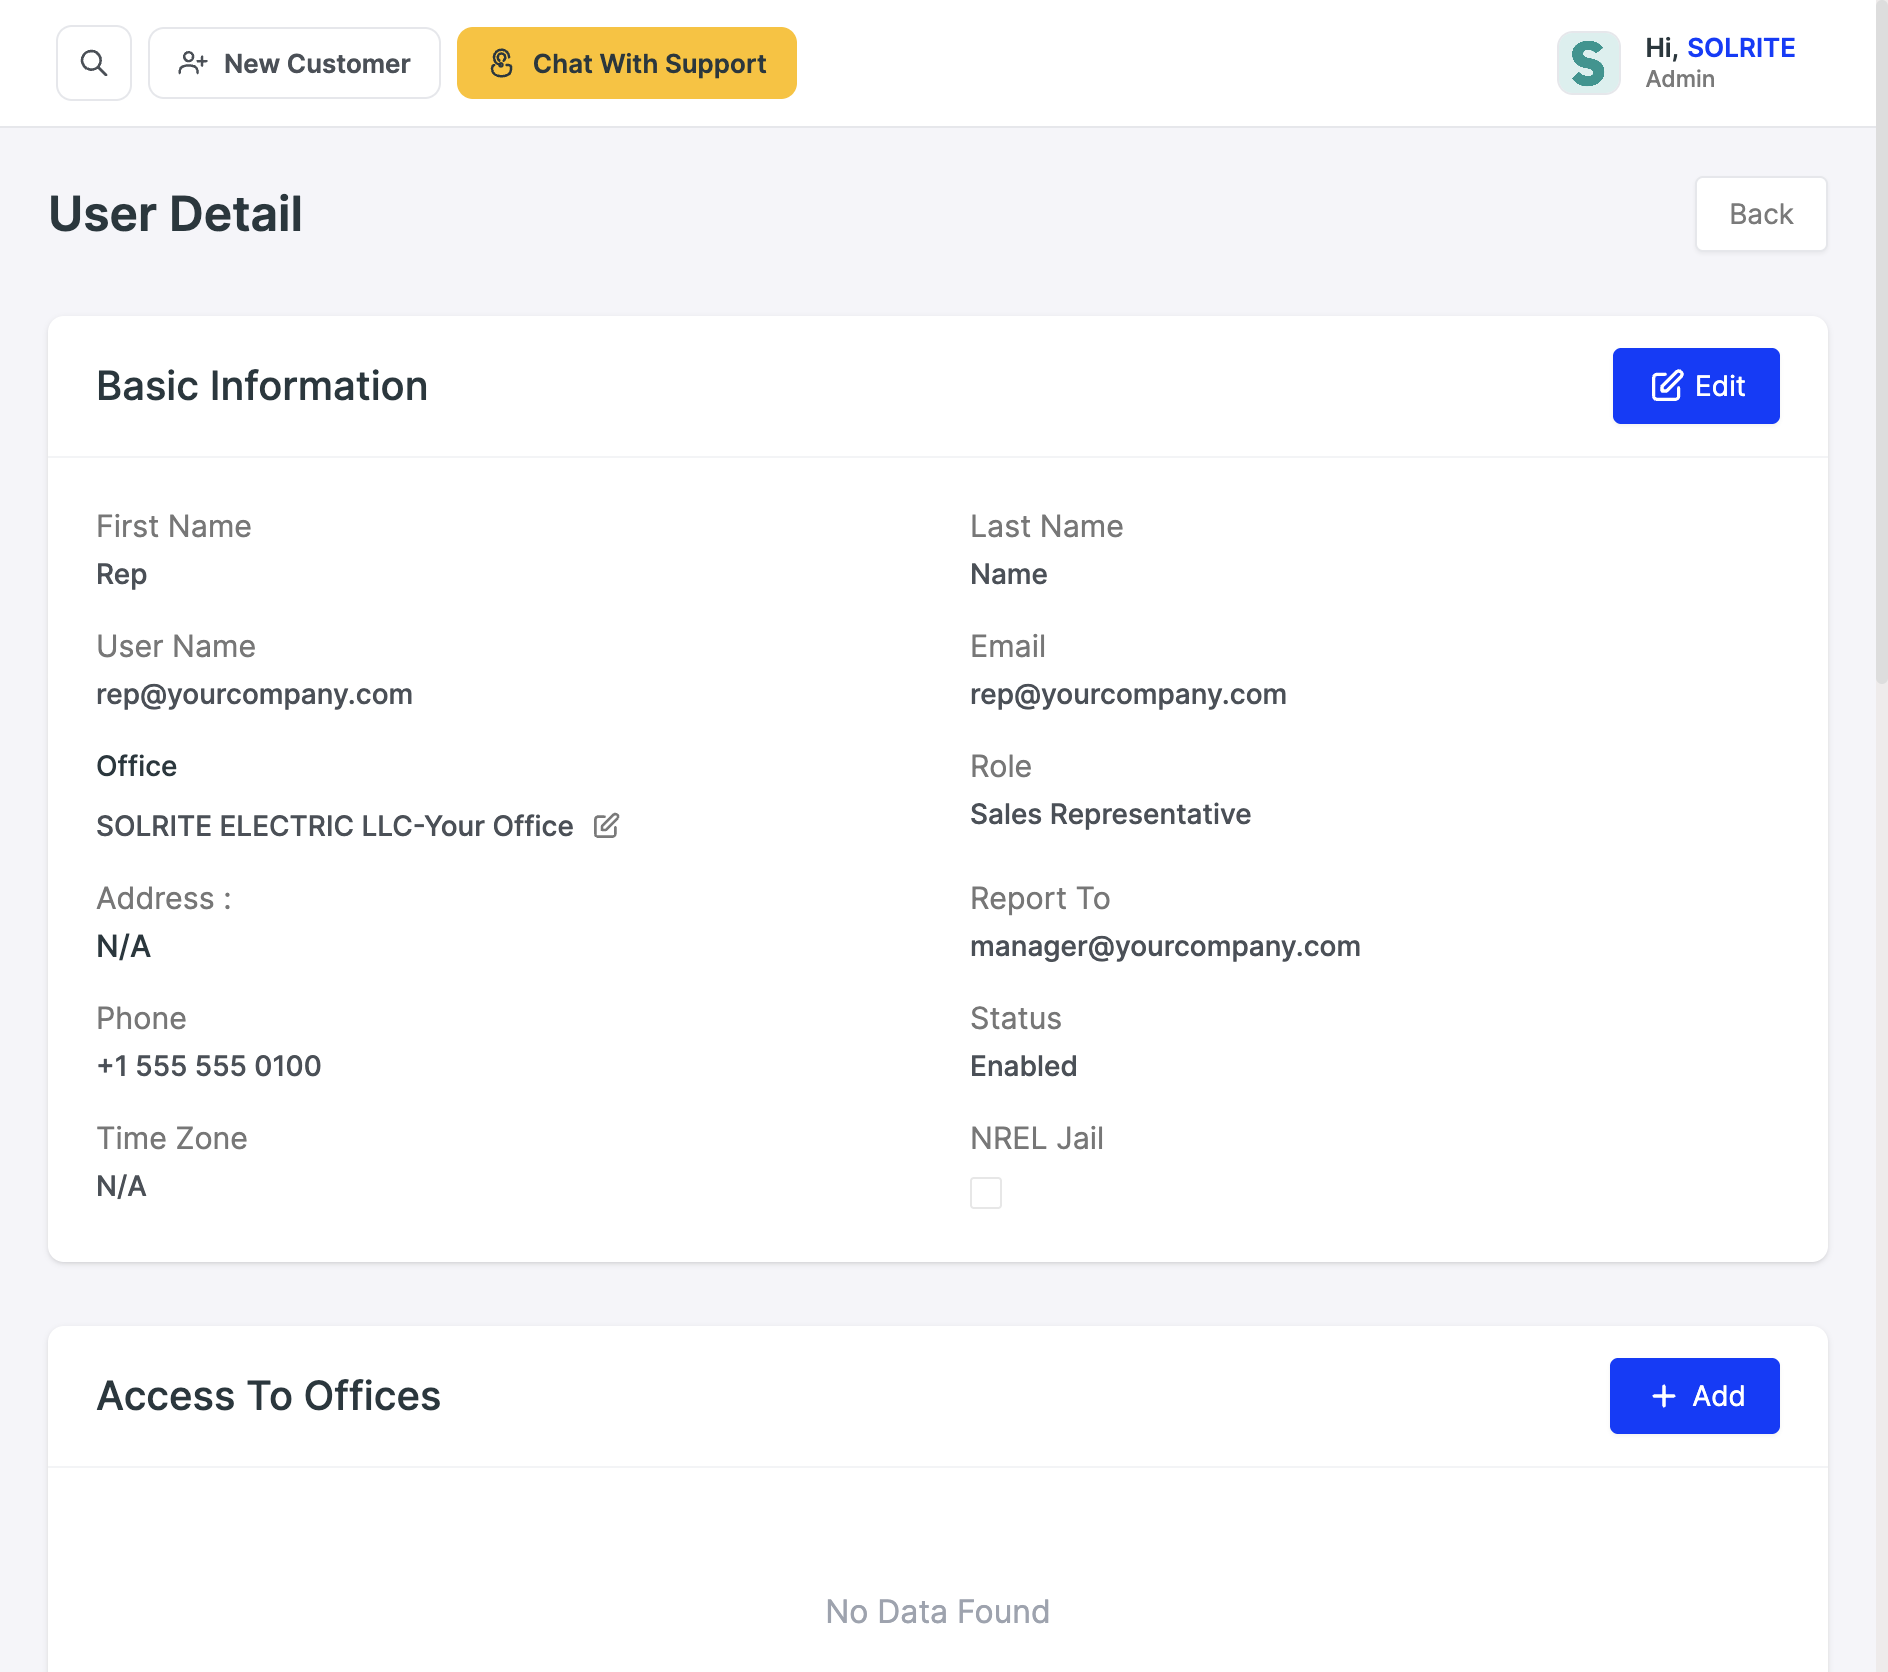
The User Detail page carries the identical HIS License card. Scroll down to it, click + Add, and fill in Texas, the rep's license number and expiry date, then Save, exactly as in steps 3 and 4 above.

The saved row appears on the rep's own profile straight away. They do not need to log out and back in.
The User Detail page a manager sees for a rep
User Detail: scroll to the HIS License card and click + Add.

Four things that will bite you

  • One license, one user. SubHub will only let a given HIS number exist on a single SCH user. If a rep has two logins, put the number on the one they actually sell from and get the other deactivated. The second attempt will fail, not silently duplicate.
  • Texas, not California. The State dropdown starts empty and the list is alphabetical, so California is easy to hit by mistake. A license filed under the wrong state does not count for a Texas deal.
  • The license is yours, not the office's. Every rep registers with TDLR individually. Selling under a teammate's number is exactly the abuse the rule exists to stop, and it is traceable back to whoever the quote was finalized under.
  • Expiry dates are real. The field is required and SubHub keeps it. Put a reminder in your calendar for the month before. An expired row is no better than an empty card.

Building a proposal

 
Your SubHub

1

Create the customer

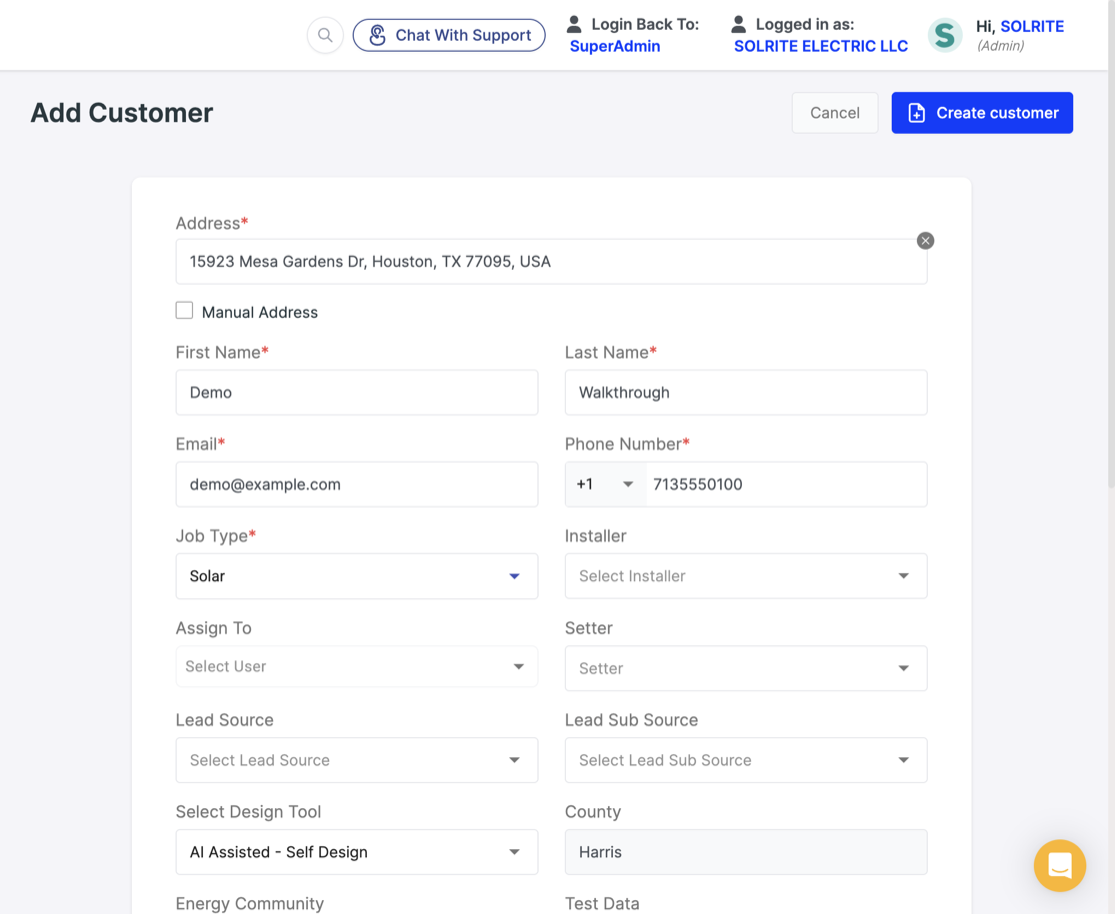
From the SCH home screen, click New Customer (top bar). Enter the customer's home Address and pick it from the Google dropdown so it geocodes. Fill in First Name, Last Name, Email, Phone. Set Job Type = Solar. Set Assign To = your own name. Click Create customer.
Tip
Use the address exactly as it appears on their utility bill.
Creating a new customer in SCH
New Customer form — address, contact info, Job Type = Solar.
2

Open the proposal

You'll land on the customer page with a new Solar proposal card. Click View Detail to open it.
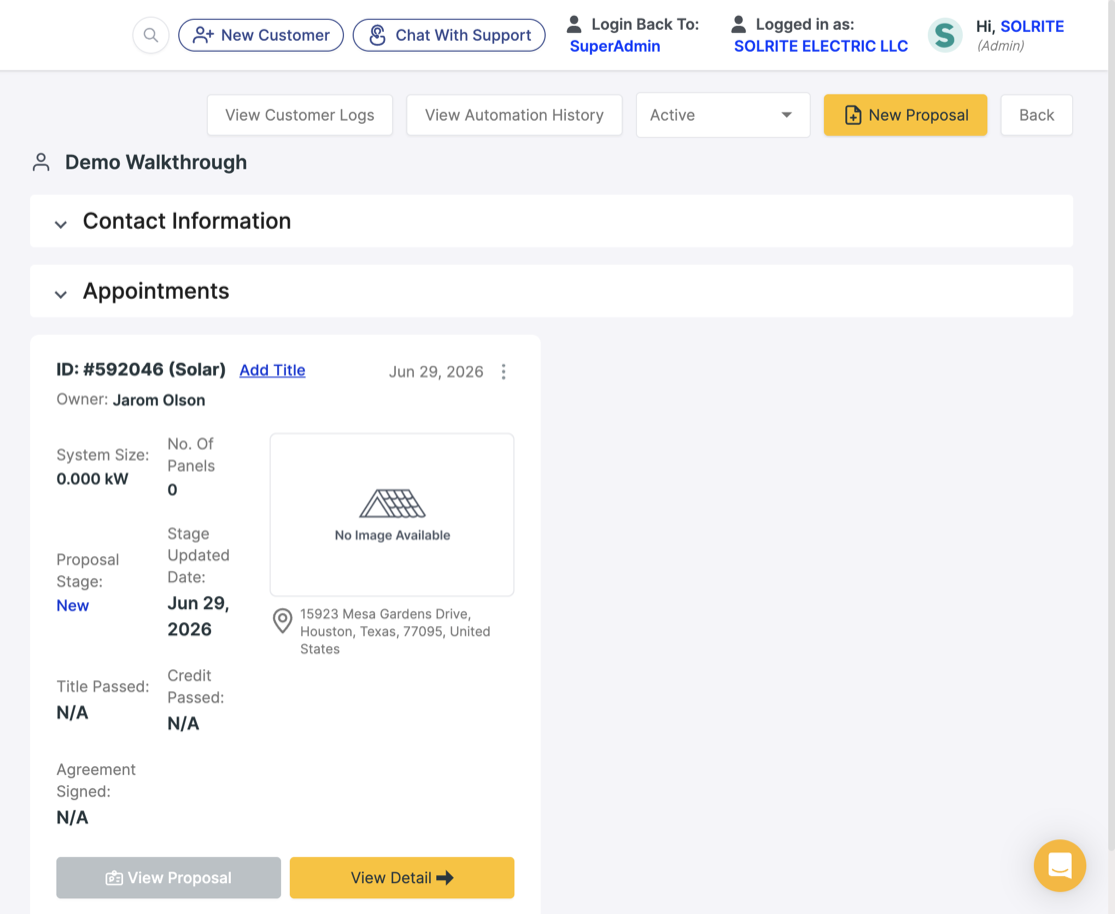
Opening the proposal with View Detail
The Solar proposal card — click View Detail.
3

Pick the utilityLegacy

On the Solar Design tab, under Consumption Profile, open the Utility dropdown and choose the customer's utility (for Houston that's CenterPoint Energy Houston Electric, LLC). The design tool can't start until a utility is set.
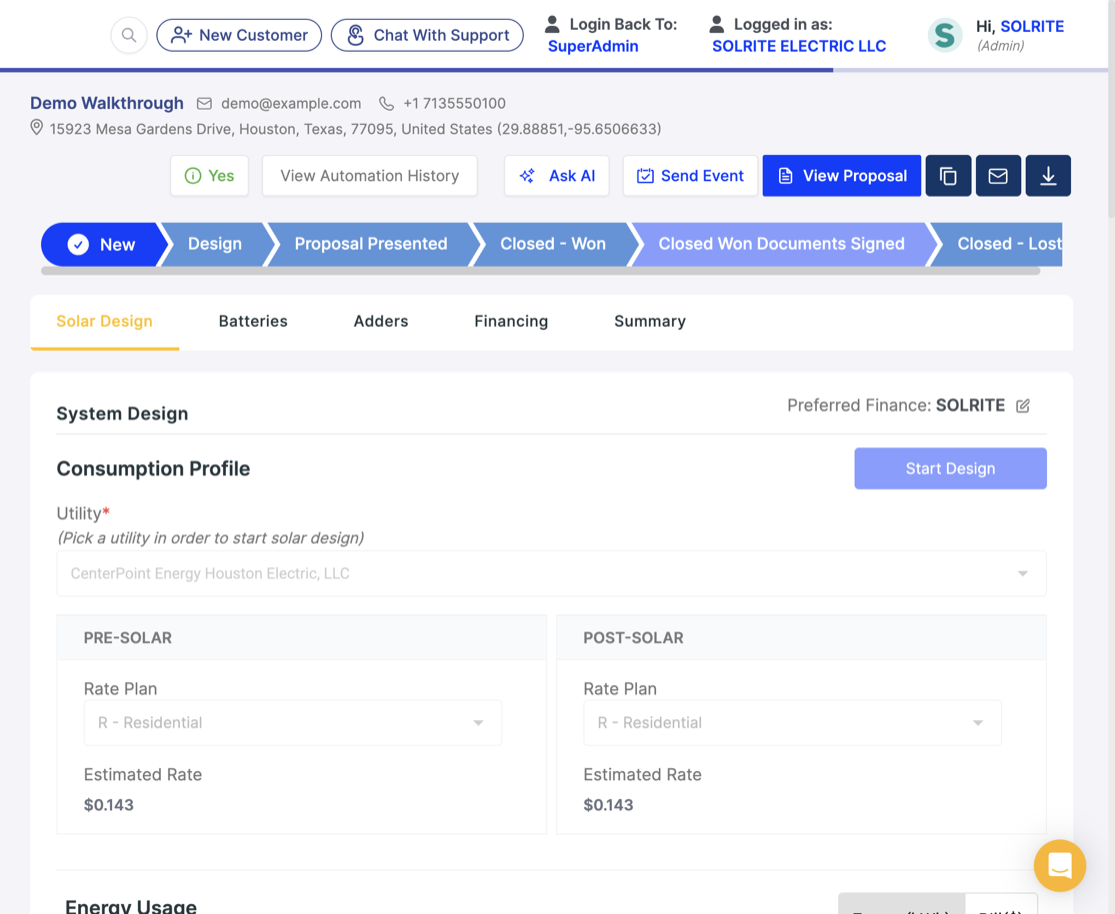
Selecting the utility
Consumption Profile — choose the customer's utility.
3

Pick the utilityNew

The proposal opens on a tabbed page. Open the Utility tab, stay on the Utility Provider sub-tab, and click the card for the customer's utility. The card turns green when it is selected — there is no Save button on this step.
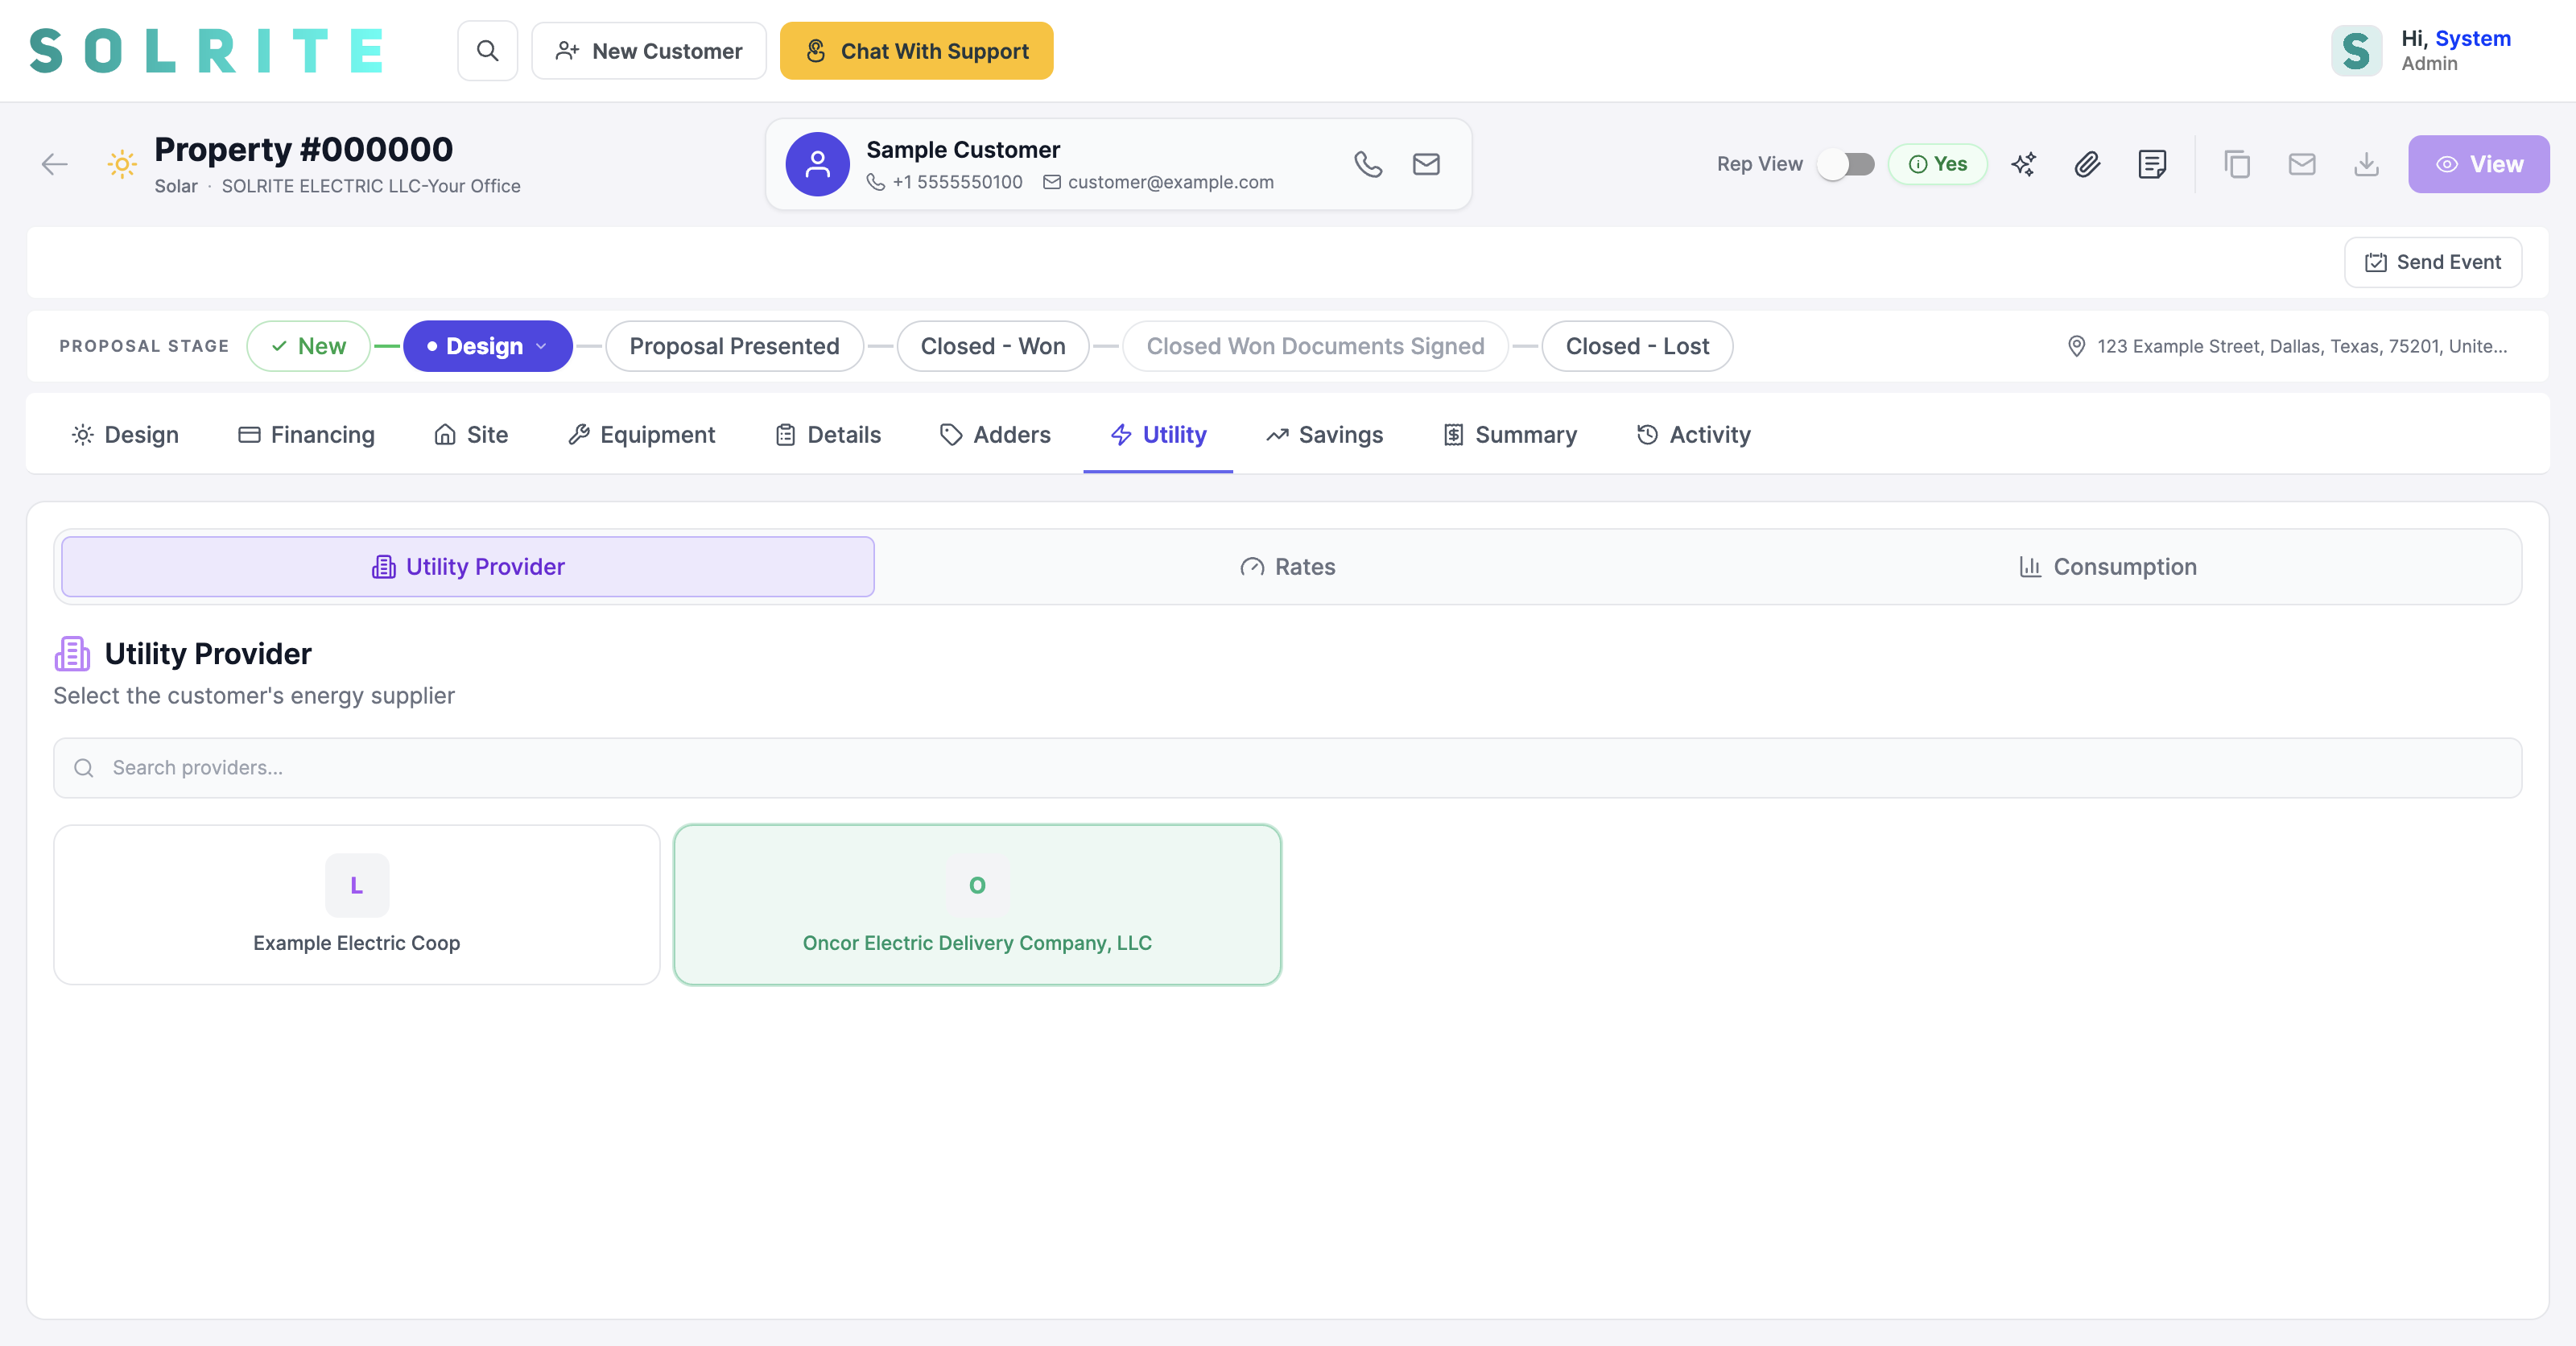
Only the local ones show
SubHub lists just the providers that serve that address, so you will usually see two or three cards, not a long dropdown. Use the search box if the list is longer.
The Utility tab with provider cards
Utility tab → Utility Provider — click the card, it turns green.
4

Enter their monthly usageLegacy

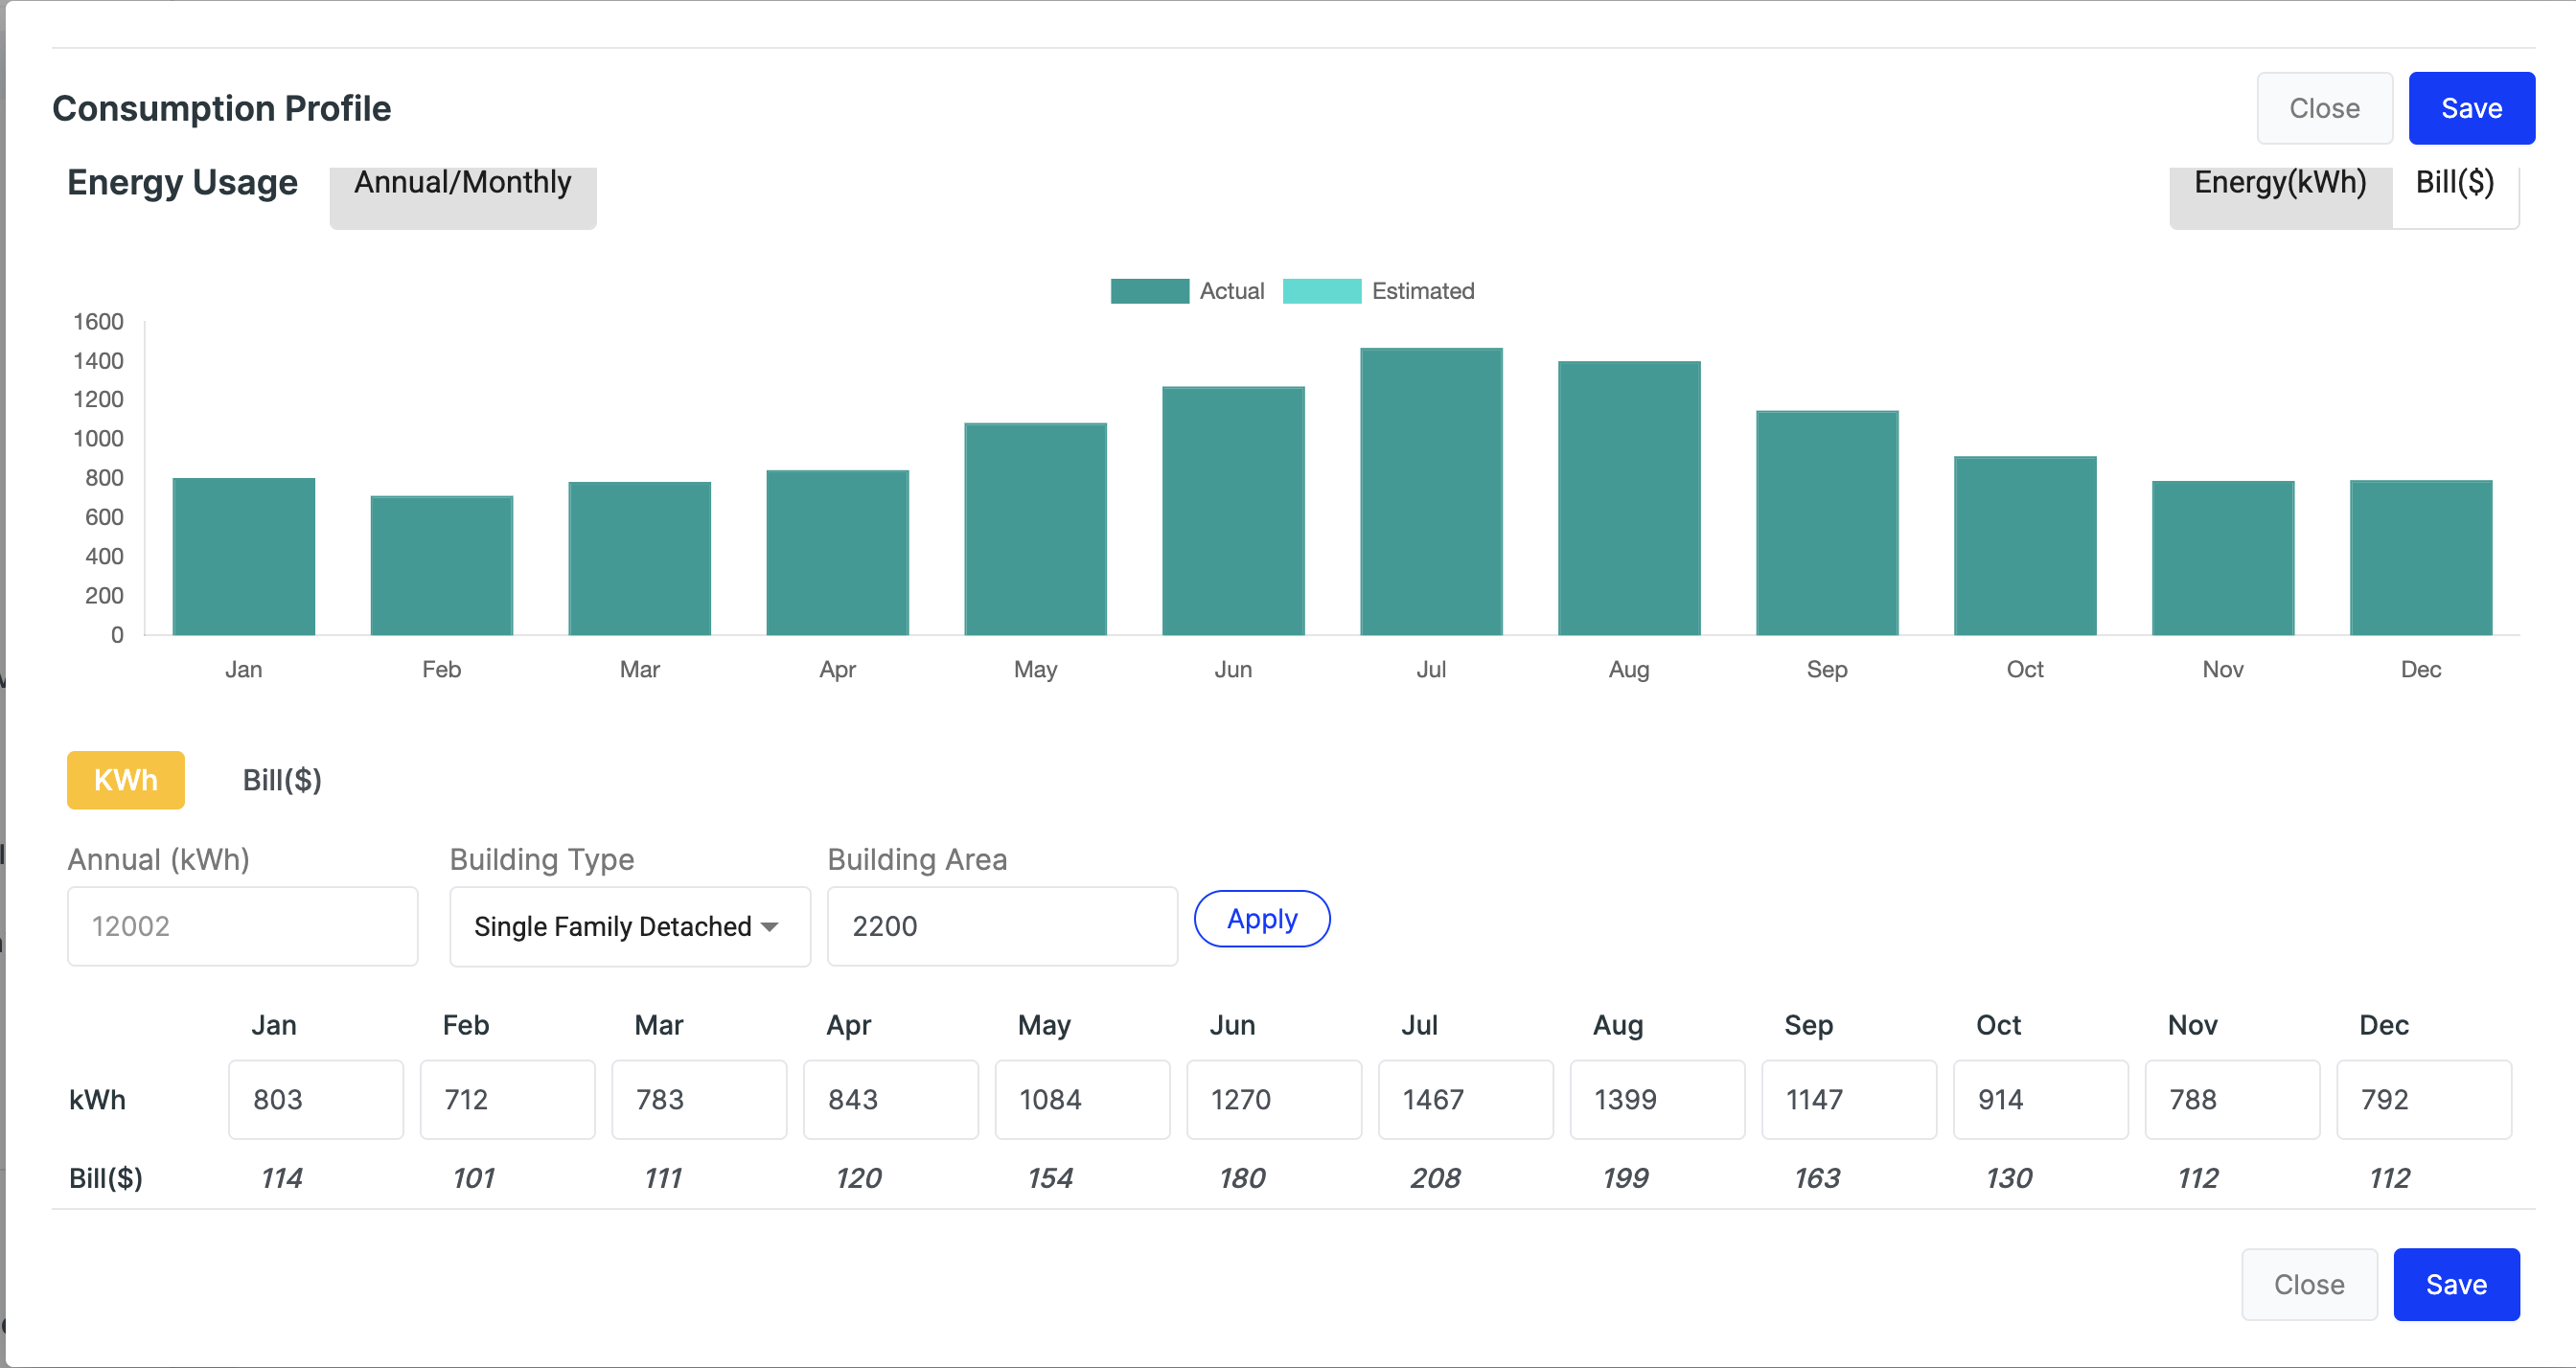
Enter the customer's monthly usage (kWh) from their utility bill — type each of the 12 months into the monthly row, then click Apply. Do not just enter an annual total: underwriting reviews the actual bill and needs the bill's usage to show up in the consumption profile.

If you can't get all 12 months, enter the months you do have — the Genability engine will estimate the missing months from the ones you fill in.
Heads up
Underwriting approves the utility bill only when the monthly consumption on the proposal exactly matches the monthly usage on the bill the customer uploaded. At a minimum, the months shown on the bill must match to the kWh. Estimated or annual-only entries that don't match the bill will get the deal rejected.
Entering monthly usage
Type each month's kWh from the bill into the monthly row, then Apply — don't rely on the Annual box.
4

Enter their monthly usageNew

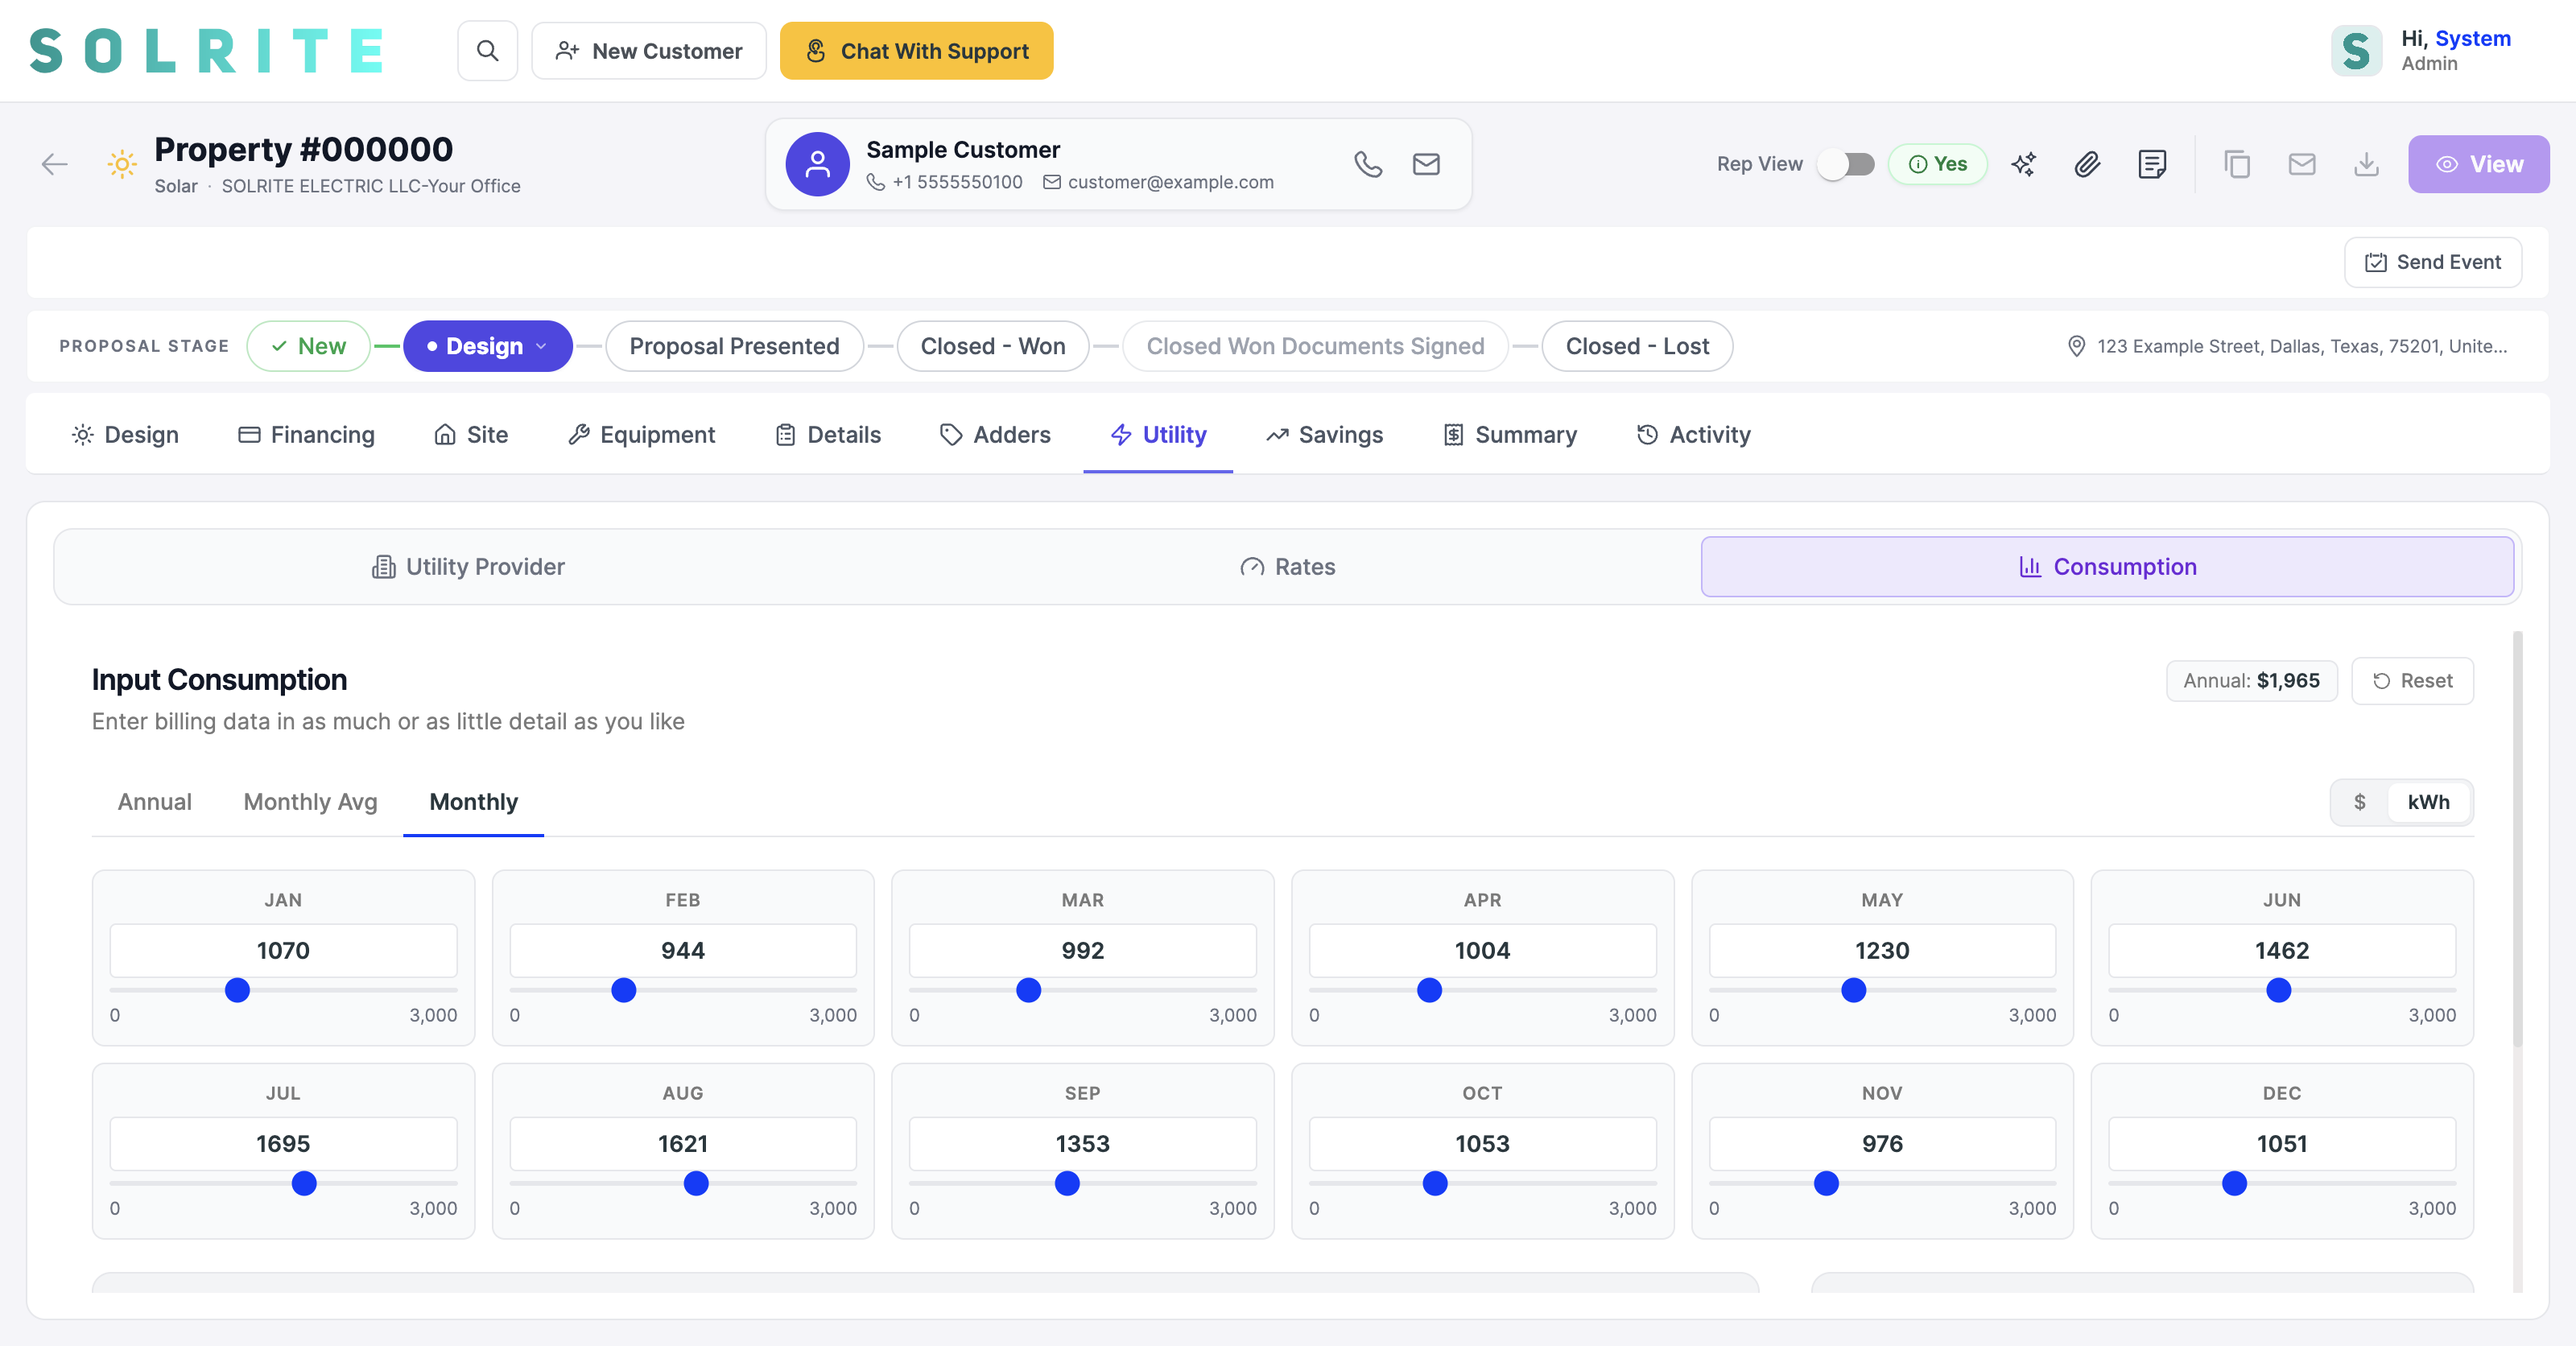
Same Utility tab, third sub-tab: Consumption. Choose the Monthly view, then type each of the 12 months from the bill into the month boxes. The values save as you type — there is no Apply button any more.
Check the kWh / $ toggle first
Top right of the panel is a $ / kWh switch. It must be on kWh before you type usage. Type kWh figures while it is set to $ and you will silently build the system off dollars.
Heads up
Underwriting still approves the utility bill only when the monthly consumption exactly matches the bill the customer uploaded. Annual-only entries that don't match the bill get the deal rejected.
The Consumption sub-tab with twelve monthly inputs
Utility → Consumption → Monthly — 12 months, with the kWh toggle set correctly.
5

Start the design

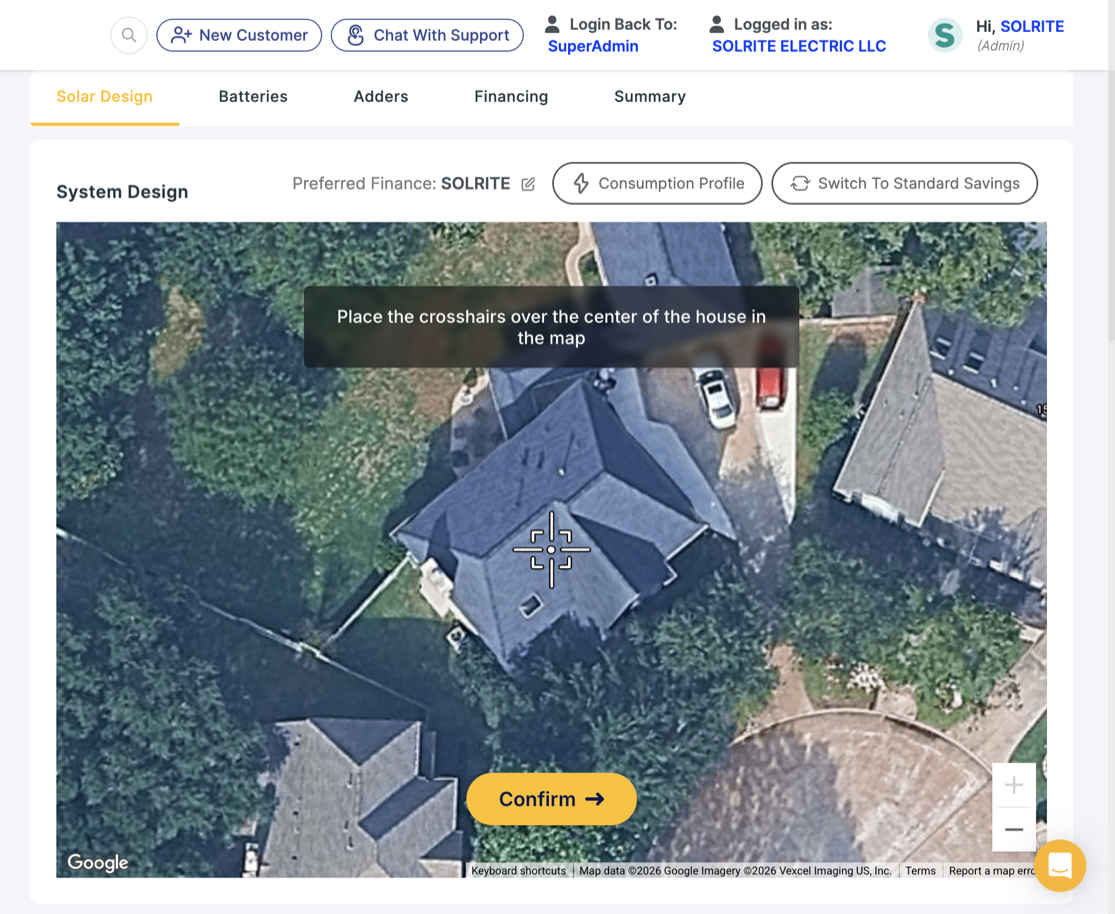
Click Start Design. The satellite design tool loads with a crosshair centered on the home.
Starting the design
Start Design — the satellite tool opens on the home.
6

Confirm the roof

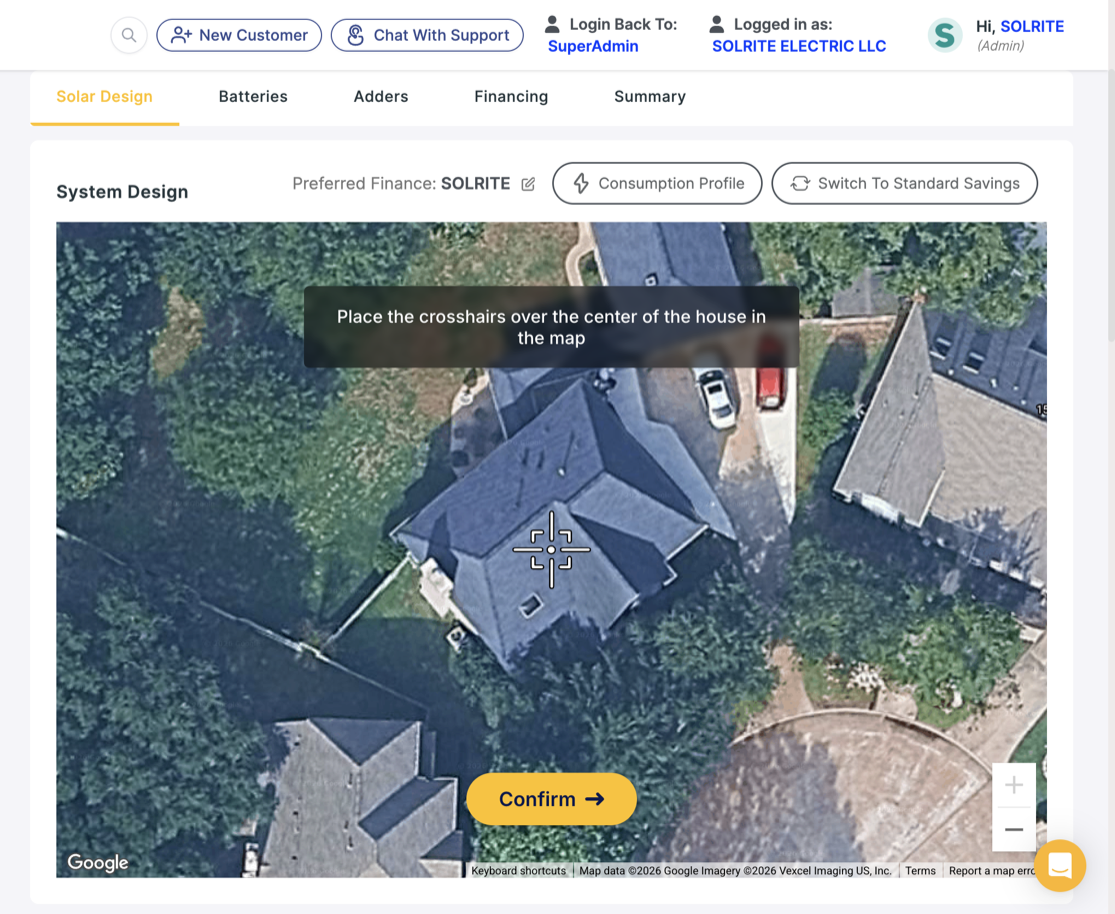
Give the satellite image a second to load, then click the yellow Confirm button. The AI auto-places panels on the best roof faces.
Tip
Before you confirm, check the top of the panel reads Preferred Finance: SOLRITE. If it shows anything else, click the pencil next to it and switch it to SOLRITE so the pricing comes out right.
Confirming the roof
Click the yellow Confirm button to auto-place panels.
7

Set the panel & review

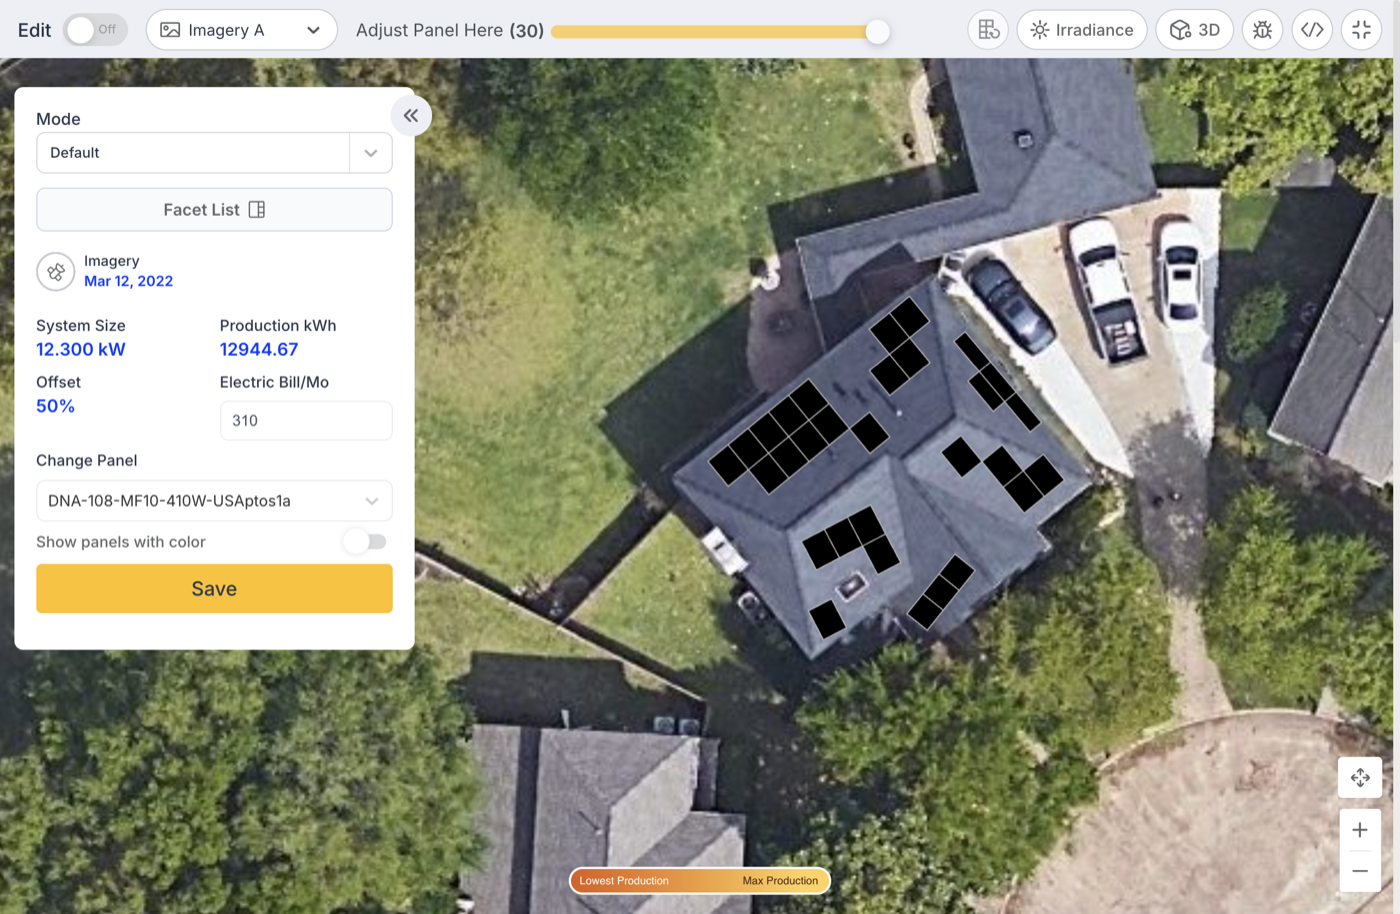
Check the panel in Change Panel. AMPS 410 is the panel we use, and it's usually already selected. If you don't see it, or you hit a "designs field is required" error later, switch it to the Aptos DNA-108-MF10-410W-USAptos1a instead (that's what's shown here). Review System Size and Offset (aim for roughly 90–100%), then click Save.
Reviewing the design and panel
Change Panel: AMPS 410 is the default; use this Aptos DNA-108 if you don't see it. Check System Size & Offset, then Save.

Editing the design — add, move & fine-tune panels

The auto-layout is just a starting point, and tuning it is often the highest-value thing you can do on a deal. Click Edit on the design to open the full editor, then shape the system by hand:

  • Adjust Panel Here slider — add or remove panels across the whole roof in one move.
  • Drag a panel directly on the roof image to reposition it; turn on Edit mode to drop new panels onto bare roof or delete shaded / obstructed ones.
  • Facet List — every roof face broken out with its own azimuth, production, panel count and pitch slider. Trim a low-producing north face, or push more panels onto the best-producing faces.
  • Change Panel, the 3D and Irradiance views, and Mode (Default / NREL / Manual) all control how the layout gets built.
  • Nothing is committed until you click Save.
Tip
Energy Community deals need at least 8 kW. If you're short, add panels onto extra roof faces here instead of re-running the whole design.
Walkthrough (3 min) — selecting & editing facets, adjusting azimuth, editing facet boundaries, marking/adding panels, and the Adjust Panel slider.

Shading & NREL designs — setting shading by hand

Sometimes when you try to build a design, SCH throws this error instead of loading the roof:

! The mode you are trying to checkout isn't available for this address, please select a different mode

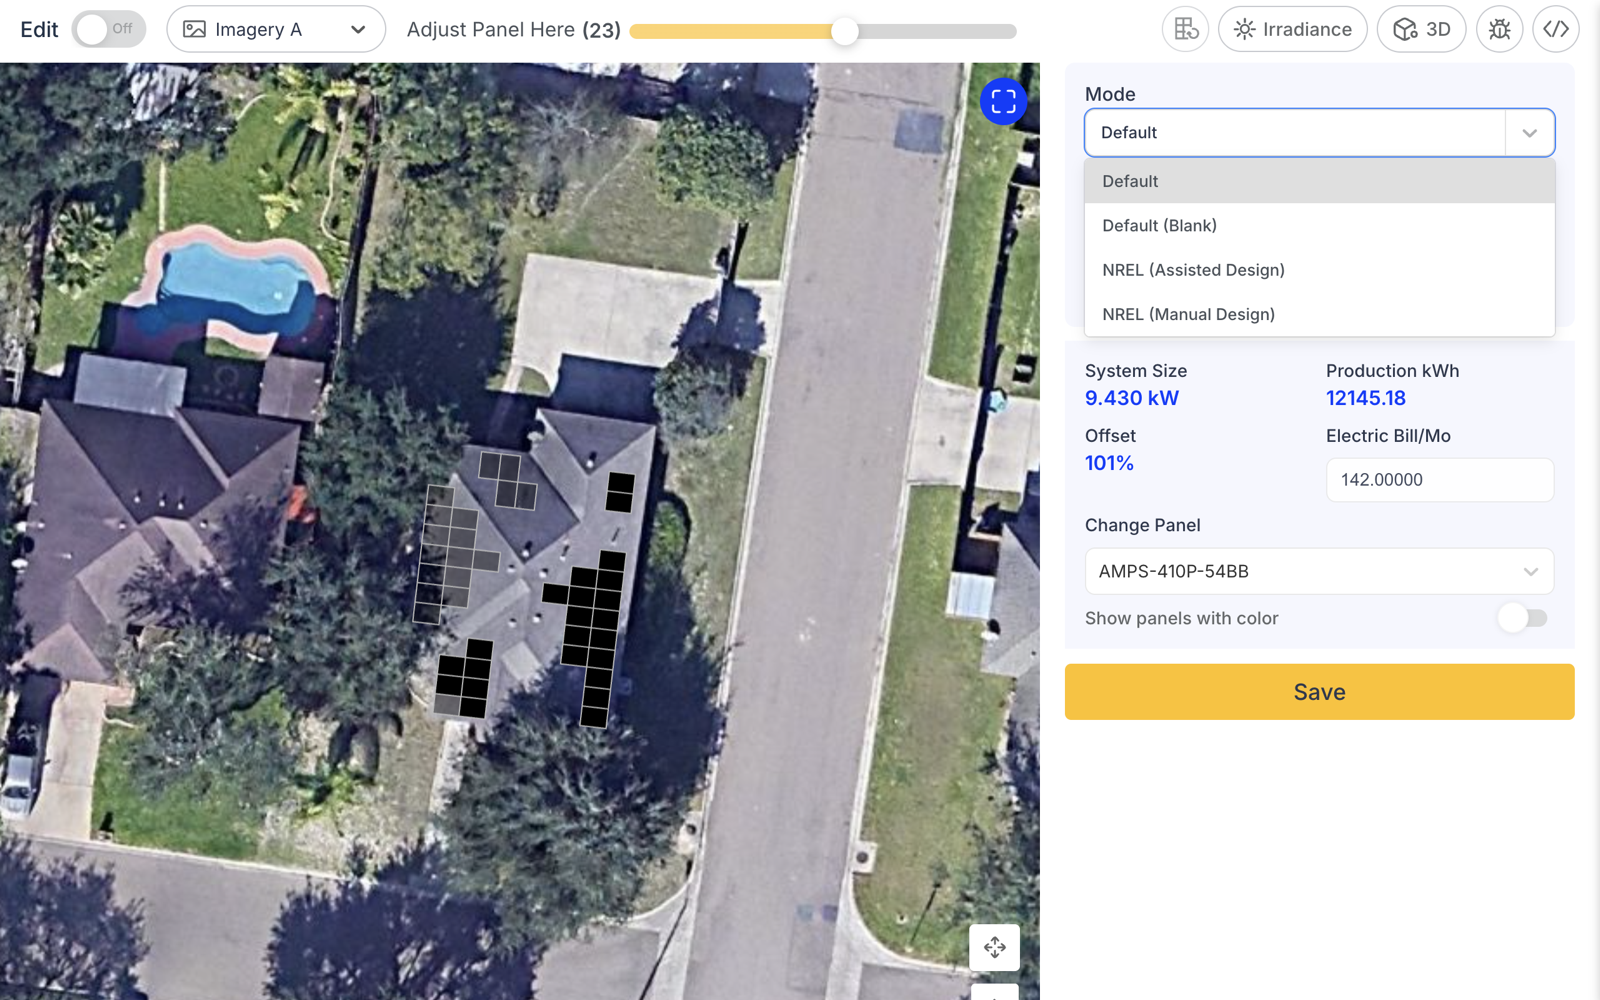
That means the aerial/LIDAR data behind the standard Default mode isn't available (or is outdated) for that address, so the design has to be built in NREL (Assisted Design) mode instead. In the design editor, open the Mode dropdown at the top of the right-hand panel and pick NREL (Assisted Design) — it will warn you that it resets the map; click Yes.

Here's the catch: Default mode reads shading automatically from the imagery. NREL mode doesn't — it assumes a wide-open, shade-free roof until you tell it otherwise. If you leave shading untouched, production comes out overstated and the deal is very likely coming back for a redesign.

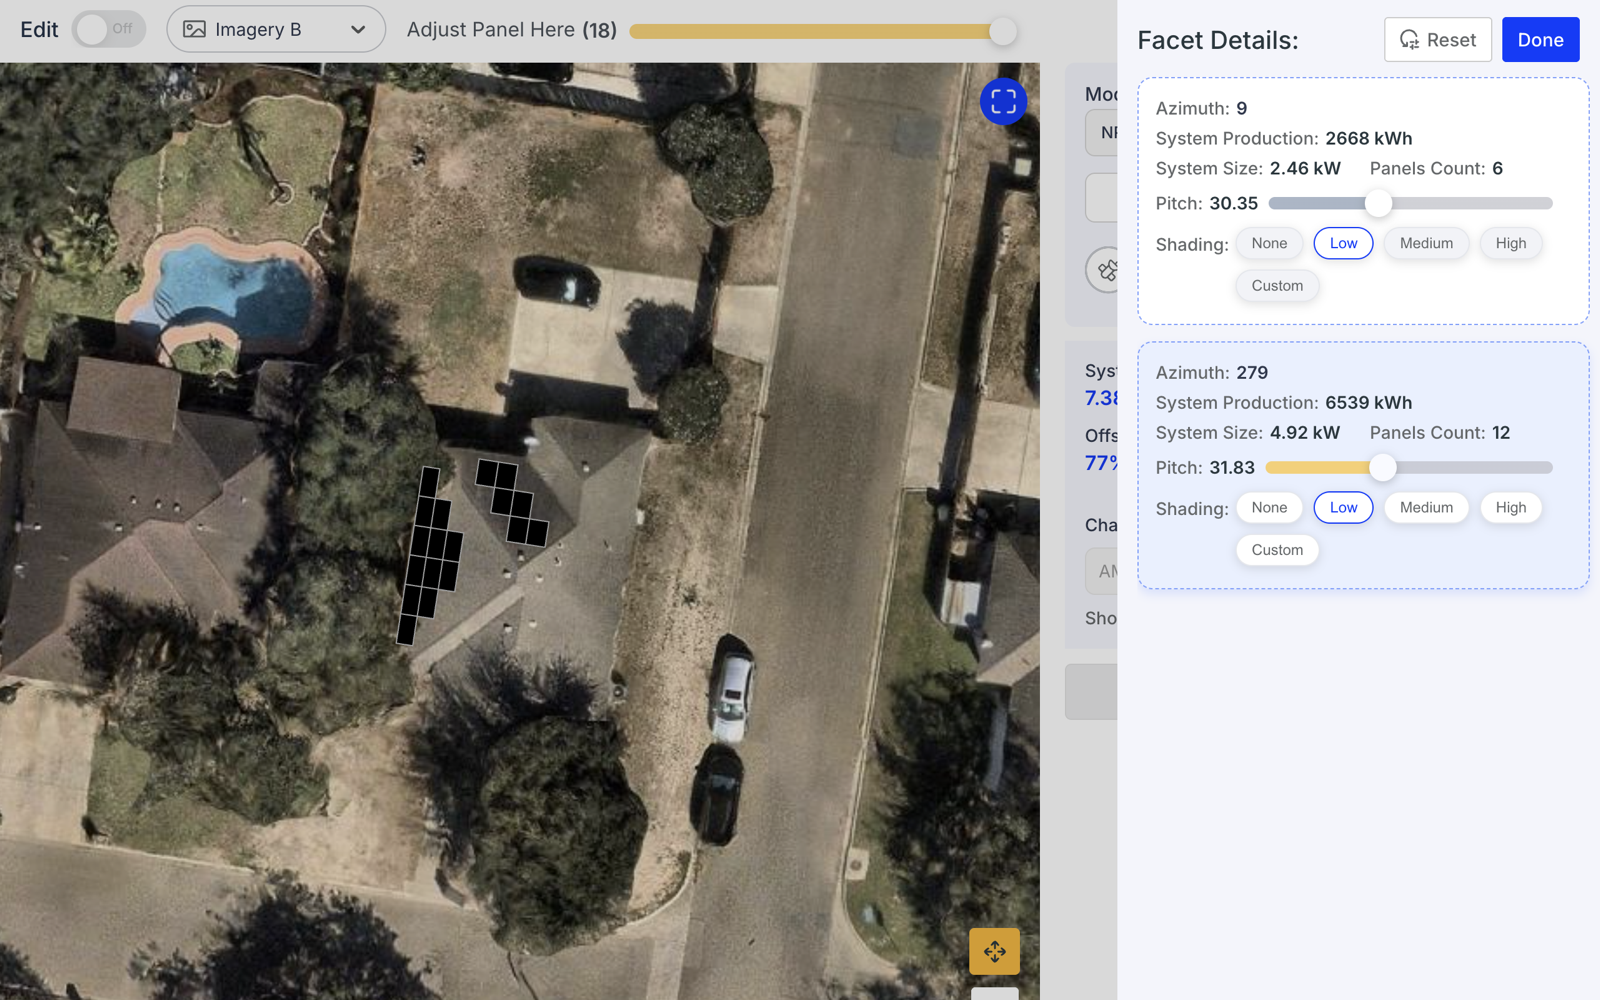
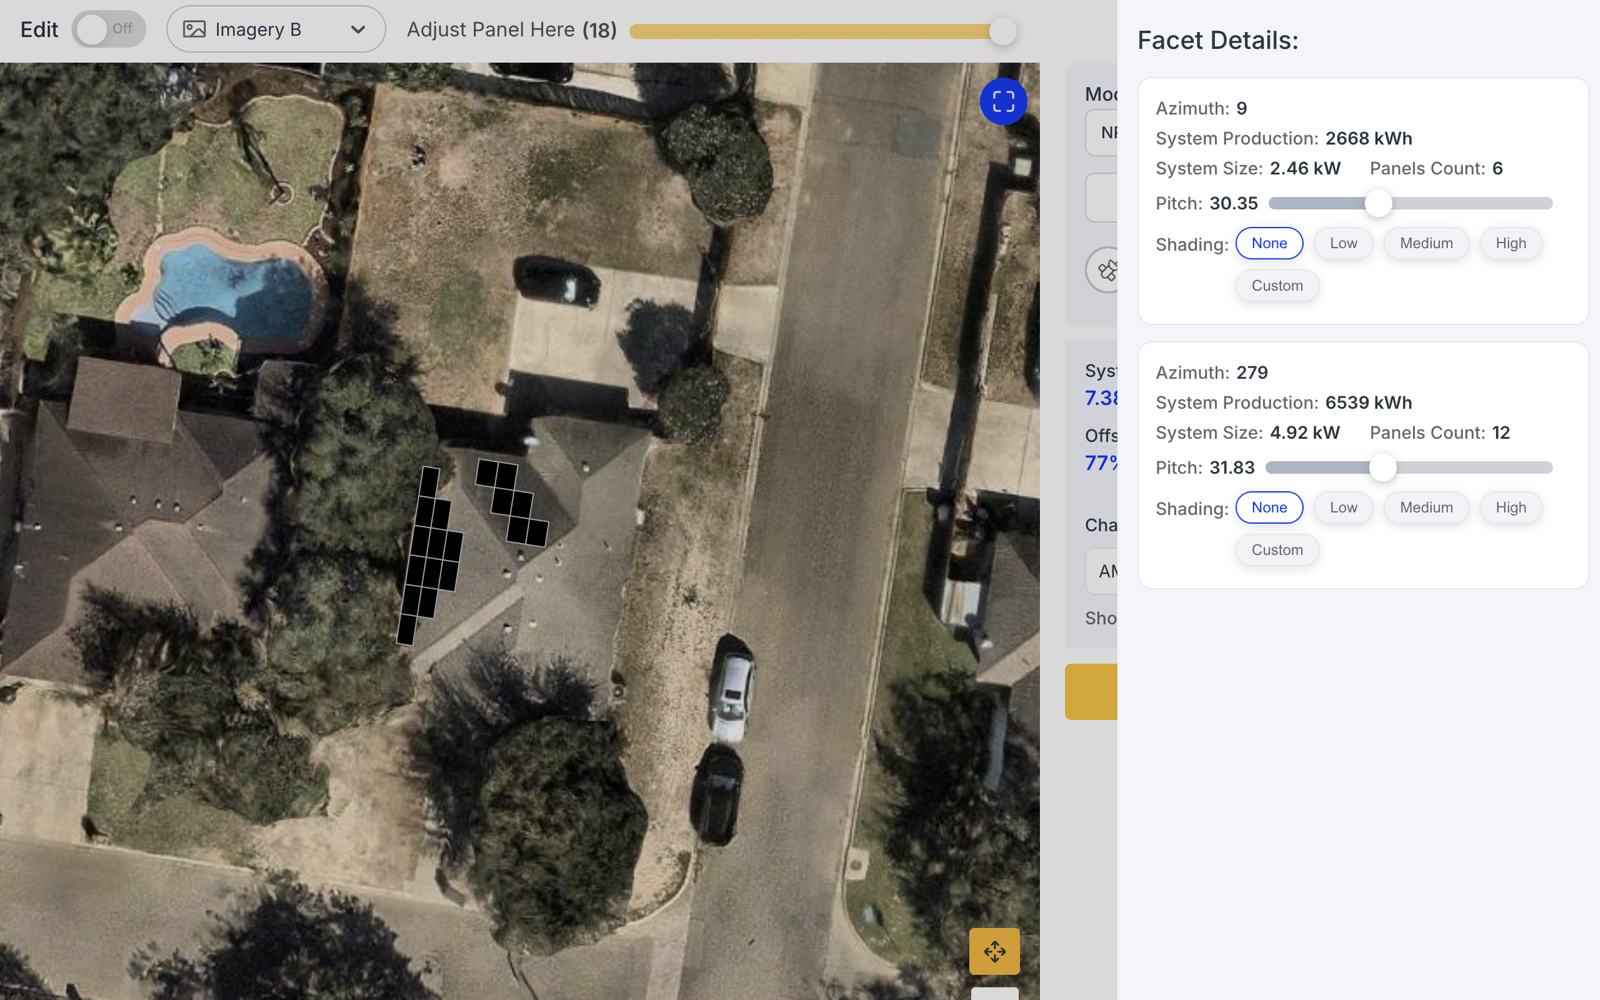
And the part everyone gets stuck on: there is no shading slider on the main panel. The shading control lives inside the Facet List. Click the Facet List button (right under Mode), and every roof face gets a card with its azimuth, production, panel count, pitch — and a Shading row: None / Low / Medium / High / Custom.

Set shading to Low on every facet with panels — never leave an NREL design on None. If the roof has real tree cover, match reality with Medium or High. Then click Done, and Save the design.
Heads up
Any deal designed on NREL has a decent chance of needing a change order once the site-survey shade report comes in — that's normally an ICO, so commission doesn't change. And never pick NREL when Default mode is available: Default's automatic shading is what keeps you out of this situation in the first place.
Mode dropdown showing NREL (Assisted Design)
Mode dropdown — when Default isn't available for the address, switch to NREL (Assisted Design).
Facet List showing per-facet shading options
Facet List — each roof face has its own Shading row. Fresh NREL designs default to None.
Facet List with Low shading selected on every facet
Select Low on every facet (minimum), then Done → Save.
8

Add the batteryLegacy

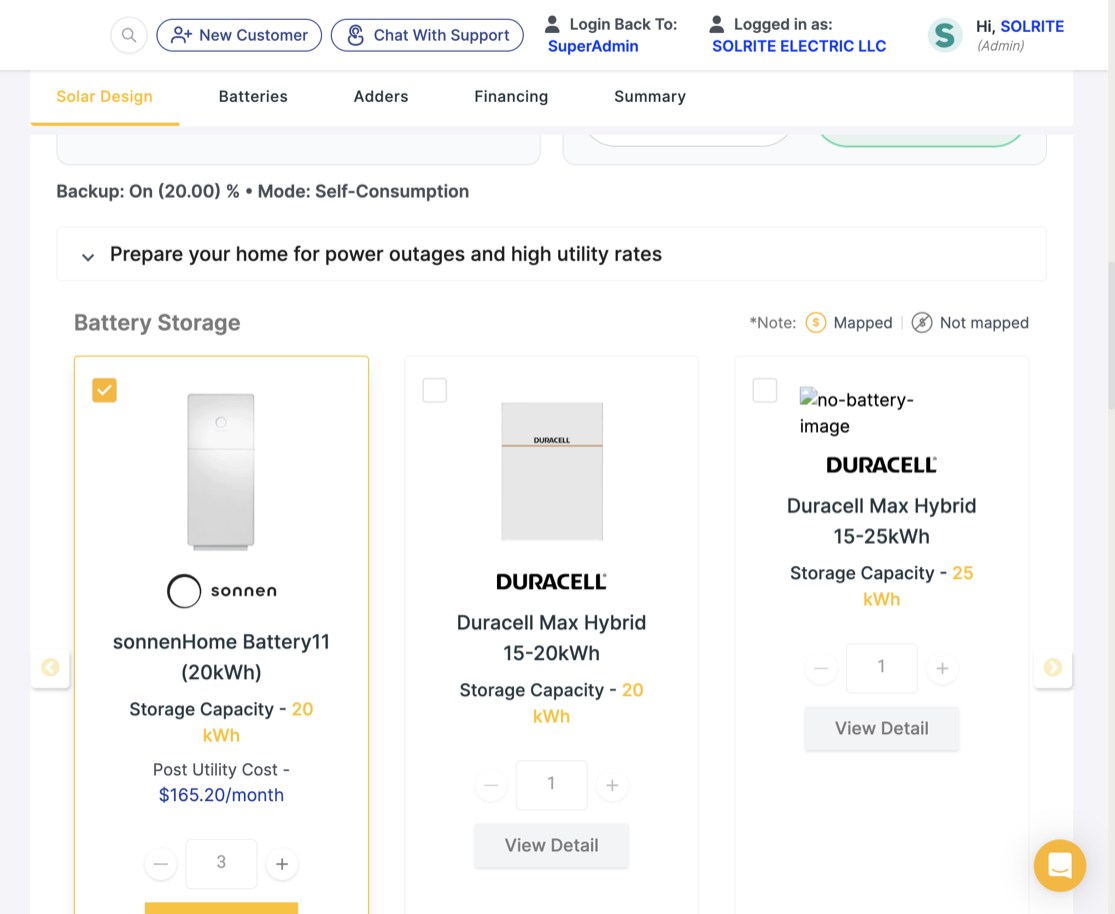
Open the Batteries tab. Turn on "Do you want to add a battery?". Set Battery Mode = Self-Consumption. In Battery Storage, select the sonnenHome Battery 11 card and set the quantity to 3 — SOLRITE requires three 20 kWh batteries on systems from 9–26 kW (it won't let you create the quote otherwise).
Tip
Duracell Max Hybrid is the alternative battery in some markets — match the same total storage target.
Adding the battery
Batteries tab — Self-Consumption mode, sonnenHome Battery 11 ×3 (Energy Community).
8

Open the proposal wizard — FinanceNew

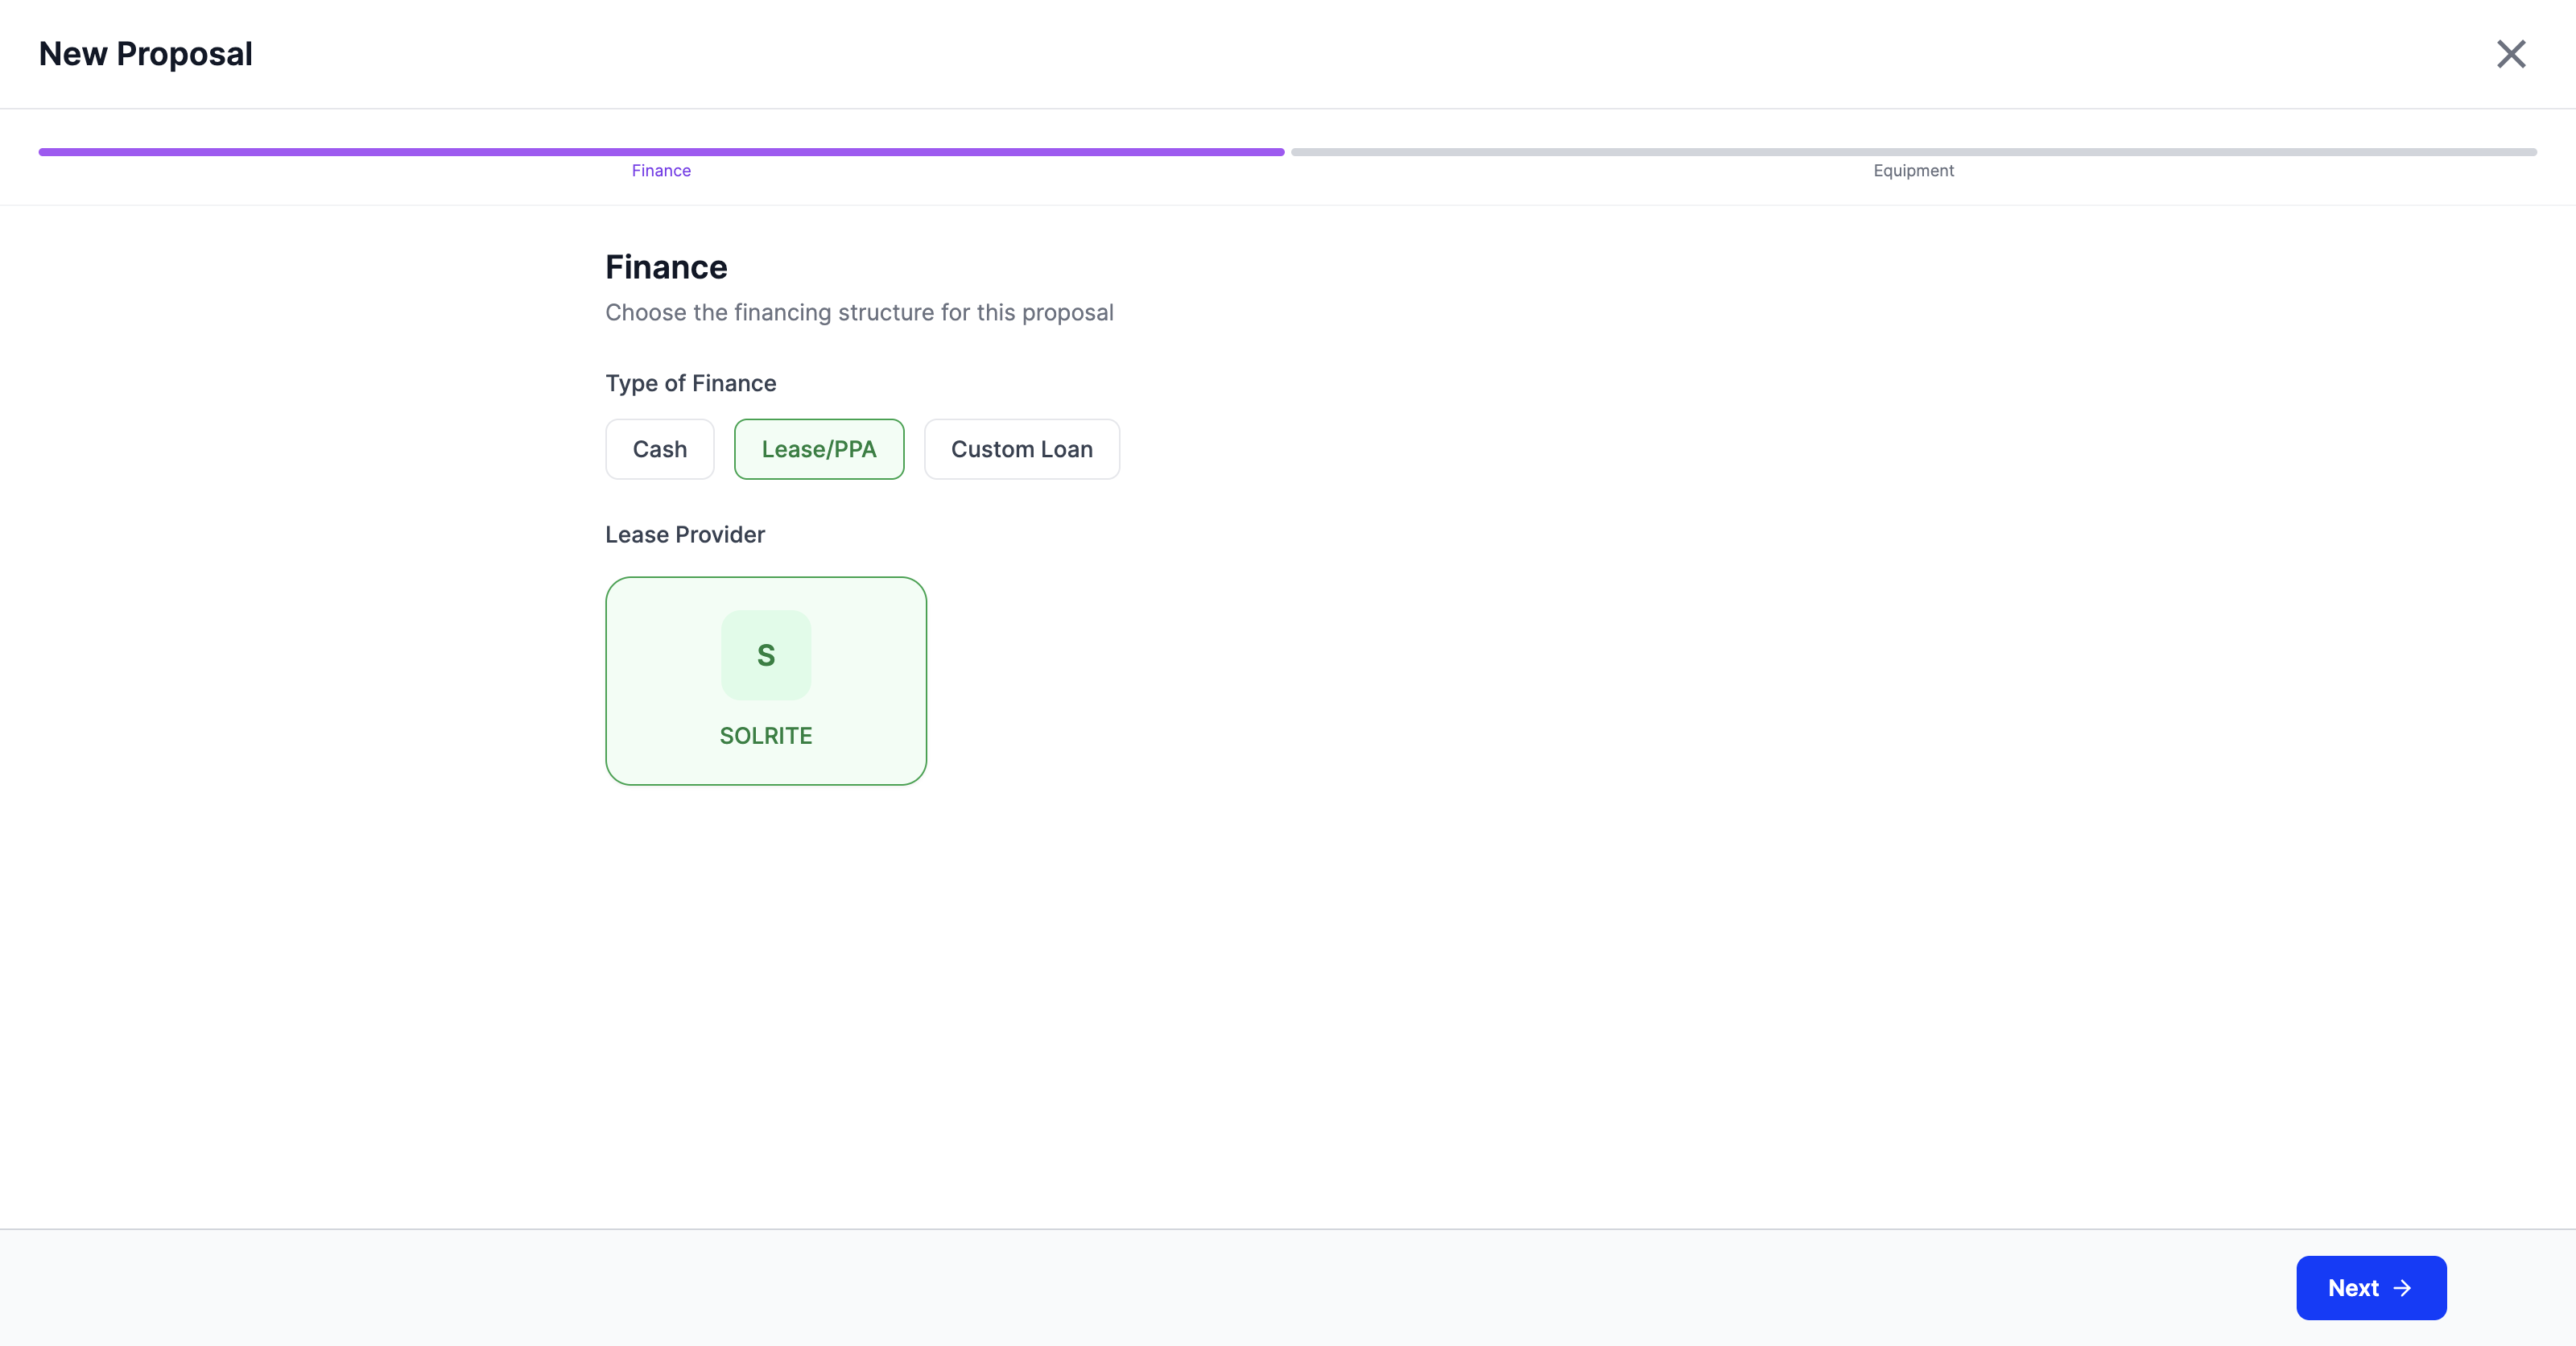
Click View Detail on the proposal card and the New Proposal wizard opens. It has two steps: Finance then Equipment. This is the biggest change from the old layout — battery and financing are no longer separate tabs you fill in yourself.

On Finance, set Type of Finance to Lease/PPA and pick SOLRITE as the Lease Provider, then click Next.
There is no Create Account button
The old Financing → SOLRITE → Create Account step is gone. Choosing SOLRITE here does the same job.
The Finance step of the new proposal wizard
Wizard step 1 — Type of Finance = Lease/PPA, Lease Provider = SOLRITE, then Next.
9

Create the accountLegacy

Scroll to the Financing → SOLRITE section. Confirm the SOLRITE Utility is filled, then click Create Account. Wait for the green "Account Created Successfully" message.
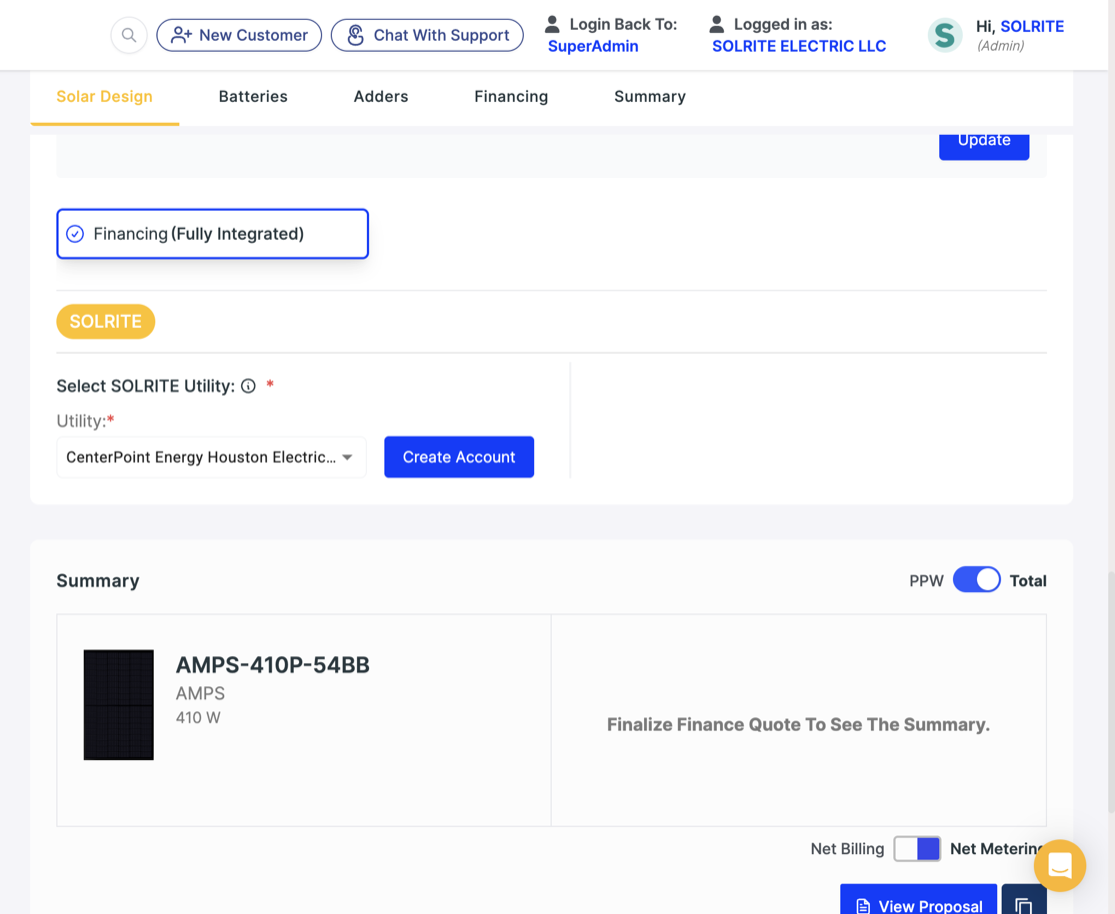
Creating the SOLRITE account
Financing → SOLRITE — Create Account and wait for the green confirmation.
9

Equipment — panel, inverter, battery, addersNew

The second wizard step puts Panel, Inverter, Battery and Adders on four cards. Click any card to change it. Underneath, Battery Configuration holds Battery Mode (Energy Arbitrage / Self Consumption / Backup Mode) and a Backup Percentage.

Set Battery Mode = Self Consumption, check the panel is AMPS 410 (or the Aptos DNA-108-MF10-410W), then click Finish. That drops you on the proposal detail page.
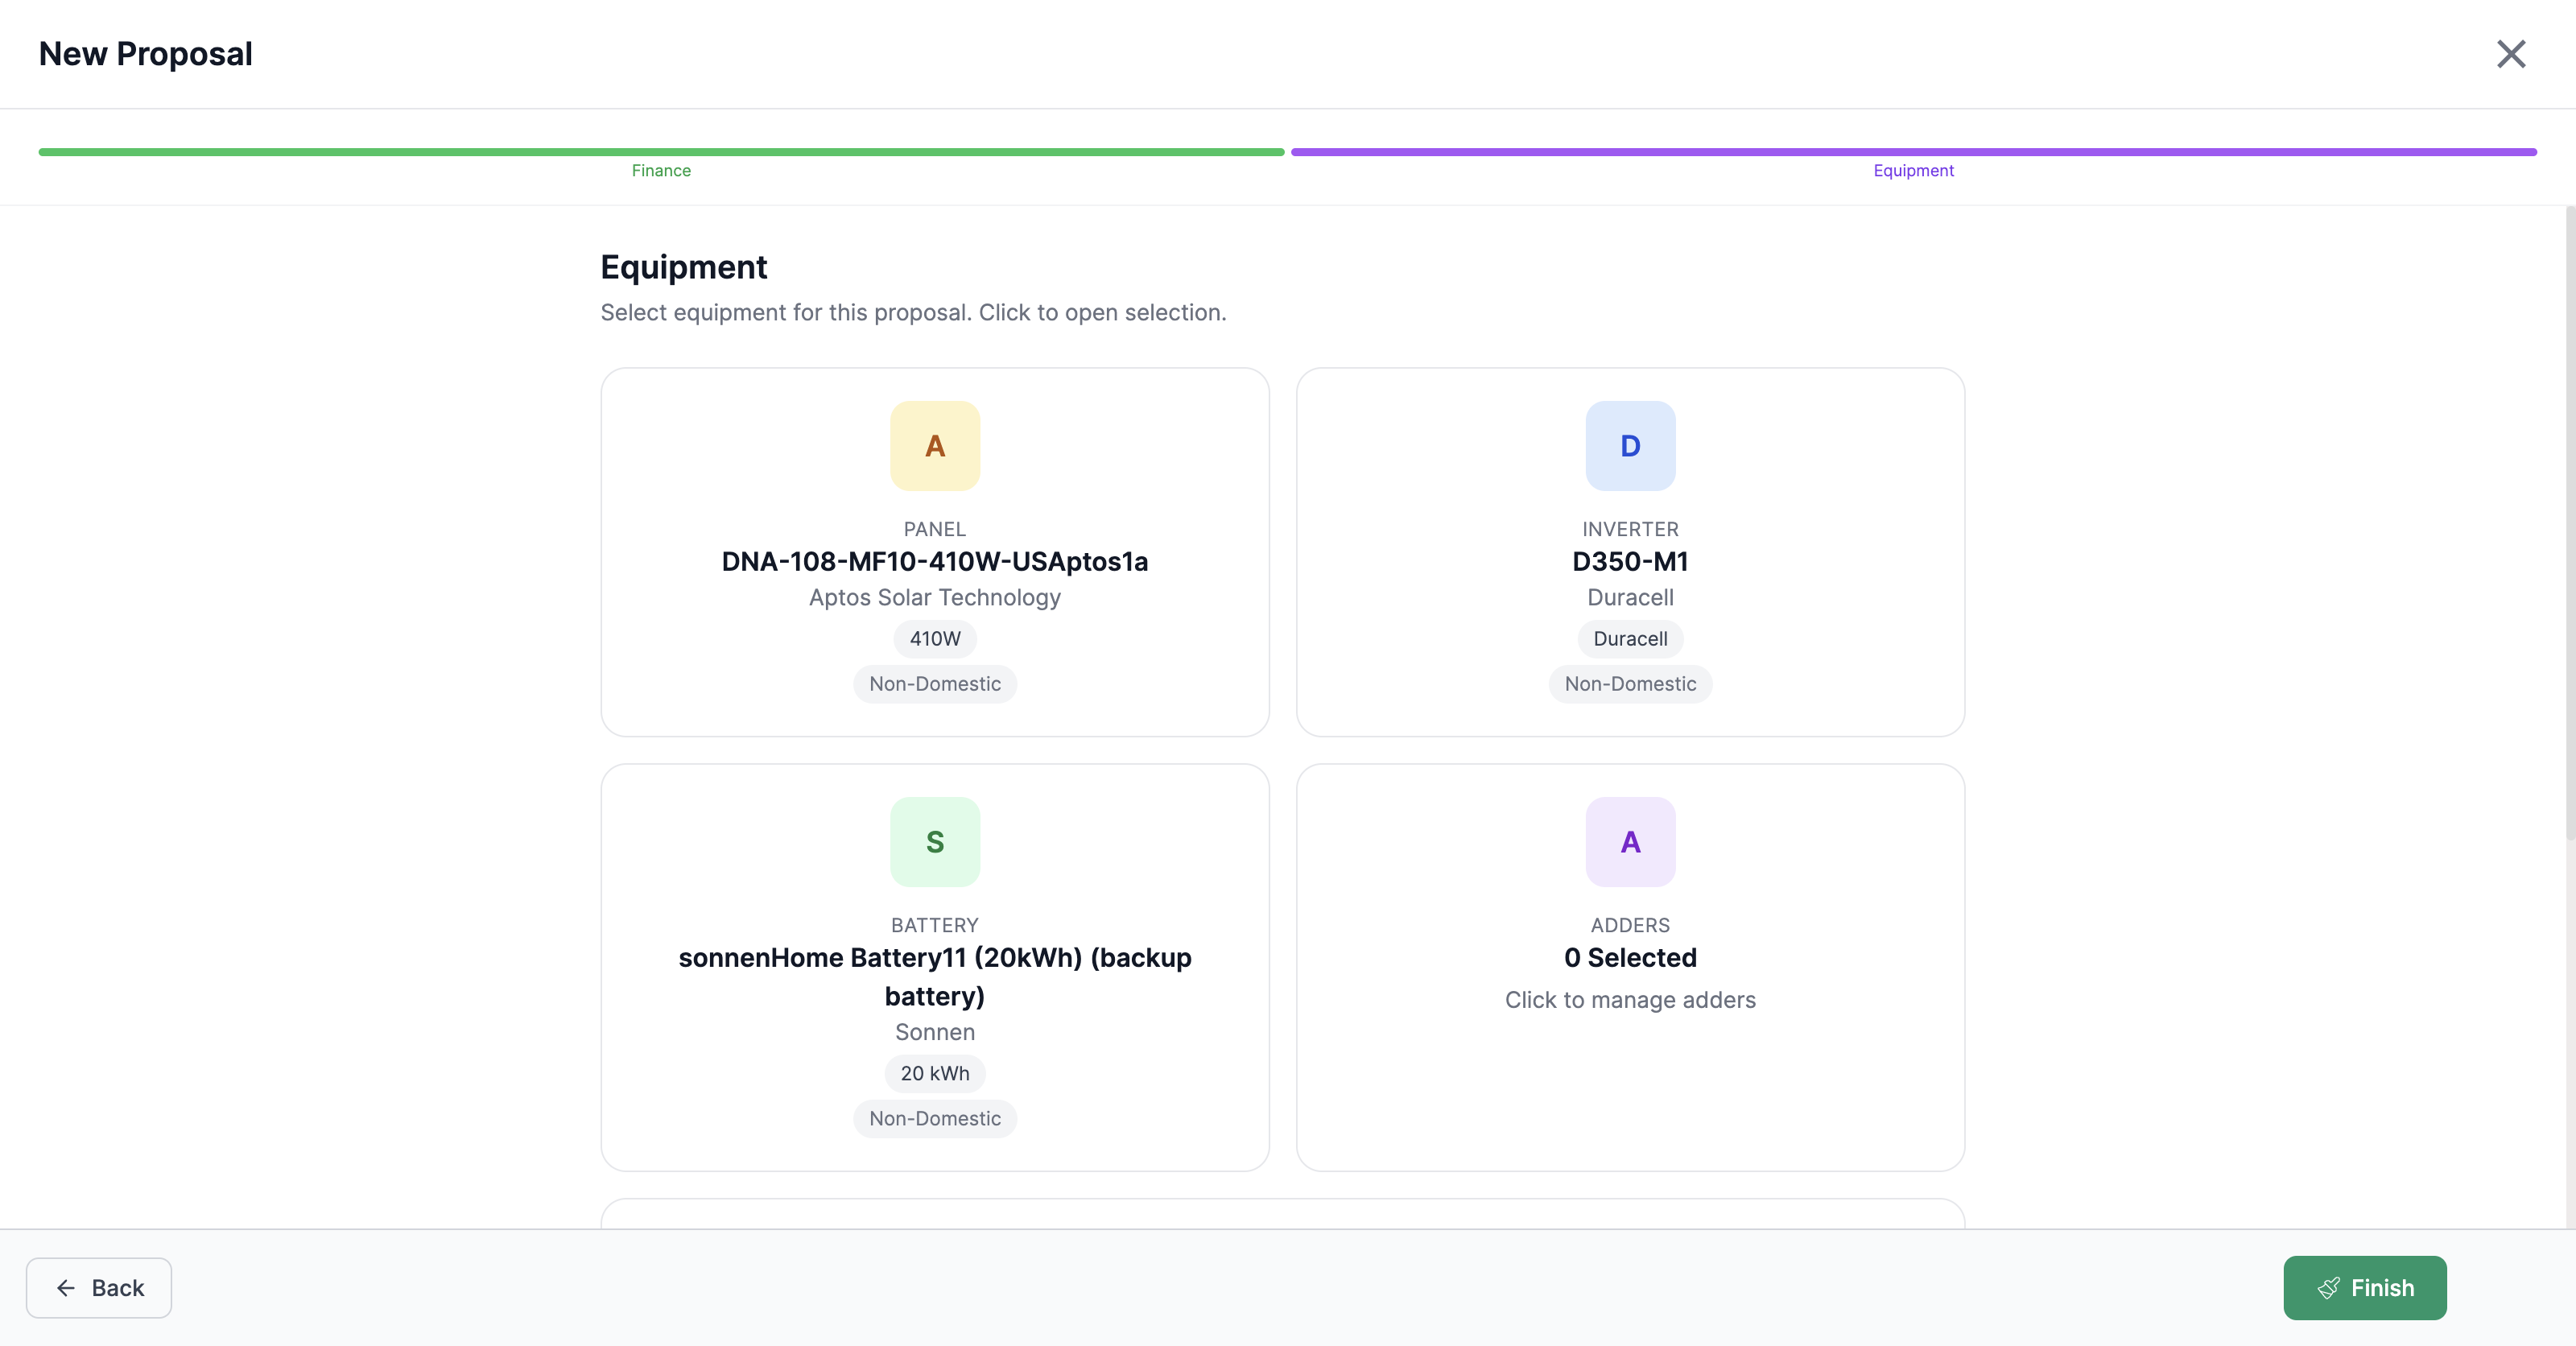
There is no quantity box — pick one card at the total size
The old flow had you set sonnenHome Battery 11 × 3. This one will only let you choose one battery and gives you no quantity field at all. That is not a bug: the list is sized by total storage, so pick the single card that equals the total you need — e.g. Duracell Max Hybrid 15-60kWh for 60 kWh. Sizes run 20, 25, 30, 40, 45 and 60 kWh.
The Equipment step of the new proposal wizard
Wizard step 2 — equipment cards plus Battery Mode, then Finish.

Known rough edges on this layout

SubcontractorHub shipped this without announcing it, and a few things genuinely do not work the way the old one did. These are known — do not burn an hour hunting for them:

  • Nothing appears below the design image. On the old layout you scrolled down from the picture to reach financing. Here there is nothing to scroll to — use the Financing tab instead.
  • Payment Type and Payment Method look crippled. Payment Type only offers % and $, and Payment Method only cash / check / credit card. You do not set the customer's rate there — that is what Compare Financing Options is for.
  • Roof type may not be selectable on the Site tab.
  • The customer list sometimes empties out. Rows vanish and come back; reload the page.

Worth knowing: SubcontractorHub can switch an individual account back to the classic flow. If this layout is genuinely blocking you, say so and it can be requested for your login.

10

Pick pricing & create the quoteLegacy

Under Finance Options (SOLRITE Gold is the default), open the Pricing dropdown and select the rate option. Then click Create Quote.
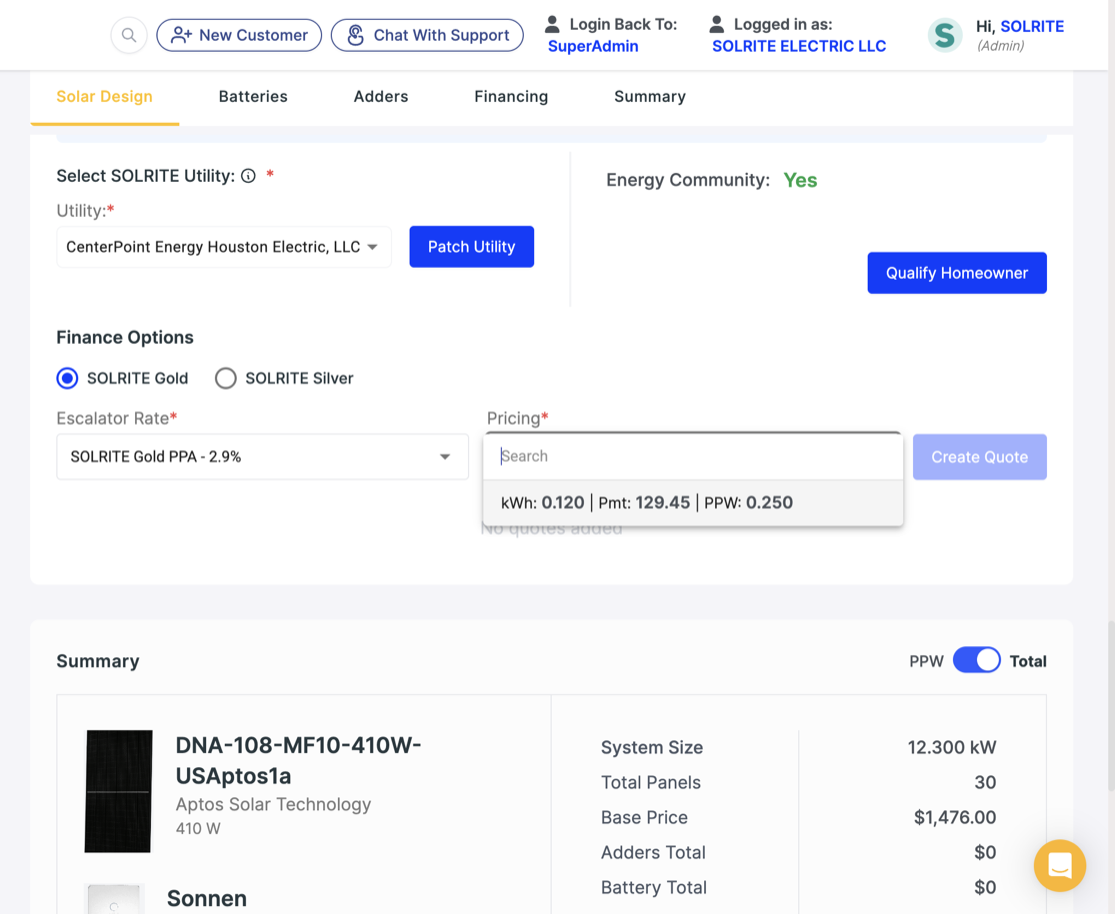
Picking pricing and creating the quote
Finance Options — pick a Pricing rate, then Create Quote.
10

Compare Financing Options, then create the quoteNew

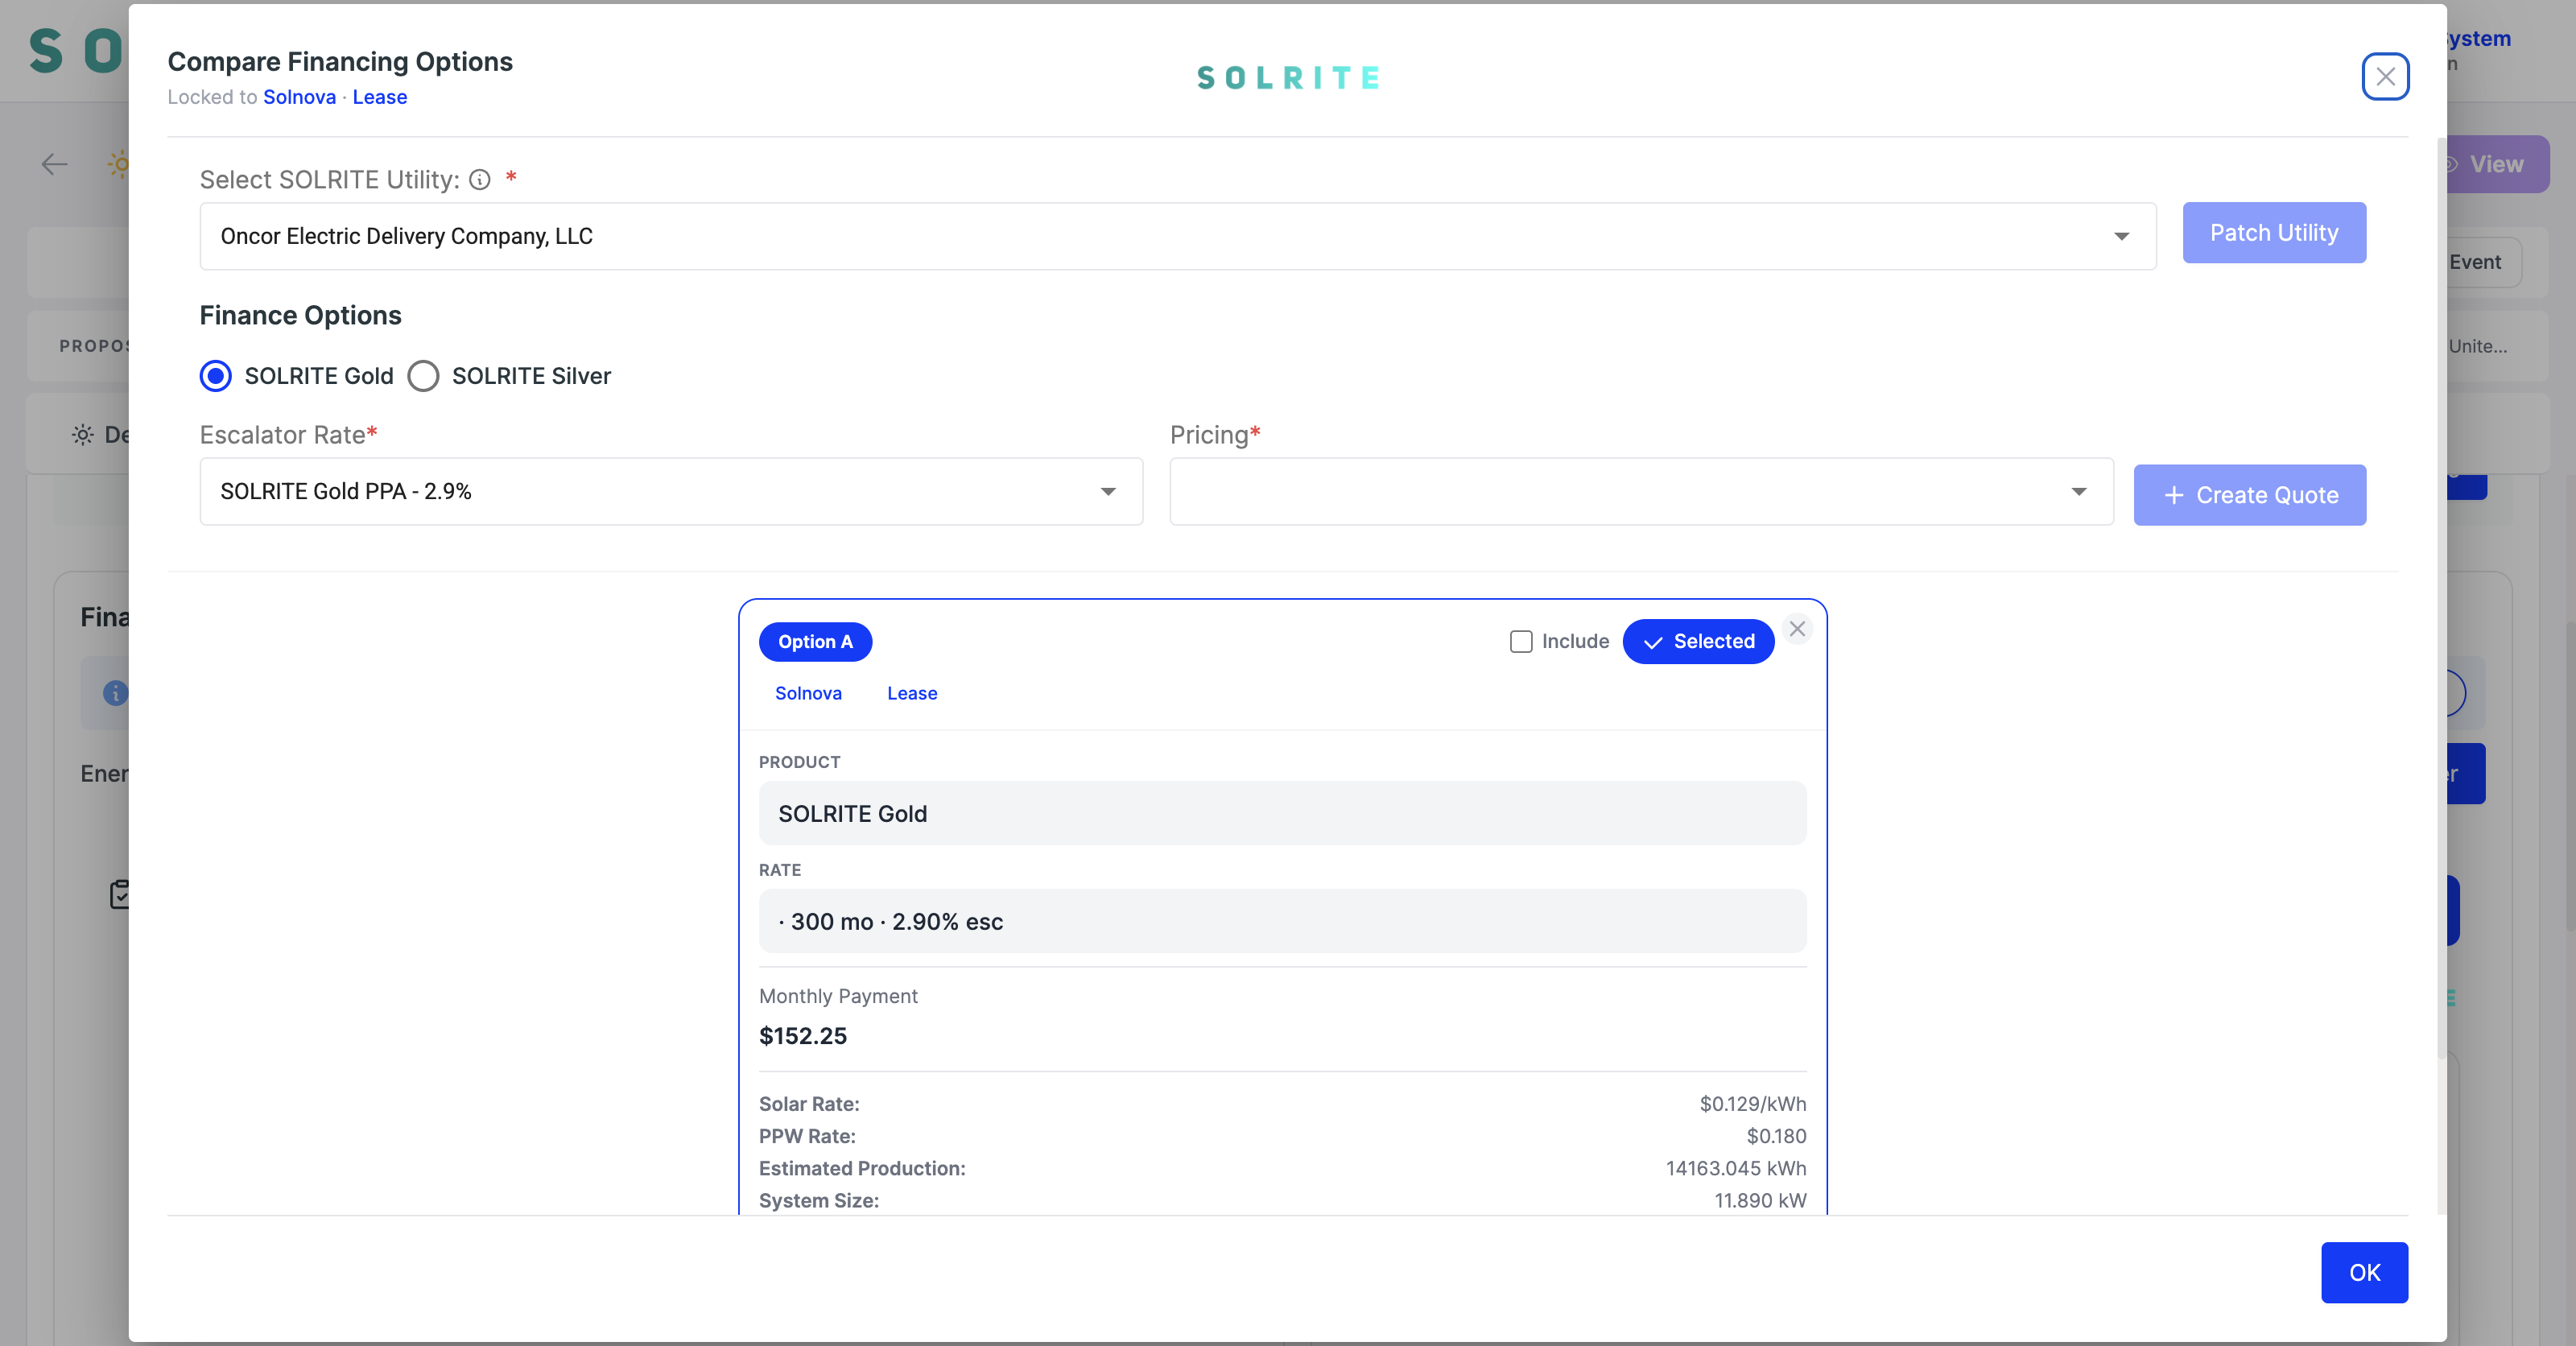
This is the step everyone gets stuck on. On the Financing tab there is no Pricing dropdown sitting on the page. You have to open the big blue Compare Financing Options button first — the whole quote is built inside that window.

In the window, top to bottom:

  • Select SOLRITE Utility — the billing utility (e.g. Oncor Electric Delivery Company, LLC).
  • Finance OptionsSOLRITE Gold or SOLRITE Silver.
  • Escalator Rate — e.g. SOLRITE Gold PPA - 2.9%.
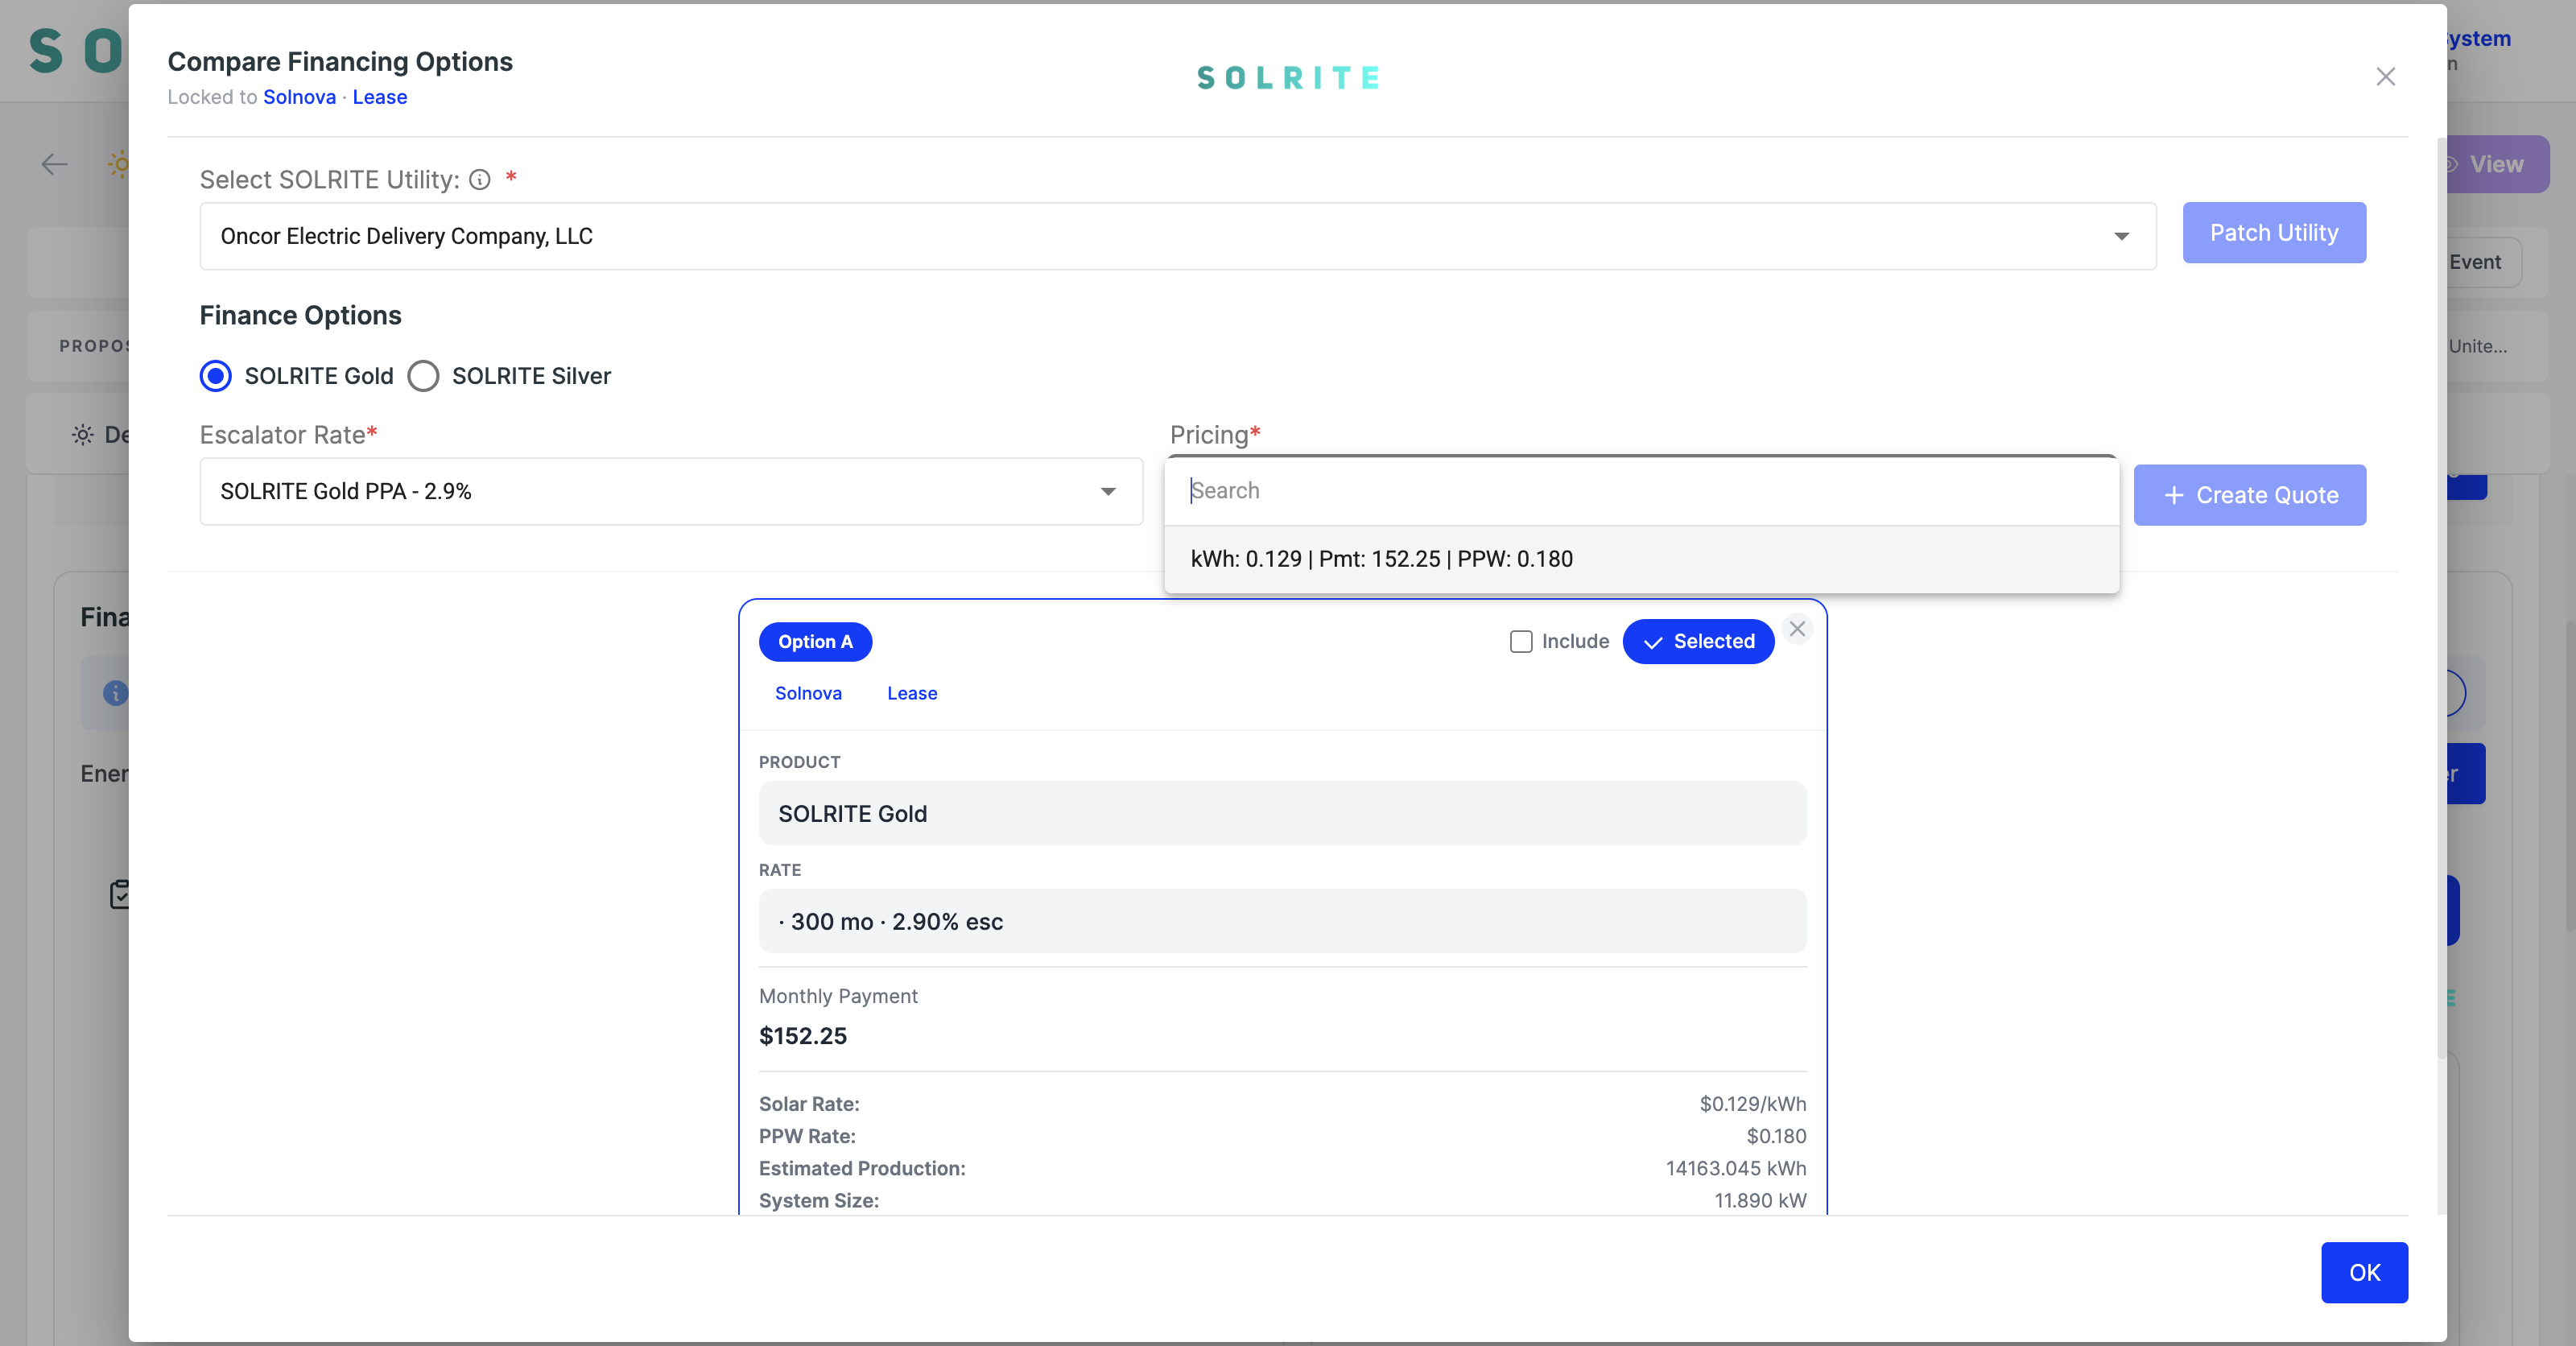
  • Pricing — open it and pick the rate line (kWh / Pmt / PPW).

Then click Create Quote. The quote appears below as Option A; click OK to close the window and it carries back to the Financing tab as Selected Finance.
Create Quote greyed out?
Same reason as always — Pricing is still empty. It is the one field that stays blank when the other three are pre-filled, which is exactly why it gets missed. Fill it and the button turns blue.
You can stack options
Set a different product or escalator and hit Create Quote again to line up Option B beside Option A, then use Selected to choose which one the customer actually gets.
The Compare Financing Options window
Compare Financing Options — utility, product, escalator, Pricing, then Create Quote.
The Pricing dropdown open inside the compare window
The Pricing dropdown — the field that keeps Create Quote greyed out until you pick a line.
11

FinalizeLegacy

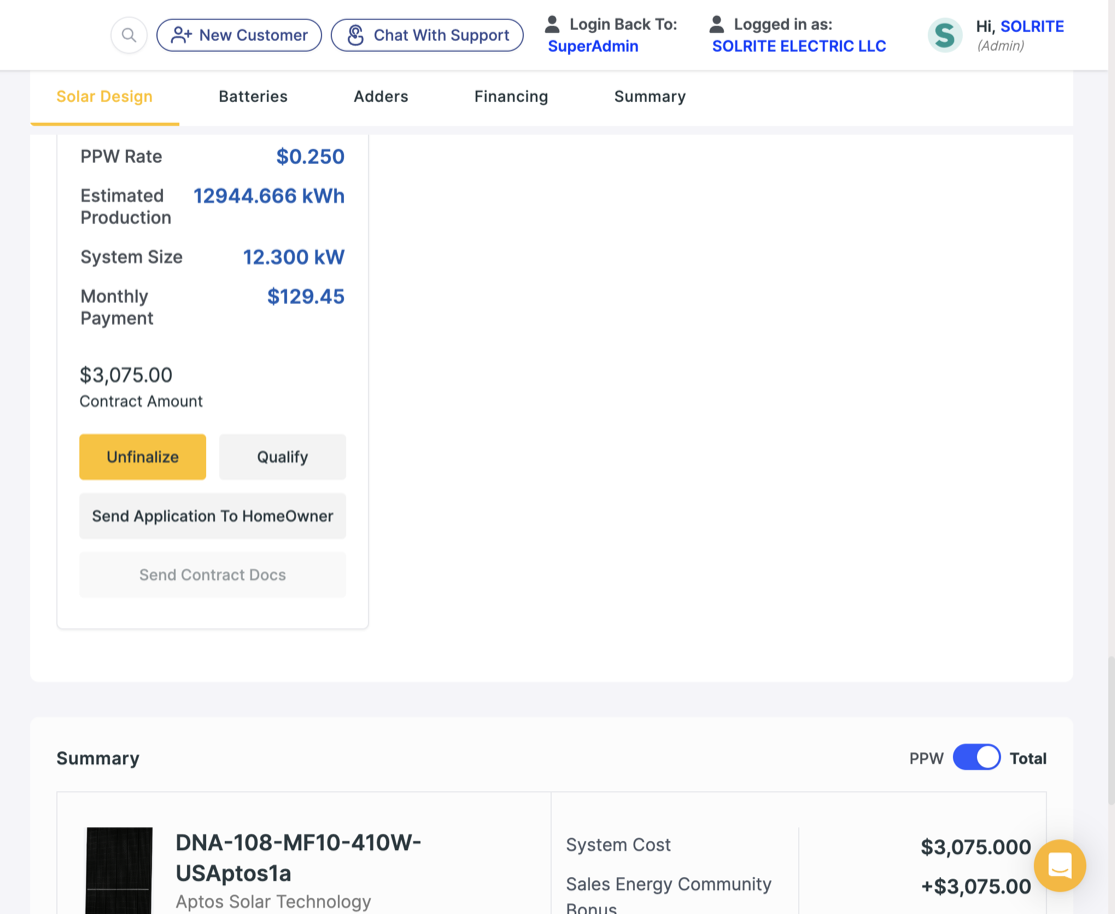
On the quote card that appears, click Finalize. The button flips to Unfinalize and the contract actions unlock — that's how you know it took.
Heads up
In states that have both Energy Community and non-EC pricing, scroll down after you click Finalize. The EC bonus populates in the summary a moment later, so don't panic if it isn't there the instant you finalize.
Finalizing the quote
Click Finalize — it flips to Unfinalize and unlocks contract actions.
11

Finalize from the Finance WorkflowNew

There is no Finalize button on a quote card any more. The Financing tab has a Finance Workflow checklist on the left — Click a step to advance its status. Click Finalize Finance Option and it moves off Pending.

The two steps below it, Send Application To HomeOwner and Send Contract Docs, show as Blocked until the ones above them are done. That is the workflow doing its job, not an error.
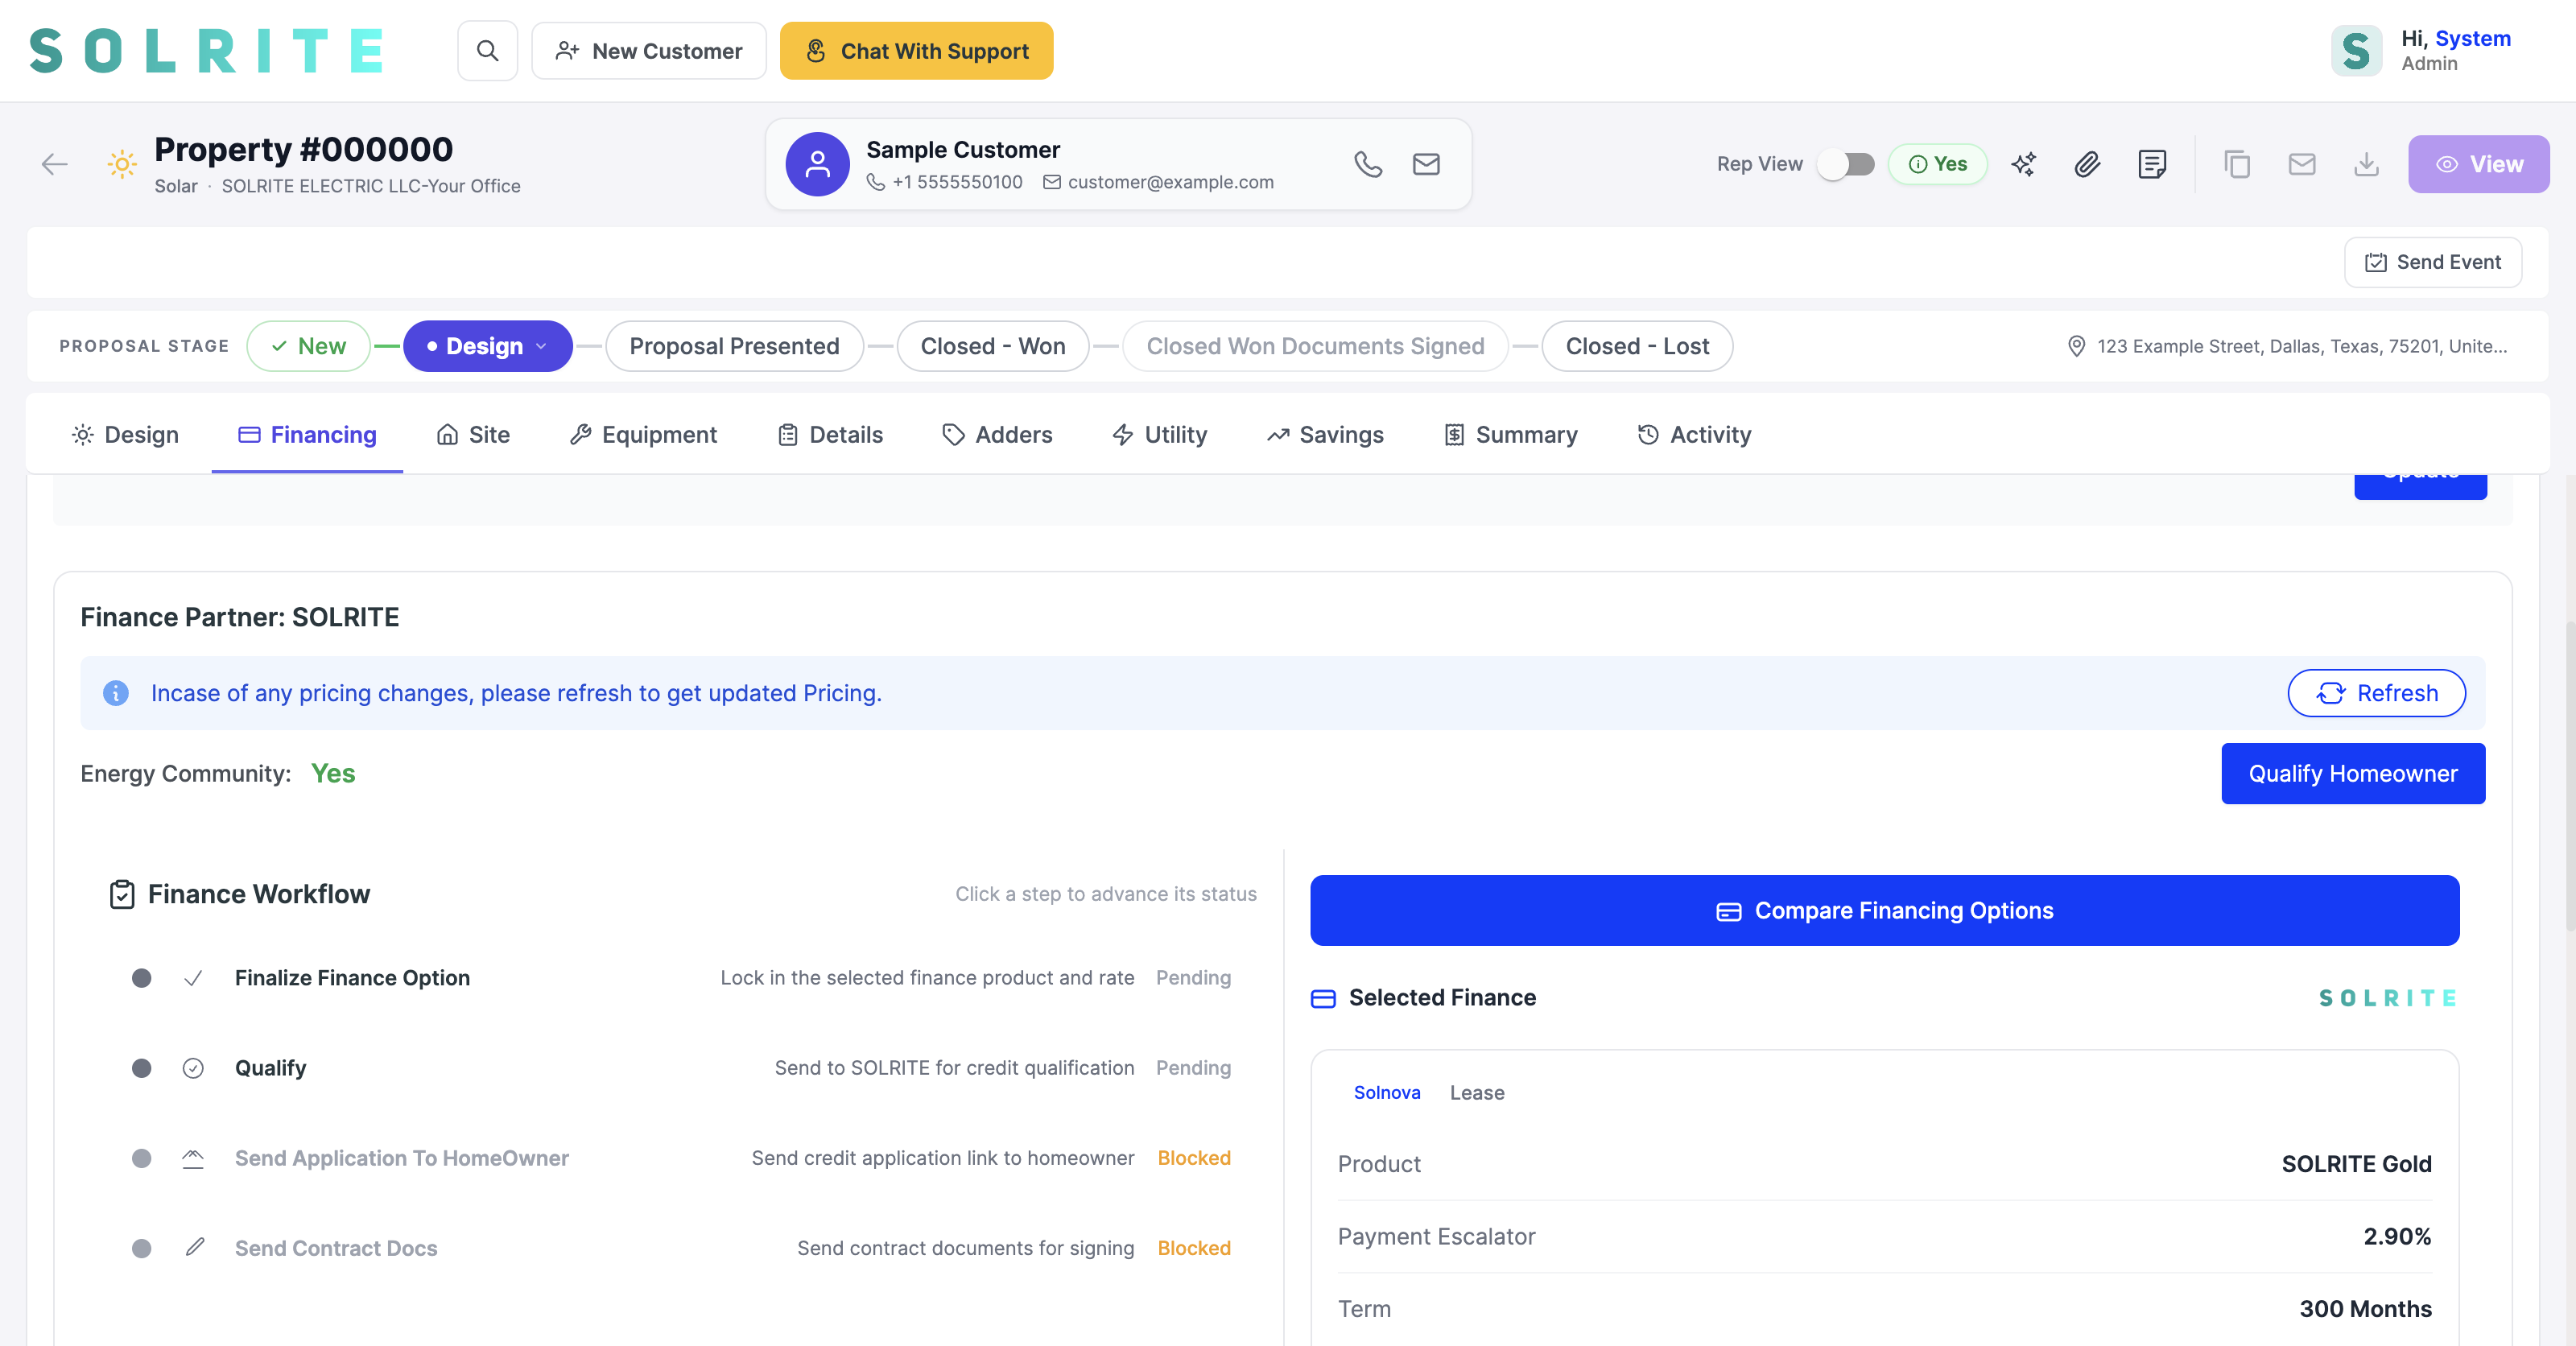
The Finance Workflow checklist on the Financing tab
Finance Workflow — Finalize Finance Option first; the greyed steps unlock in order.
12

Send itLegacy

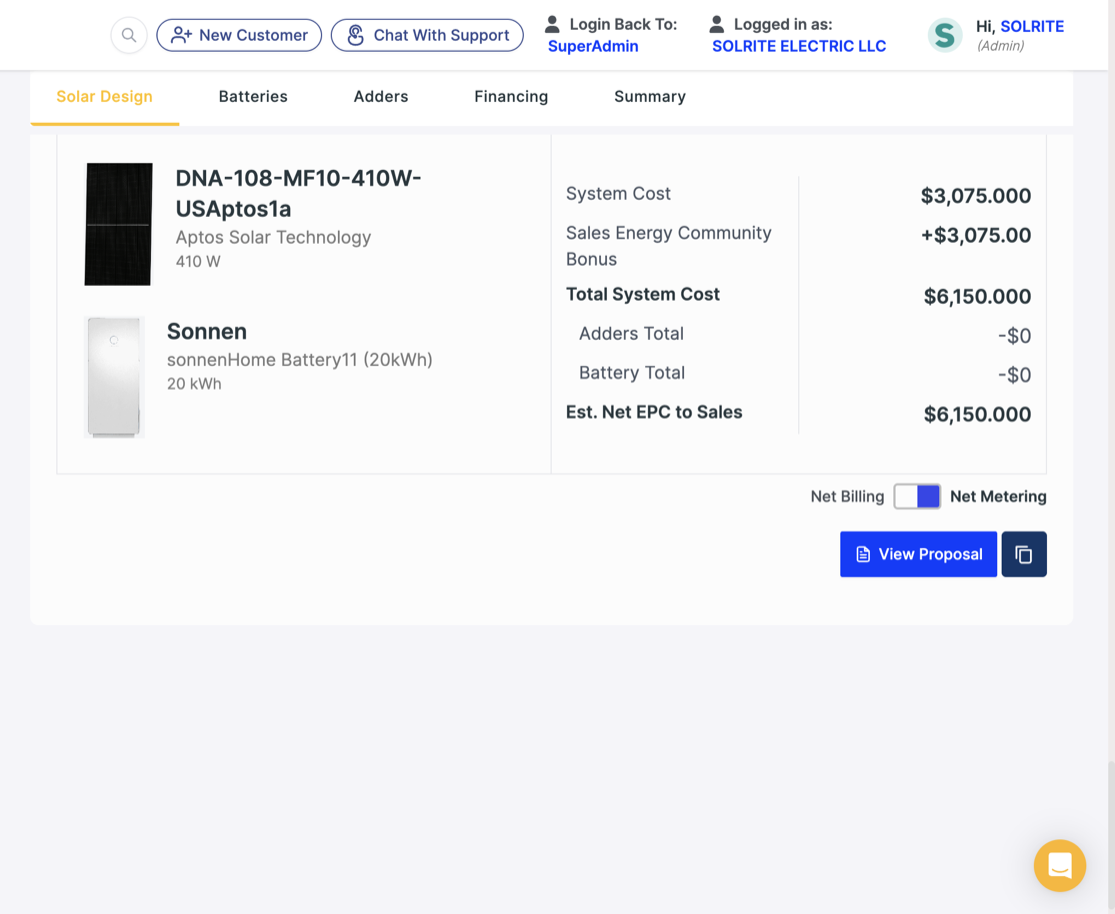
Click View Proposal to open the customer's shareable proposal link. Send it to them with a clear next step (e.g. "Take a look this weekend, jot down questions, and let's connect Monday to move forward.").
Viewing and sending the proposal
View Proposal — grab the shareable link and send with a next step.
12

Send itNew

There is no View Proposal button under the pricing any more. It moved to the top right of the proposal, next to three icons:

  • View (purple button) — opens the customer's shareable proposal in a new tab.
  • Copy icon — Copy Proposal URL. Copies the same link straight to your clipboard, fastest way to text it.
  • Envelope icon — Send Proposal To Customer. Emails it from SubcontractorHub.
  • Download icon — saves the proposal as a PDF.

Send it with a clear next step (e.g. "Take a look this weekend, jot down questions, and let's connect Monday to move forward.").

All four are greyed out?
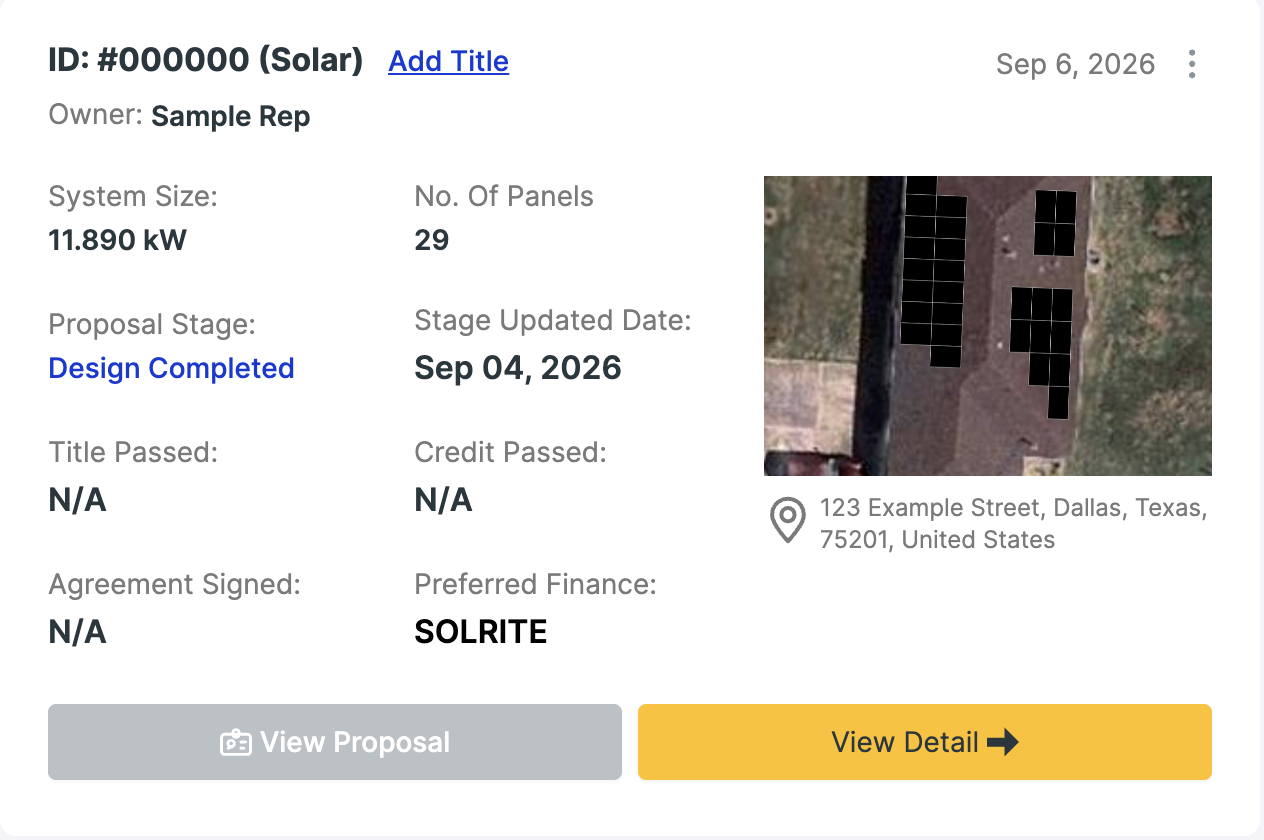
They stay locked until the quote is finalized. Hover and it says Finalize Finance Quote to view Proposal. Go back to the Finance Workflow and click Finalize Finance Option (previous step).
Top right of the proposal header: copy, envelope and download icons next to the purple View button
Top right of the proposal: Copy, Send, Download, View. Shown here before Finalize, which is why they look faded.
Proposal card on the customer page with View Proposal and View Detail buttons
Also on the customer page: each proposal card has View Proposal. Same rule, greyed out until the quote is finalized.
13

Credit check, then send the contractLegacy

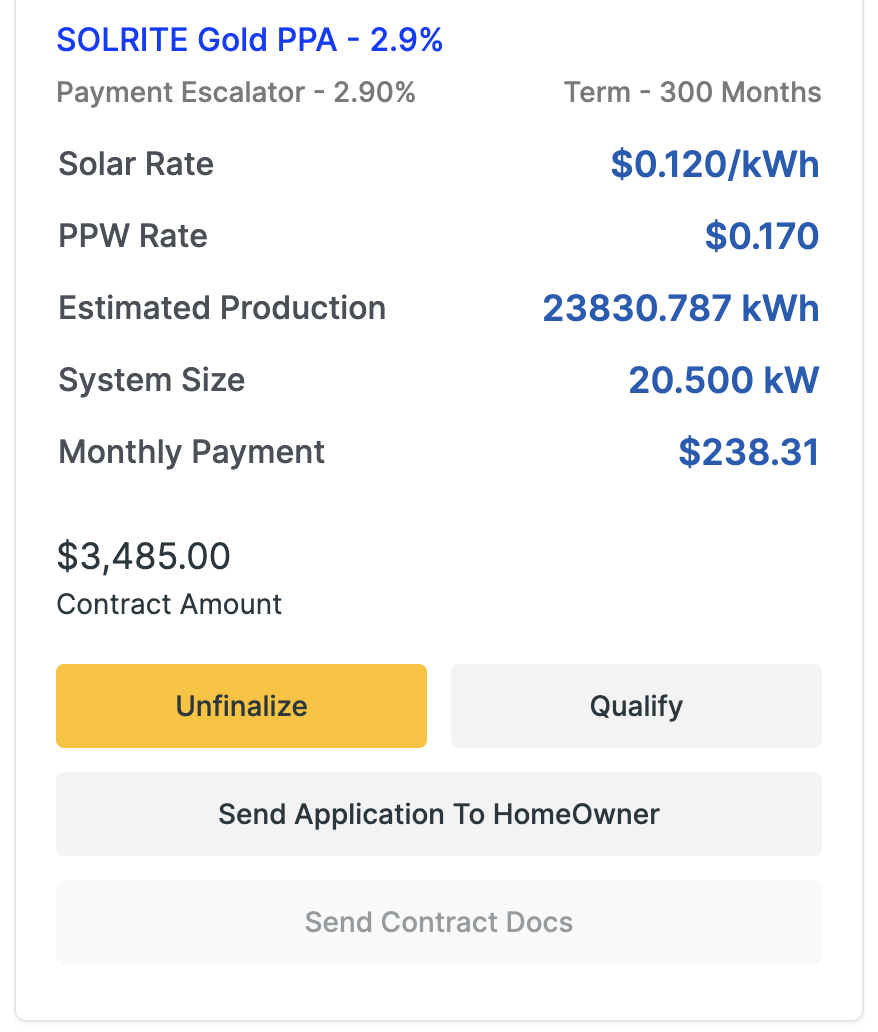
Sending the proposal is not the last step. Before any contract can go out, the customer has to clear the credit pre-screen. On the finalized quote card, click Qualify and run it. Until it comes back passed, Send Contract Docs stays greyed out. That is by design, not a bug.

Once they pass, click Send Contract Docs. Here is the part reps get wrong: the contract does not go straight to the homeowner. It comes to you, the sales rep, first. You sign it, and only then does it route on to the customer for their signature.
Watch your own inbox
Reps regularly think the customer is sitting on the contract when it is actually parked in the rep's own email waiting on the rep's signature. Sign it the moment it lands, then follow up with the customer.
The Qualify and Send Contract Docs buttons on the finalized quote card
Qualify first. Send Contract Docs stays greyed out until the credit pre-screen passes.
13

Qualify, then send the contractNew

Everything now runs down the same Finance Workflow list, in order:
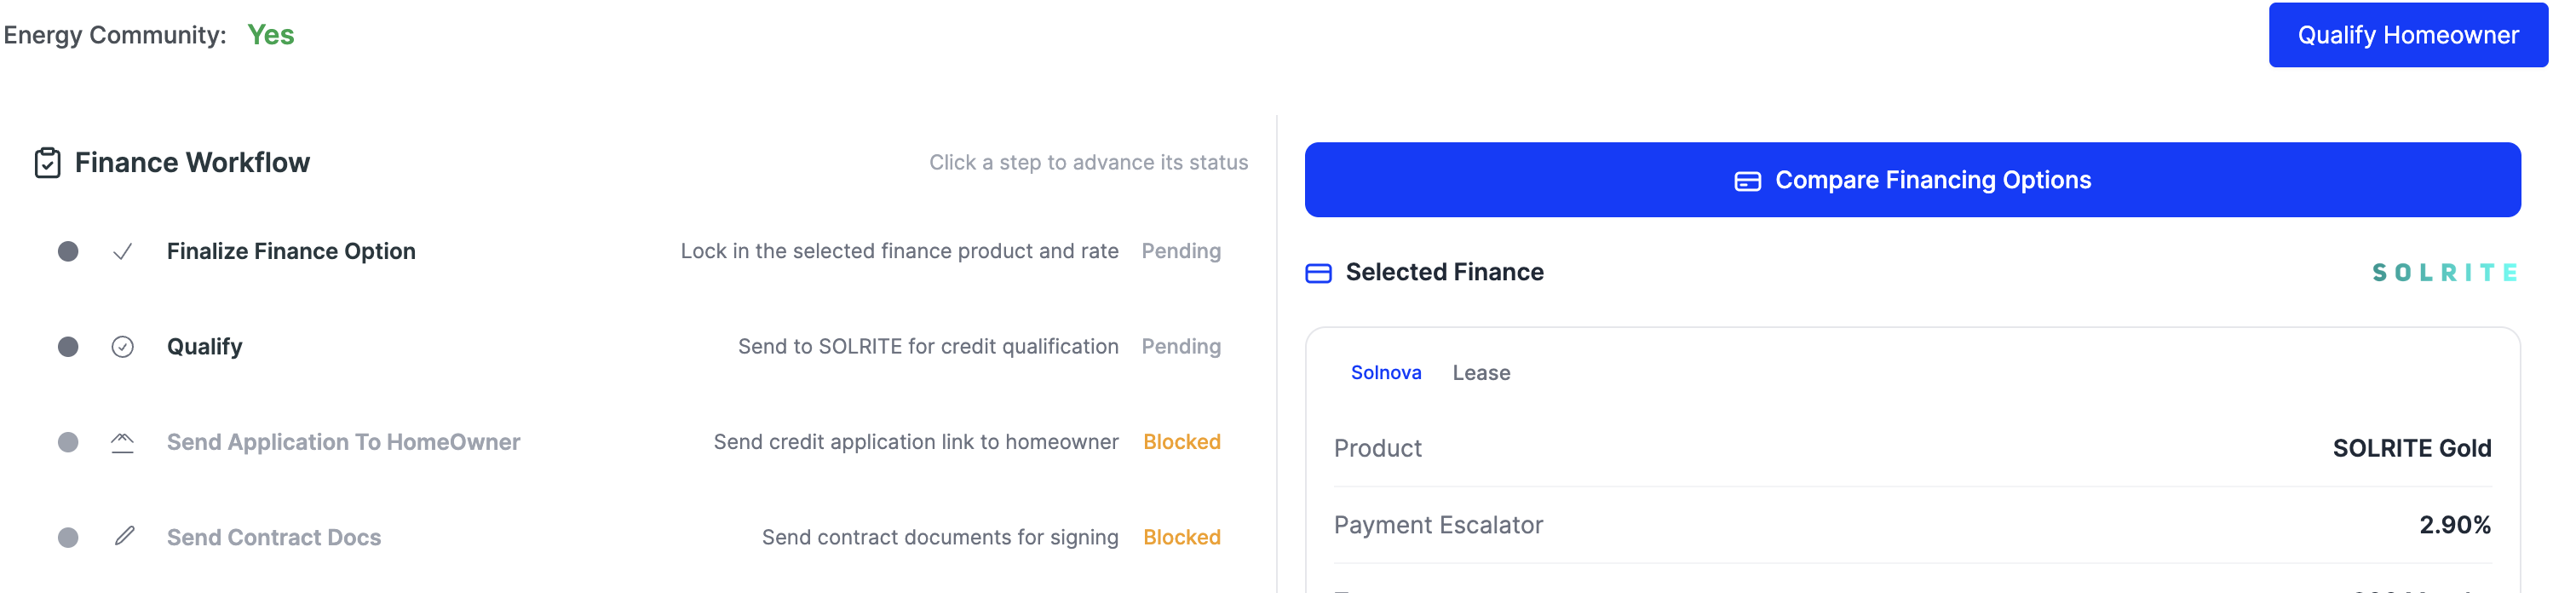
  • Qualify — sends to SOLRITE for the credit pre-screen. There is also a Qualify Homeowner button higher up the tab; either one starts it.
  • Send Application To HomeOwner — sends the credit application link.
  • Send Contract Docs — unlocks once the pre-screen passes.
The contract still comes to you first
Unchanged from the old layout: the contract routes to the rep for signature before it ever reaches the homeowner. Watch your own inbox.
The Finance Workflow list on the Financing tab: Finalize Finance Option, Qualify, Send Application To HomeOwner, Send Contract Docs, plus the Qualify Homeowner button
Work down the list. Send Contract Docs shows Blocked until the steps above it clear, then click it to send.

Steps 14–16 below: not yet re-shot on the new layout

The three post-signature steps (Welcome Call, Billing Profile, Upload Docs) were captured on the old layout and have not been confirmed on this one yet — they only appear once both signatures are in, so there was no signed deal to photograph. The actions are the same three; expect them on the Financing tab rather than on a quote card. If yours looks different: screenshot it and send it over so this page can be corrected.

14

Send the welcome call link

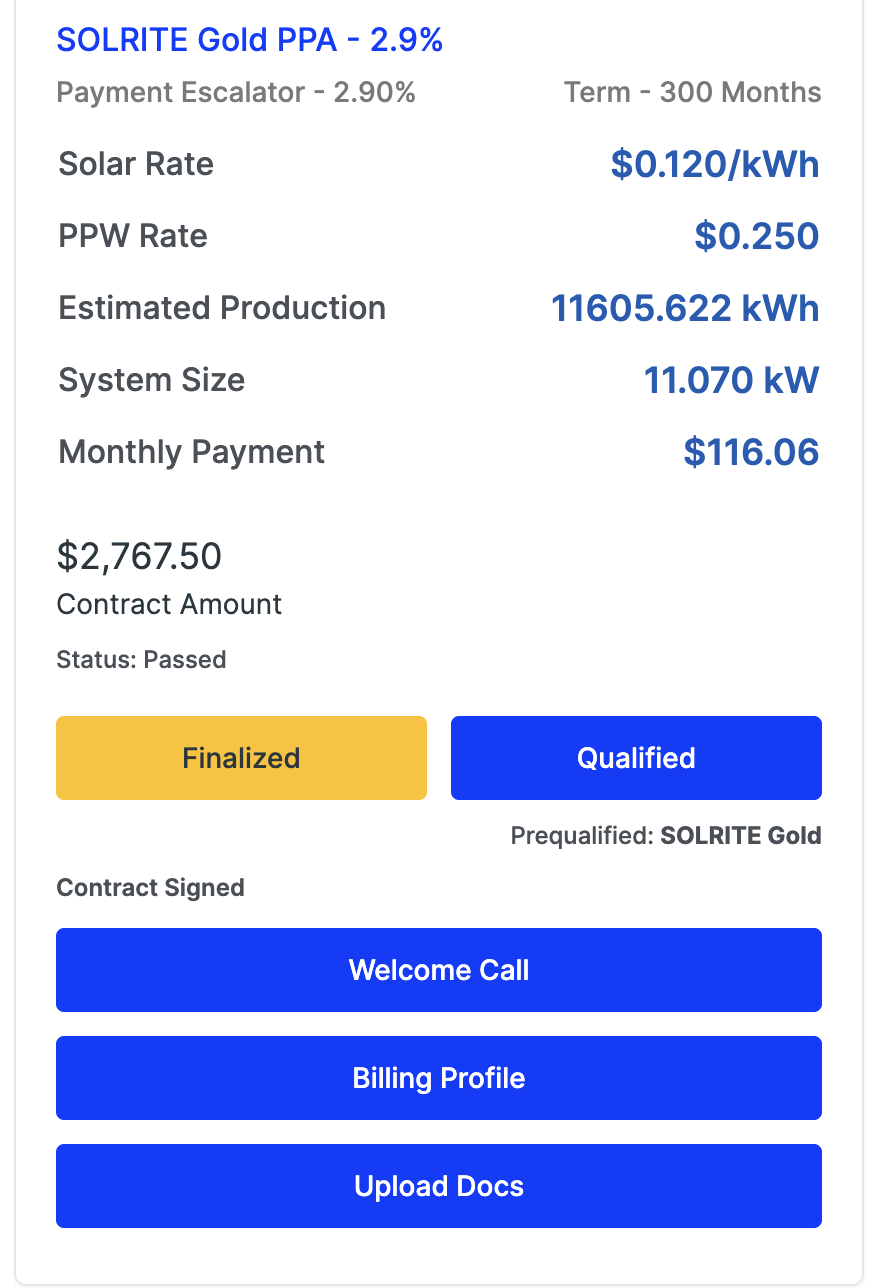
Once the contract comes back fully signed, the quote card changes. Unfinalize and Qualify flip to Finalized and Qualified, a Contract Signed label appears, and three new buttons drop in: Welcome Call, Billing Profile and Upload Docs. Those three are the rest of your job on this deal.

Open the proposal again (View Detail), scroll down to the SOLRITE quote box, and click Welcome Call (Call Pilot) to generate the customer's welcome-call link. Text it to them so they can knock out their welcome call.
Don't wait for them to appear
If you signed the contract but these three buttons still aren't showing, the customer hasn't signed yet. They only unlock once both signatures are in.
The Welcome Call, Billing Profile and Upload Docs buttons that appear after the contract is signed
After the contract is signed: Welcome Call, Billing Profile and Upload Docs appear on the quote card.
15

Send the billing profile

In that same quote box, click Billing Profile to get the customer's secure payment-setup link. Send it so they can add their payment method (this is how the VPA gets billed).

16

Get the utility bill uploaded

Click Upload Docs in the quote box to get the customer's document-upload link. Send it so they can upload their most recent utility bill, or upload it yourself if you already have a copy. That clears the last item before site survey.

Troubleshooting

The errors you'll actually hit — and the fix.

"designs field is required" on Create Account

The panel isn't mapped for this territory. Fix: AMPS 410 is the default panel, so it's usually already set. If it didn't apply, go back to the design, set Change Panel to the Aptos DNA-108-MF10-410W-USAptos1a (410 W), Save, and try again.

"...has not been mapped" / pricing won't load

Fix: Same fix — use the Aptos panel.

"Design has not been approved"

The design needs an admin approval before you can quote. Fix: Ping an admin to approve it, then Create Quote.

Battery "...not allowed in Texas / California"

That battery size isn't valid for this system size in this market. Fix: Check the battery sizing matrix in your sales guidelines and pick an allowed size. This comes up most often in California, which uses a more dynamic battery-size table than Texas.

Create Quote is greyed out

You haven't picked a Pricing option yet. Fix: Select one from the dropdown first.